![[Compaq]](../../images/compaq.gif)
![[Go to the documentation home page]](../../images/buttons/bn_site_home.gif)
![[How to order documentation]](../../images/buttons/bn_order_docs.gif)
![[Help on this site]](../../images/buttons/bn_site_help.gif)
![[How to contact us]](../../images/buttons/bn_comments.gif)
![[OpenVMS documentation]](../../images/ovmsdoc_sec_head.gif)
| Document revision date: 28 June 1999 | |
|
|
|
|
|
|
This guide explains how to use Availability Manager software to detect and fix system availability problems.
Revision/Update Information: This manual supersedes Availability Manager Manual Version 1.1.
Operating System and Version:
Windows NT: Version 4.0 SP 3 or SP 4 (with Internet Explorer Version
4.0 or higher)
OpenVMS: Version 7.1 or 7.2
Software Version: Availability Manager Version 1.2
Compaq Computer Corporation
Houston, Texas
Digital Equipment Corporation makes no representations that the use of its products in the manner described in this publication will not infringe on existing or future patent rights, nor do the descriptions contained in this publication imply the granting of licenses to make, use, or sell equipment or software in accordance with the description.
Possession, use, or copying of the software described in this publication is authorized only pursuant to a valid written license from Digital Equipment Corporation or an authorized sublicensor.
© Digital Equipment Corporation 1998, 1999. All rights reserved.
Compaq, the Compaq logo, and the DIGITAL logo are registered in the U.S. Patent and Trademark Office.
Alpha, DEC, DIGITAL, OpenVMS, VAX, VMS, are trademarks of Digital Equipment Corporation.
The following are third-party trademarks:
IEEE is a registered trademark of the Institute of Electrical and Electronics Engineers, Inc.
Intel, Pentium, and Intel Inside are registered trademarks of Intel Corporation.
Java is a registered trademark of Sun Microsystems, Inc.
Microsoft, Windows, and Windows NT are registered trademarks and Windows 95 is a trademark of Microsoft Corporation.
OSI is a registered trademark of CA Management, Inc.
All other trademarks and registered trademarks are the property of their respective holders.
Motif is a registered trademark of The Open Group.
Netscape and the Netscape Navigator are registered trademarks of Netscape Communications Corporation.
Other product names mentioned herein may be the trademarks of their respective companies.
Compaq conducts its business in a manner that conserves the environment and protects the safety and health of its employees, customers, and the community.
ZK6552
The OpenVMS documentation set is available on CD-ROM.
| Contents | Index |
This guide is intended for system managers who install and use Availability Manager software. It is assumed that the system managers who use this product are familiar with Windows terms and functions.
This guide contains the following chapters and appendixes:
The following manuals provide additional information:
For additional information on the Open Systems Software Group (OSSG) products and services, access the OpenVMS World Wide Web site. Use the following URL:
http://www.openvms.digital.com |
Compaq welcomes your comments on this manual.
Print or edit the online form SYS$HELP:OPENVMSDOC_COMMENTS.TXT and send us your comments by:
| Internet | openvmsdoc@zko.mts.dec.com |
| Fax | 603 884-0120, Attention: OSSG Documentation, ZK03-4/U08 |
|
OSSG Documentation Group, ZKO3-4/U08
110 Spit Brook Rd. Nashua, NH 03062-2698 |
Use the following World Wide Web address to order additional documentation:
http://www.openvms.digital.com:81/ |
If you need help deciding which documentation best meets your needs, call 800-DIGITAL (800-344-4825).
The following conventions are used in this guide:
| Ctrl/ x | A sequence such as Ctrl/ x indicates that you must hold down the key labeled Ctrl while you press another key or a pointing device button. |
| PF1 x | A sequence such as PF1 x indicates that you must first press and release the key labeled PF1 and then press and release another key or a pointing device button. |
| [Return] |
In examples, a key name enclosed in a box indicates that you press a
key on the keyboard. (In text, a key name is not enclosed in a box.)
In the HTML version of this document, this convention appears as brackets, rather than a box. |
| ... |
Horizontal ellipsis points in examples indicate one of the following
possibilities:
|
|
.
. . |
Vertical ellipsis points indicate the omission of items from a code example or command format; the items are omitted because they are not important to the topic being discussed. |
| ( ) | In command format descriptions, parentheses indicate that you must enclose the options in parentheses if you choose more than one. |
| [ ] | In command format descriptions, brackets indicate optional elements. You can choose one, none, or all of the options. (Brackets are not optional, however, in the syntax of a directory name in an OpenVMS file specification or in the syntax of a substring specification in an assignment statement.) |
| { } | In command format descriptions, braces indicate required elements; you must choose one of the options listed. |
| text style |
This text style represents the introduction of a new term or the name
of an argument, an attribute, or a reason.
In the HTML version of this Conventions table, this convention appears as italic text. |
| italic text | Italic text indicates important information, complete titles of manuals, or variables. Variables include information that varies in system output (Internal error number), in command lines (/PRODUCER= name), and in command parameters in text (where dd represents the predefined code for the device type). |
| UPPERCASE TEXT | Uppercase text indicates a command, the name of a routine, the name of a file, or the abbreviation for a system privilege. |
| Monospace type |
Monospace type indicates code examples and interactive screen displays.
In the C programming language, monospace type identifies the following elements: keywords, the names of independently compiled external functions and files, syntax summaries, and references to variables or identifiers introduced in an example. |
| numbers | All numbers in text are assumed to be decimal unless otherwise noted. Nondecimal radixes---binary, octal, or hexadecimal---are explicitly indicated. |
This chapter provides the following information:
The Availability Manager is a system management tool that allows you to monitor, from an OpenVMS or a Windows NT node, one or more OpenVMS nodes on an extended local area network (LAN).
If you have the Storage and Cluster Extensions (SCE) installed on Windows NT machines, you will also see data from Windows NT nodes. |
The Availability Manager helps system managers and analysts target a specific node or process for detailed analysis. This tool collects system and process data from multiple OpenVMS nodes simultaneously; it analyzes the data and uses a graphical user interface (GUI) to display the output.
An older version of the tool, DECamds, uses a Motif® GUI to display information about OpenVMS nodes. The newer version, called the Availability Manager, uses a Java® GUI to display information about OpenVMS nodes on an OpenVMS or a Windows NT node.
The main Application window of the Availability Manager is divided into three sections that display different types of information about the nodes you are monitoring: group, node, and event data. Based on its analysis of the data, the Availability Manager notifies you immediately if any node you are monitoring is experiencing a performance problem, especially one that affects the node's accessibility to users. At a glance, you can see whether a problem is a persistent one that warrants further investigation and correction.
An important advantage of the Availability Manager is that it uses its own protocol; unlike most performance monitors, it does not rely on TCP/IP or any other standard protocol. Therefore, even if a standard protocol is unavailable, the Availability Manager can continue to operate.
You can customize the Availability Manager to meet the requirements of your particular site. For example, you can change the severity levels of the events that are displayed and escalate their importance.
The Availability Manager helps improve OpenVMS system and OpenVMS Cluster availability by providing the following functionality:
| Availability | Alerts users to resource availability problems, suggests paths for further investigation, and recommends actions to improve availability. |
| Centralized management | Provides centralized management of remote nodes within an extended local area network (LAN). |
| Intuitive interface | Provides an easy-to-learn and easy-to-use graphical user interface (GUI). |
| Correction capability | Allows real-time intervention, including adjustment of node and process parameters, even when remote nodes are hung. |
| Customization | Adjusts to site-specific requirements through a wide range of customization options. |
| Scalability | Makes it easier to monitor multiple OpenVMS nodes over a single site or over multiple sites. |
The Availability Manager utilizes two types of nodes for monitoring OpenVMS systems:
The Data Analyzer and Data Collector nodes communicate over an extended LAN using an IEEE® 802.3 Extended Packet format protocol. Once a secure connection is established, the Data Analyzer instructs the Data Collector to gather specific system and process data.
Although you can run the Data Analyzer as a member of a monitored cluster, it is typically run on a system that is not a member of the cluster being monitored. You can have more than one Data Analyzer application executing in a LAN, but only one Data Analyzer at a time should be running on each system.
Figure 1-1 shows a possible configuration of Data Analyzer and Data Collector nodes.
Figure 1-1 Availability Manager Node Configuration
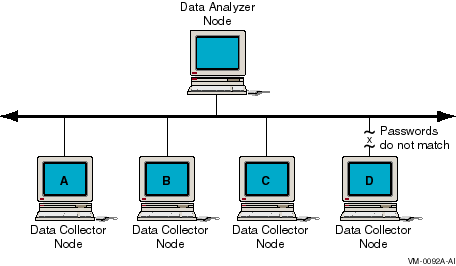
In Figure 1-1, the Data Analyzer can monitor nodes A, B, and C across the network. The password on node D does not match the password of the Data Analyzer; therefore, the Data Analyzer cannot monitor node D.
For more information about password security, see Section 1.3.
Figure 1-2 illustrates how the Availability Manager collects and analyzes data on OpenVMS nodes.
Figure 1-2 Collecting and Analyzing Data
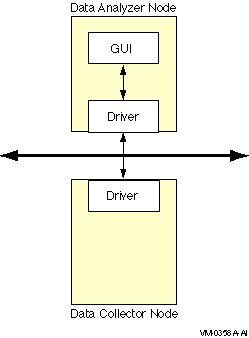
After the Availability Manager software has been installed, you can begin to request information from one or more Data Collector nodes. Requesting and receiving information requires the Availability Manager to perform the following steps:
The Availability Manager uses passwords to maintain security. These passwords have somewhat different appearances on Windows NT Data Analyzer nodes and on OpenVMS Data Analyzer and Data Collector nodes. On Windows NT Data Analyzer nodes, passwords are up to 8 characters long. On OpenVMS Data Analyzer and Data Collector nodes, passwords are part of a three-part security code called a security triplet.
The following sections explain these security methods further.
1.3.1 Data Analyzer Password Security
For monitoring to take place, the password on a Data Analyzer node must match the password section of the security triplet on each OpenVMS Data Collector node. (A Windows NT Data Analyzer checks only the password part of each OpenVMS Data Collector security triplet. OpenVMS Data Collectors impose other security measures, which are explained in Section 1.3.2.)
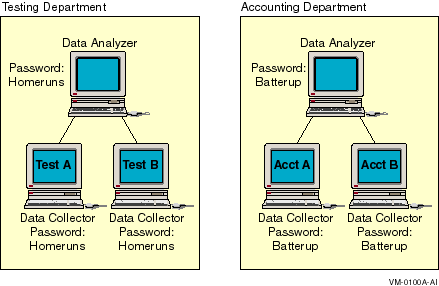
Figure 1-3 illustrates how you can use passwords to limit access to node information. The Testing Department's Data Analyzer, whose password is HOMERUNS, can access only OpenVMS Data Collector nodes with the HOMERUNS password as part of their security triplets. The same is true of the Accounting Department Data Analyzer, whose password is BATTERUP; it can access only OpenVMS Data Collector nodes with the BATTERUP password as part of their security triplets.
Figure 1-3 Availability Manager Password Matching
The Availability Manager sets a default password when you install the Data
Analyzer. To change that password, you must use a customization
option that is explained in Chapter 6.
1.3.2 OpenVMS Data Collector Security Features
OpenVMS Data Collector nodes have the following security features:
        Protocol ID:        08-00-2B-80-48
        Multicast Address:  09-00-2B-02-01-09
|
This chapter provides the following information:
Beginning with OpenVMS Version 7.2, the Data Collector ships as part of the OpenVMS system installation. After you install or upgrade to OpenVMS Version 7.2, the Data Collector is on your system.
To use the Data Collector, do either of the following:
$ @SYS$STARTUP:AMDS$AM_STARTUP START
|
@SYS$STARTUP:AMDS$AM_STARTUP START
|
Note this startup command procedure has a different name than the
DECamds startup command procedure, SYS$STARTUP:AMDS$STARTUP.COM.
2.2 Starting the Data Analyzer
This section describes what you need to do after the Availability Manager Data Analyzer is installed. Starting the Data Analyzer is somewhat different on OpenVMS and on Windows NT systems. However, on both systems, starting the Data Analyzer automatically starts the Java graphical user interface (GUI) that allows you to view information that is collected from the Data Collector nodes.
The following sections contain the sequence of steps required to start
the Data Analyzer on an OpenVMS node and a Windows NT node.
2.2.1 How to Start the Data Analyzer on an OpenVMS Alpha Node
Make sure the Data Analyzer has been installed on the OpenVMS Alpha node from which you want to monitor other nodes. To starting the Data Analyzer, perform the following two steps:
$ @SYS$MANAGER:JAVA$SETUP |
$ avail |
Make sure the Data Analyzer has been installed on the Windows NT node from which you want to monitor other nodes. The steps for starting the Data Analyzer are somewhat different, depending on whether you have OpenVMS Management Tools for Windows NT (OMT) installed or not. Follow the series of steps that apply to you.
Starting the Data Analyzer Without OMT Installed
To start the Data Analyzer, follow these steps:
The Availability Manager then displays the main Application window, which is shown in Figure 2-1.
Starting the Data Analyzer with OMT Installed
To start the Data Analyzer, follow these steps:
The Availability Manager then displays the main Application window, which is
shown in Figure 2-1.
2.3 Using the Application Window
Figure 2-1 shows the Availability Manager Application window.
Figure 2-1 Application Window

The Application window is divided into following sections, called panes:
You can change the size of the panes as well as the width of specific
fields in the Application window and also the borders between the
fields by clicking on a border and dragging it. Scroll bars indicate
whether you are displaying all or part of a screen. For example,
clicking a right arrow on a scroll bar allows you to view the rightmost
portion of a screen.
2.3.1 Other Window Components
In addition to panes, the Application window also includes the following components (see Figure 2-1):
The title bar runs across the top of the window and contains the heading Compaq Availability Manager.
The menu bar, immediately below the title bar, contains the following menu options:
The status bar runs across the bottom of the window. It displays the
name of the selected group and the number of nodes in that group.
2.3.2 Displaying More Information
In the Application window, you can do the following at any time:
To monitor nodes in the Application window, you must select the group that contains those nodes. You select groups in the Group pane, which is shown in Figure 2-2.
Figure 2-2 Group Pane
Groups are set up during installation and are user definable. For example, you might define groups by function, type of hardware, or geographical location.
For instance, if you were to set up groups of nodes by geographical location, you might assign nodes A and B to a group called Dallas and nodes C, D, and E to a group called Denver. When you select a group, the Availability Manager displays only the nodes in that group, as shown in the following table.
| Group Selected | Nodes Displayed |
|---|---|
| Dallas |
Node A
Node B |
| Denver |
Node C
Node D Node E |
Compaq recommends that you define a cluster as its own group.
2.4.1 Group Names That are Displayed by Default
When you start the Availability Manager, the names of groups of nodes that have the Availability Manager Data Collector installed are displayed. By default, the group name of the first node detected is highlighted. (A list of the nodes in that group is displayed in the Node pane.)
Under the Availability Manager heading in the Group pane is a list of one group---or possibly the following two:
To display the names of nodes other than the nodes in the default group, click the name of that group in the Group pane (see Figure 2-2). In the Node pane of the Application window, (see Figure 2-1), the Availability Manager displays the nodes in the group you have selected.
If you want to display the names of more groups in the Group pane,
however, you need to use a customization option. See Section 6.1 for
instructions.
2.5 Displaying Information about Nodes
The Node pane of the Application window allows you to focus on resource usage activity at a high level and to display more specific data whenever you want. This section explains the basic use of this pane. Chapter 3 explains in more detail how to use the Node pane.
Within the group of nodes you select, the Availability Manager displays all the nodes with which that group can communicate. Figure 2-3 shows a list of OpenVMS nodes.
Figure 2-3 Node Pane
Each node name has an icon next to it. The icon colors represent the following:
| Red | Security check was successful. However, a threshold has been exceeded (noted in red), and an event has been posted. |
| Yellow | Node security check is in progress or has failed. |
| Green | Security check was successful; data is being collected. |
| Black | Path to node has been lost. |
To select a node, double-click its name in the Node pane. The Availability Manager highlights the name of the node and displays the Node Summary, as shown in Figure 2-4.
Figure 2-4 Node Summary Page
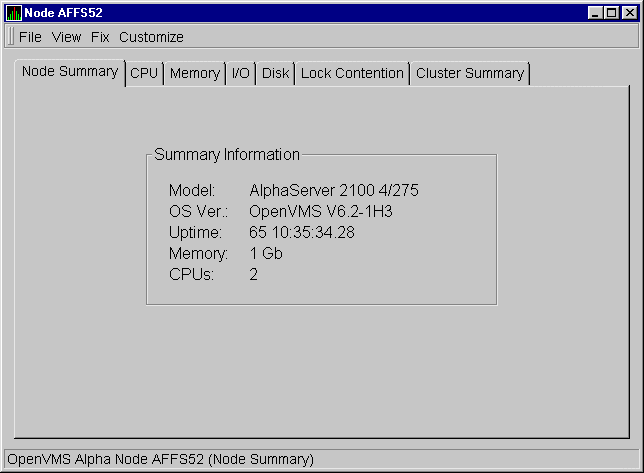
The data displayed on this page is explained in detail in Chapter 3.
At the top of the Node Summary are tabs that correspond to most of the
fields in the Node pane. When you click a tab in the Node Summary, the
Availability Manager displays most of the same pages that are displayed when
you double-click a field in the Node pane (see Figure 2-3).
2.5.2 Selecting Data to Collect on OpenVMS Nodes
For OpenVMS nodes, you must turn on data collection for each type of data you want to collect. (On Windows NT nodes, data is collected by default.)
To turn on various types of data collection, follow these steps:
The Availability Manager displays the OpenVMS Data Collection page, as shown in Figure 2-5.
Figure 2-5 OpenVMS Data Collection Page
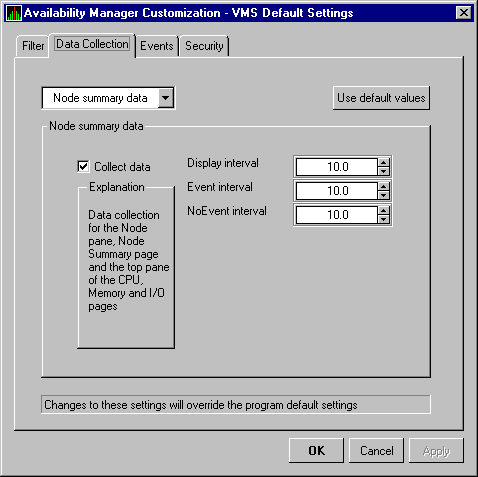
The first data item displayed, Node summary data, is collected by default; the check mark next to Collect data indicates this. On this page, you can also change the intervals at which data is collected, which is explained in Chapter 6.
Click the arrow next to Node summary data to display the types of data you can collect. For each type of data you want to collect, follow these steps:
You can collect the following types of data about OpenVMS nodes:
See Chapter 3 for details about each type of node data. Chapter 6
contains details about customizing data collection.
2.6 Getting Help
To obtain online help, click the Help menu on the Application window menu bar. Then select one of the following options:
| Menu Option | Description |
|---|---|
| Availability Manager Help | Information about using the Availability Manager |
| Availability Manager Release Notes | Last-minute information about the software and how it works |
| About Availability Manager... | Information about this Availability Manager release (such as the version number) |
This chapter describes the node data that the Availability Manager displays by default and more detailed data that you can choose to display. (Differences are noted whenever information displayed for OpenVMS nodes differs from that displayed for Windows NT nodes.)
On OpenVMS systems, you can turn on and off the collection of
individual types of data, and you can a specify several interval times
for the collection and display of events. These are discussed in
Chapter 6.
3.1 Node Pane
After you select a group of nodes in the Group pane, the Availability Manager
automatically displays data for each node within that group on the Node
pane of the Application window. The following sections describe the
information displayed for OpenVMS and Windows NT Node panes.
3.1.1 OpenVMS Node Pane
Figure 3-1 shows an example of an OpenVMS Node pane.
Figure 3-1 OpenVMS Node Pane
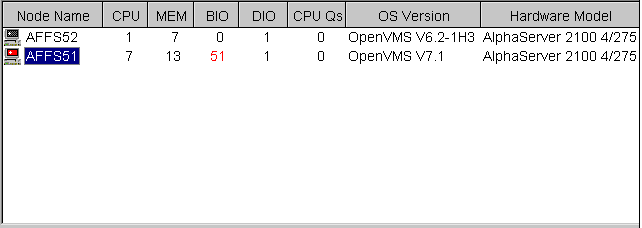
Data displayed in red on your screen indicates that the amount is above the threshold set for that field.
For each OpenVMS node and group it recognizes, the Availability Manager displays the information shown in Table 3-1.
| Data Item | Description |
|---|---|
| Node Name | Name of node being monitored |
| CPU | Percentage of CPU usage of all processes on the node |
| MEM | Percentage of space in memory that all processes on the node use |
| BIO | Buffered I/O rate of processes on the node |
| DIO | Direct I/O usage of processes on the node |
| CPU Qs | Number of processes in CPU queues |
| OS Version | Version of the operating system on the node |
| Hardware Model | Hardware model of the node |
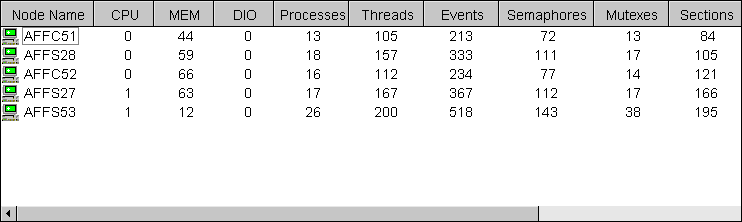
Figure 3-2 shows a sample Windows NT Node pane. From the group selected, the Availability Manager displays all the nodes with which it can communicate.
Figure 3-2 Windows NT Node Pane
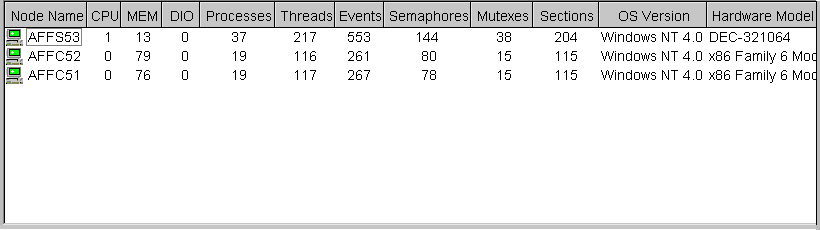
For each Windows NT node in the group you select, the Availability Manager displays the data items shown in Table 3-2.
| Data Items | Description |
|---|---|
| Node Name | Name of node. |
| CPU | Percentage of CPU usage of all the processes on the node. |
| MEM | Percentage of memory that is in use. |
| DIO | Direct I/O usage of processes on the node. |
| Processes | Number of processes on the computer at the time of data collection. |
| Threads | Number of threads on the computer at the time of data collection. (A thread is a basic executable entity that can execute instructions in a processor.) |
| Events | The number of events on the computer at the time of data collection. An event is used when two or more threads want to synchronize execution. |
| Semaphores | The number of semaphores on the computer at the time of data collection. Threads use semaphores to control access to data structures that they share with other threads. |
| Mutexes | The number of mutexes on the computer at the time of data collection. Threads use mutexes to ensure that only one thread executes a section of code at a time. |
| Sections | The number of sections on the computer at the time of data collection. A section is a portion of virtual memory created by a process for storing data. A process can share sections with other processes. |
| OS Version | Version of the operating system on the node, including service pack information. |
| Hardware Model | Hardware model of the node. |
The following sections describe the data display pages associated with node data. You can display these pages in either of two ways:
The menu bar on each node data page contains the options described in Table 3-3.
| Menu Option | Description | For More Information |
|---|---|---|
| File | Contains the Exit option, which you can choose to exit from the tabbed pages. | -- |
| View | Contains options that allow you to view data from another perspective. | Specific tabs |
| Fix | Contains options that allow you to resolve various resource availability problems and improve system performance. | Chapter 5 |
| Customize | Contains options that allow you to organize data collection and analysis and to display data by filtering and customizing Availability Manager data. | Chapter 6 |
The following sections describe these node data pages:
| Node Data Page or Pages | Reference |
|---|---|
| Node Summary | Section 3.2.1 |
| CPU Modes and Process States | Section 3.2.2 |
| Memory Summaries | Section 3.2.3 |
| OpenVMS I/O Summary and Page Faults | Section 3.2.4 |
| Disk Summaries | Section 3.2.5 |
| OpenVMS Lock Contention | Section 3.2.6 |
| OpenVMS Cluster Summary | Section 3.2.7 |
| OpenVMS Single Process | Section 3.2.9 |
When you double-click a node name, operating system (OS) version, or hardware model on the Node pane, Availability Manager displays the Node Summary page, as shown in Figure 3-3.
Figure 3-3 Node Summary Page
On this page, the following information is displayed for the node selected.
| Data Items | Displays |
|---|---|
| Model | System hardware model name |
| OS Ver. | Name and version of the operating system |
| Uptime | Time since the last reboot, measured in days, hours, minutes, and seconds |
| Memory | Total amount of physical memory found on the system, in megabytes |
| CPUs | Number of active CPUs on the node |
By clicking the CPU tab, you can display CPU pages that contain more detailed statistics about CPU mode usage and process states than the Node Summary does. You can use the CPU pages to diagnose issues that CPU-intensive users or CPU bottlenecks might cause. For OpenVMS nodes, you can also display information about specific CPU process states.
These modes summaries and process states pages are described in the
following sections.
3.2.2.1 OpenVMS and Windows NT CPU Modes Summaries
When you double-click a value under the CPU or CPU Qs heading on the Node pane, or when you click the CPU tab, the Availability Manager displays the CPU Modes Summary by default. You can use the View menu to select the CPU Process States page (see Section 3.2.2.2).
The pages displayed for OpenVMS and Windows NT nodes are somewhat different, as described in the following sections.
Figure 3-4 shows a sample OpenVMS CPU Modes summary page.
Figure 3-4 OpenVMS CPU Modes Summary Page
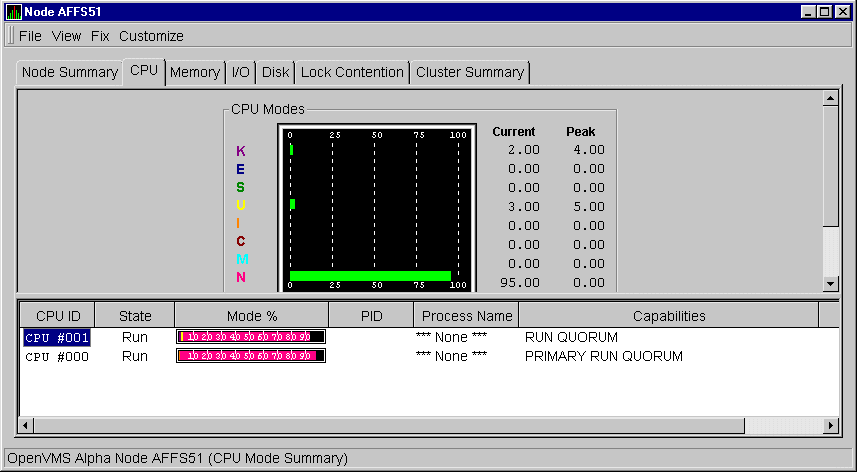
The top pane of the OpenVMS CPU Modes Summary is a graphical representation of OpenVMS CPU usage by type of mode. On symmetric multiprocessing (SMP) nodes, percentages are averaged across all the CPUs and are displayed as a single value.
The following table shows the alphabetic symbols that represent CPU modes:
| Symbol | Mode |
|---|---|
| K | Kernel |
| E | Executive |
| S | Supervisor |
| U | User |
| I | Interrupt |
| C | Compatibility |
| M | Multiprocessor synchronization |
| N | Null |
Values that exceed thresholds are displayed on the screen in red. To the right of the graph are current and peak amounts for each mode.
The Availability Manager also displays a graph of CPU process status queues. The amounts for COM are the sums of the queue lengths of processes in the COM and COMO states. The amounts for WAIT are the sums of the queue lengths of processes in the miscellaneous WAIT, COLPG, CEF, PFW, and FPG states.
At the bottom of the CPU Modes summary is another pane with values under the following headings:
Figure 3-5 shows a sample Windows NT CPU Modes summary page.
Figure 3-5 Windows NT CPU Modes Summary Page
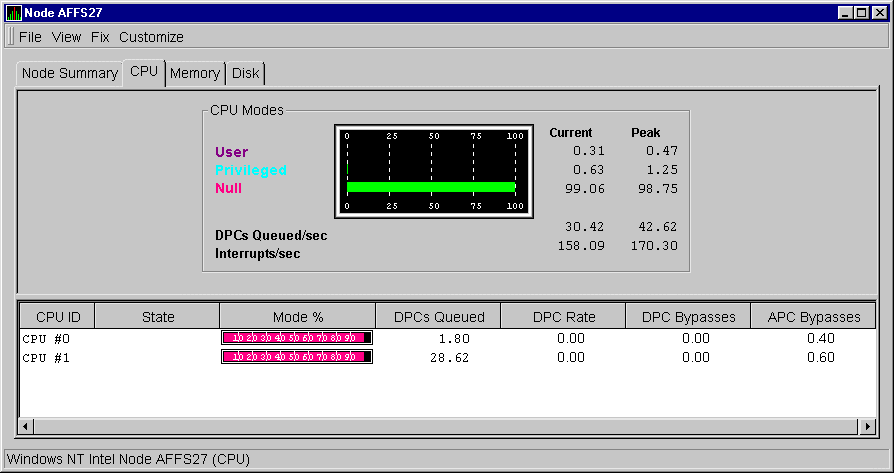
The top pane of the Windows NT CPU Modes summary is a graphical representation of Windows NT CPU usage by type of mode.
On the left, the following CPU modes are listed:
On the graph, values that exceed thresholds are displayed in red. To the right of the graph are current and peak amounts for each mode.
Current and peak amounts are also displayed for the following values:
At the bottom of the Windows NT CPU Modes summary is another pane with values under the following headings:
To display OpenVMS CPU Process States, select CPU Process States from the View menu on the OpenVMS CPU Modes summary (see Figure 3-4). Figure 3-6 shows a sample OpenVMS CPU Process States page.
Figure 3-6 OpenVMS CPU Process States Page
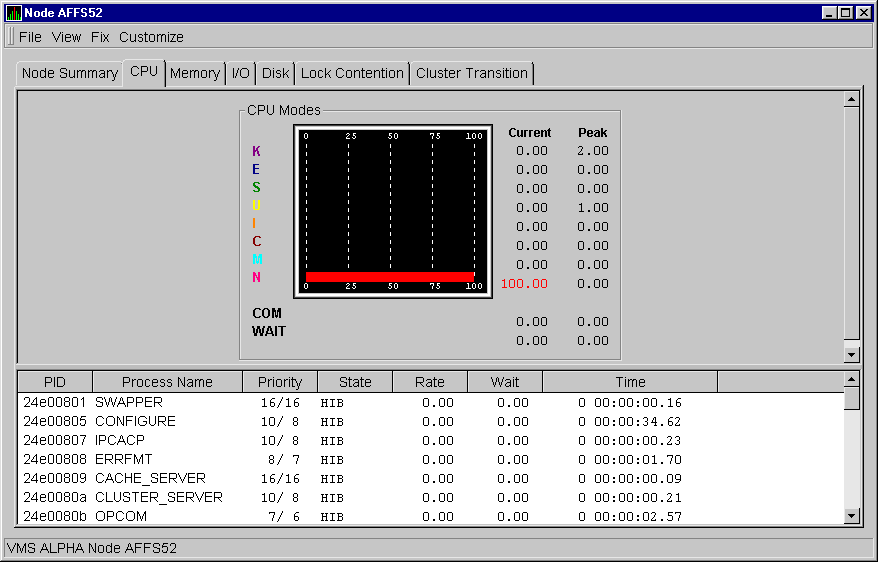
The top pane of the OpenVMS CPU Process States page displays the same information as the OpenVMS CPU Modes summary (see Section 3.2.2.1). The bottom pane displays data under the following headings:
| Heading | Description |
|---|---|
| PID | Process identifier, a 32-bit value that uniquely identifies a process. |
| Process Name | Name of the process active on the CPU. |
| Priority | Computable (xx) and base (yy) process priority in the format xx/yy. |
| State | One of the process states listed in Appendix A. |
| Rate | Percentage of CPU time used by this process. This is the ratio of CPU time to elapsed time. The CPU rate is also displayed in the bar graph. |
| Wait | Percentage of time the process is in the COM or COMO state. |
| Time | Amount of actual CPU time charged to the process. |
The Memory summary pages contain statistics about memory usage on the
node you select. The Memory summary pages displayed for OpenVMS and
Windows NT nodes are somewhat different, as described in the following
sections.
3.2.3.1 Windows NT Memory
You can display the Windows NT Memory in either of the following ways:
The Availability Manager then displays the Windows NT Memory page, as shown in Figure 3-7.
Figure 3-7 Windows NT Memory Page
The graph on the page displays the following data:
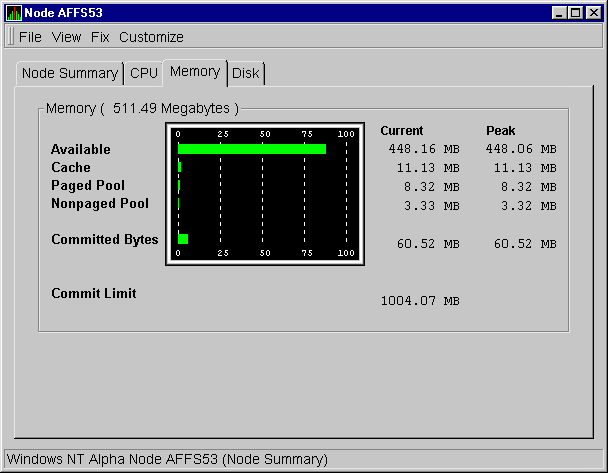
When you double-click a value under the MEM heading in an OpenVMS Node pane, or if you select the Memory tab, the Availability Manager displays the OpenVMS Memory page, as shown in Figure 3-8.
Figure 3-8 OpenVMS Memory Page
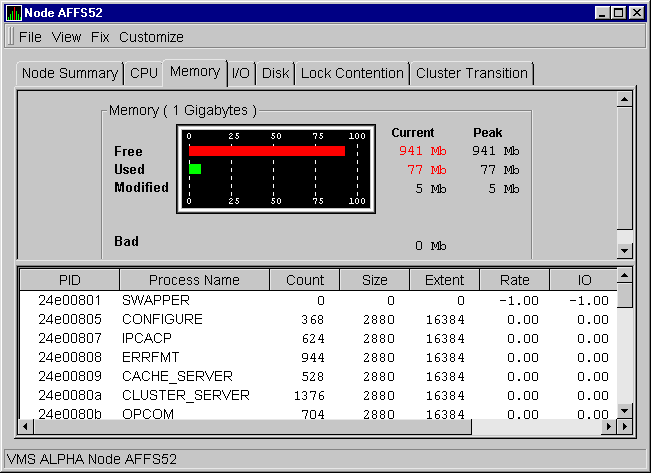
The graph in the top pane shows memory distribution (Free, Used, Modified, Bad) as absolute values, in megabytes of memory. Current and peak values are also listed for each type of memory distribution. (Free memory uses the lowest seen value as its peak.) Values that exceed thresholds are displayed in red.
The bottom pane displays data under the following headings:
| Heading | Description |
|---|---|
| PID | Process identifier, a 32-bit value that uniquely identifies a process. |
| Process Name | Name of the process. |
| Count 1 | Number of physical pages or pagelets of memory that the process is using for the working set count. |
| Size 1 | Number of pages or pagelets of memory the process is allowed to use for the working set size. The operating system periodically adjusts this value based on an analysis of page faults relative to CPU time used. |
| Extent 1 | Number of pages or pagelets of memory in the process's working set extent (WSEXTENT) quota as defined in the user authorization file (UAF). Number of pages or pagelets cannot exceed the value of the system parameter WSMAX. |
| Rate | Number of page faults per second for the process. |
| I/O | Rate of I/O read attempts necessary to satisfy page faults (also known as page read I/O or the hard fault rate). |
When you double-click a value on the lower part of the OpenVMS Memory
page (Figure 3-8), the Availability Manager displays an OpenVMS Single
Process page, where you can click tabs to display specific data about
one process. This data can include a combination of data elements from
the CPU, Memory, and I/O displays, as well as data for specific quota
utilization, current image, and queue wait time. These pages are
described in Section 3.2.9.
3.2.4 OpenVMS I/O Summary and Page Faults
By clicking an I/O tab on an OpenVMS page, you can display pages containing summary statistics of OpenVMS I/O rates, quotas, and page faults.
From the View menu, you can choose the following additional OpenVMS I/O pages:
The OpenVMS I/O Summary displays the rate at which I/O transfers take place per second, including paging write I/O (WIO), direct I/O (DIO), and buffered I/O (BIO).
When you double-click a data item under the DIO or BIO heading on the Node pane, or if you click the I/O tab, the Availability Manager displays the OpenVMS I/O Summary page, as shown in Figure 3-9.
Figure 3-9 OpenVMS I/O Summary Page
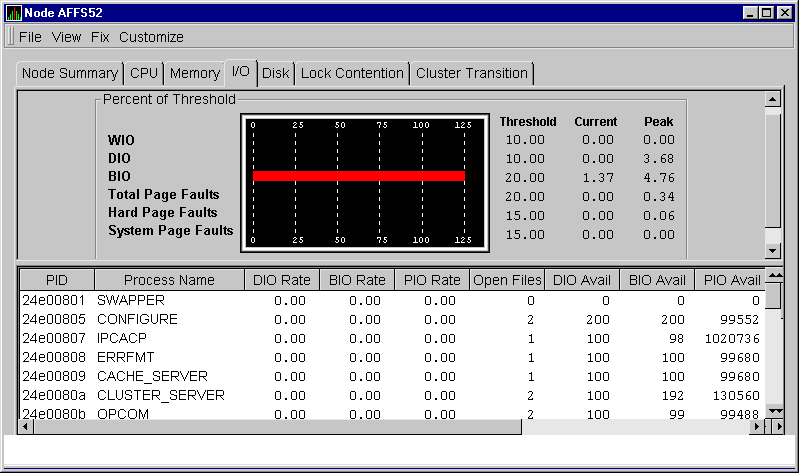
The I/O (per Second) graph at top of the page represents the percentage of threshold for the types of I/O shown in the following table:
In addition, current and peak values are listed for each type of I/O. Values that exceed thresholds are displayed in red.
You can enlarge the I/O page to the right to display a Page Faults (per Second) graph. This graph displays the page faults per second for the process. Amounts are also listed under the following headings:
| Heading | Description |
|---|---|
| Threshold | Defined in Event Properties |
| Current | Current value or rate |
| Peak | Highest value of rate seen since start of data collection |
The bottom of the page displays data under the following headings:
| Heading | Description |
|---|---|
| PID | Process identifier, a 32-bit value that uniquely identifies a process. |
| Process Name | Name of the current process. |
| DIO Rate | Direct I/O rate; the rate at which I/O transfers occur between the system devices and the pages or pagelets that contain the process buffer that the system locks in physical memory. |
| BIO Rate | Buffered I/O rate; the rate at which I/O transfers occur between the process buffer and an intermediate buffer from the system buffer pool. |
| PIO Rate | Paging I/O rate; the rate of read attempts necessary to satisfy page faults (also known as page read I/O or the hard fault rate). |
| Open Files | Number of open files. |
| DIO Avail | Direct I/O limit remaining; the number of remaining direct I/O limit operations available before the process reaches its quota. DIOLM quota is the maximum number of direct I/O operations a process can have outstanding at one time. |
| BIO Avail | Buffered I/O limit remaining; the number of remaining buffered I/O operations available before the process reaches its quota. BIOLM quota is the maximum number of buffered I/O operations a process can have outstanding at one time. |
| PIO Avail | Paging limit remaining. |
| Files | Open file limit remaining; the number of additional files the process can open before reaching its quota. The FILLM quota is the maximum number of files that can be opened simultaneously by the process, including active network logical links. |
Click I/O Page Faults on the View menu to select this option. The Availability Manager displays the OpenVMS I/O Page Faults page, as shown in Figure 3-10.
Figure 3-10 OpenVMS I/O Page Faults Page
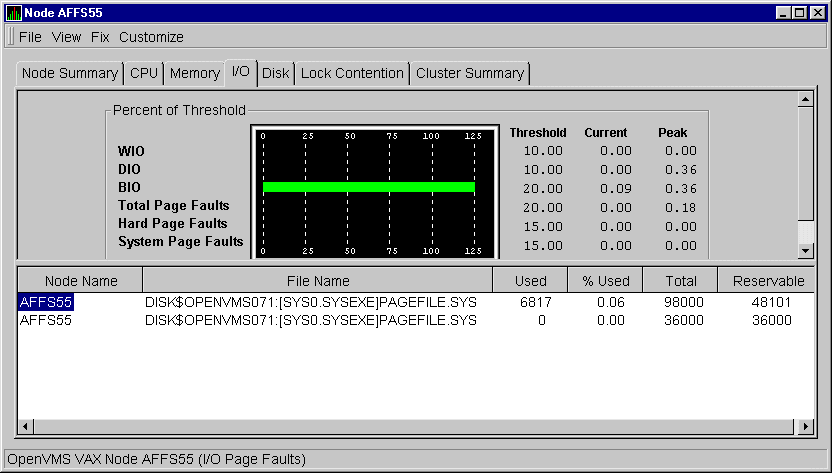
The top pane displays the same information as the OpenVMS I/O Summary (Figure 3-9). The bottom pane displays total page faults under the headings shown in the following table.
| Heading | Description |
|---|---|
| Node Name | Name of the node on which the page/swap file resides. |
| File Name | Name of the page/swap file. For secondary page/swap files, the file name is obtained by a special AST to the job controller on the remote node. The Availability Manager makes one attempt to retrieve the file name. |
| Used | Number of used blocks in the file. |
| % Used | Graph representing the percentage of the blocks from the available blocks in each file. |
| Total | Total number of blocks in the file. |
| Reservable | The number of blocks that a process can logically claim for future physical allocation. This value might be listed as a negative value because it is merely a value of a process's interest in getting pages from the file. If every process currently executing needed to use the file, then this value is the debt that is owed. |
The Disk tab allows you to display disk pages that
contain data about availability, count, and errors of disk devices on
the system. OpenVMS disk data displays differ from those for Windows NT
nodes, as described in the following sections.
3.2.5.1 OpenVMS Disk Status, Single Disk, and Disk Volume
On OpenVMS pages, the View menu lets you choose the following disk summary pages:
Also, on the Disk Status Summary, you can double-click a device name to display a Single Disk Summary.
When you click the Disk tab on the OpenVMS Node Summary, the Availability Manager displays the default disk page, the OpenVMS Disk Status Summary page, as shown in Figure 3-11. This page displays disk device data, including path, volume name, status, and mount, transaction, error, and resource wait counts.
Figure 3-11 OpenVMS Disk Status Summary Page
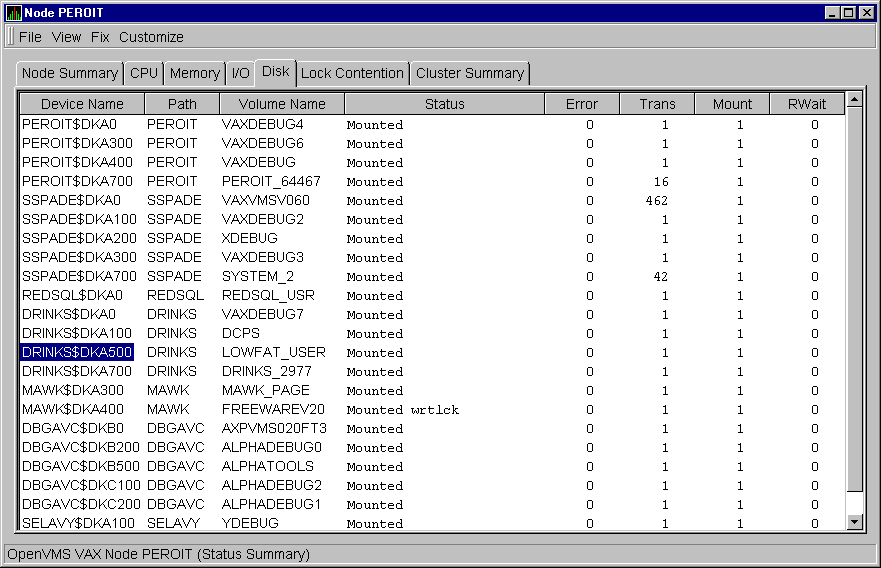
This summary displays values under the following headings:
| Heading | Description | ||||||||||||||||||||||||||
|---|---|---|---|---|---|---|---|---|---|---|---|---|---|---|---|---|---|---|---|---|---|---|---|---|---|---|---|
| Device Name | Standard OpenVMS device name that indicates where the device is located, as well as a controller or unit designation. | ||||||||||||||||||||||||||
| Path | Primary path (node) from which the device receives commands. | ||||||||||||||||||||||||||
| Volume Name | Name of the mounted media. | ||||||||||||||||||||||||||
| Status |
One or more of the following disk status values:
|
||||||||||||||||||||||||||
| Error | Number of errors generated by the disk (a quick indicator of device problems). | ||||||||||||||||||||||||||
| Trans | Transactions: number of current in-progress file system operations for the disk. | ||||||||||||||||||||||||||
| Mount | Number of nodes that have the specified disk mounted. | ||||||||||||||||||||||||||
| Rwait | Indicator that a system I/O operation is stalled, usually during normal connection failure recovery or volume processing of host-based shadowing. |
To collect single disk data and display the data on the Single Disk Summary, double-click a device name on the Disk Status Summary. Figure 3-12 is an example of a Single Disk Summary page.
The display interval of the data collected is 5 seconds. For the Availability Manager Version 1.2, the event interval and no-event interval have not been implemented.
Figure 3-12 OpenVMS Single Disk Summary Page
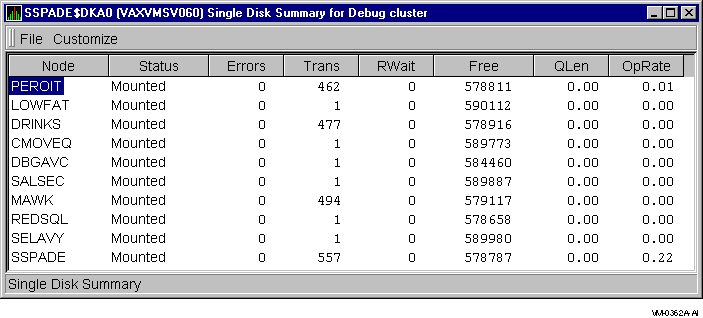
This summary displays values under the following headings:
| Heading | Description |
|---|---|
| Node | Name of the node |
| Status | Status of the disk: mounted, online, offline, and so on |
| Errors | Number of errors on the disk |
| Trans | Number of currently-in-progress file system operations on the disk (number of open files on the volume) |
| Rwait | Indication of an I/O stalled on the disk |
| Free |
Count of free disk blocks on the volume
An (M) after the free block count indicates this node holds the lock on the volume that DECamds uses to obtain the true free block count on the volume. Other nodes might not have accessed the disk, so their free block count might not be up to date. |
| QLen | Average number of operations in the I/O queue for the volume |
| OpRate | Count of rate of change to operations on the volume |
When you select the Status Summary option from the View menu on the OpenVMS Node Summary, the Availability Manager displays the OpenVMS Disk Status Summary, as shown in Figure 3-13. This page displays disk volume data, including path, volume name, disk block utilization, queue length, and operation count rate.
Figure 3-13 OpenVMS Disk Volume Summary Page
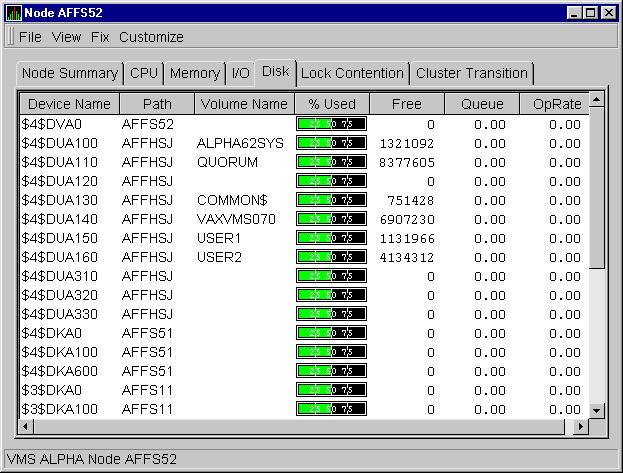
This summary displays values under the following headings:
| Heading | Description |
|---|---|
| Device Name | Standard OpenVMS device name that indicates where the device is located, as well as a controller or unit designation. |
| Path | Primary path (node) from which the device receives commands. |
| Volume Name | Name of the mounted media. |
| % Used | Percentage of the number of volume blocks in use in relation to the total volume blocks available. |
| Free | Number of blocks of volume space available for new data. |
| Queue | Average number of I/O operations pending for the volume (an indicator of performance; less than 1.00 is optimal). |
| OpRate | Rate at which the operations count to the volume has changed since the last sampling. The rate measures the amount of activity on a volume. The optimal load is device specific. |
On Windows NT nodes, the View menu lets you choose the following summary pages:
Windows NT Logical Disk Summary
A logical disk is the user-definable set of partitions under a drive letter. The Windows NT Logical Disk Summary displays logical disk device data, including path, label, percentage used, free space, and queue statistics.
To display the Logical Disk Summary page, follow these steps:
The Availability Manager displays the Windows NT Logical Disk Summary, as shown in Figure 3-14.
Figure 3-14 Windows NT Logical Disk Summary Page
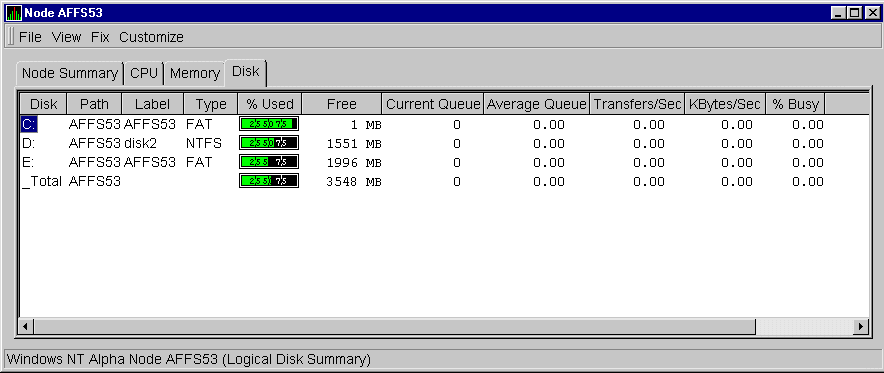
This summary displays values under the following headings:
| Heading | Description |
|---|---|
| Disk | Drive letter, for example, c:, or _Total, which is the summation of statistics for all the disks. |
| Path | Primary path (node) from which the device receives commands. |
| Label | Name that you give a device. |
| Type | File system type; for example, FAT or NTFS. |
| % Used | Percentage of disk space used. |
| Free | Ratio of free space available on the logical disk unit to total usable space provided by the selected logical disk drive. |
| Current Queue | Number of requests outstanding on the disk at the time the performance data is collected. It includes requests in service at the time of data collection. |
| Average Queue | Average number of both read and write requests that were queued for the selected disk during the sample interval. |
| Transfers/Sec | Rate of read and write operations on the disk. |
| KBytes/Sec | Rate bytes are transferred to or from the disk during write or read operations. The rate is displayed in kilobytes per second. |
| % Busy | Percentage of elapsed time that the selected disk drive is busy servicing read and write requests. |
Windows NT Physical Disk Summary
A physical disk is hardware used on your computer system. The Windows NT Physical Disk Summary displays disk volume data, including path, label, queue statistics, transfers, and bytes per second.
To display the Windows NT Physical Disk Summary, follow these steps:
The Availability Manager displays the Windows NT Physical Disk Summary page, as shown in Figure 3-15.
Figure 3-15 Windows NT Physical Disk Summary Page
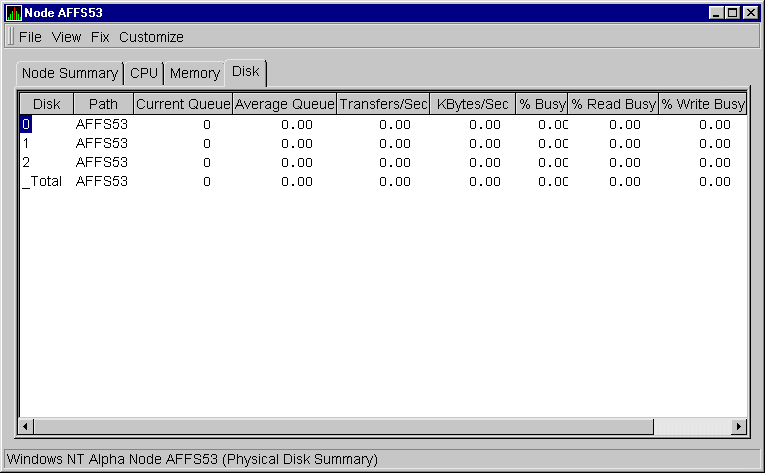
This page displays values under the following headings:
| Heading | Description |
|---|---|
| Disk | Drive number, for example, 0, 1, 2. |
| Path | Primary path (node) from which the device receives commands. |
| Current Queue | Number of requests outstanding on the disk at the time the performance data is collected; it includes requests in service at the time of data collection. |
| Average Queue | Average number of read and write requests that were queued for the selected disk during the sample interval. |
| Transfers/Sec | Rate of read and write operations on the disk. The rate is displayed in kilobytes per second. |
| KBytes/Sec | Rate bytes are transferred to or from the disk during read or write operations. The rate is displayed in kilobytes per second. |
| % Busy | Percentage of elapsed time the selected disk drive is busy servicing read and write requests. |
| % Read Busy | Percentage of elapsed time the selected disk drive is busy servicing read requests. |
| % Write Busy | Percentage of elapsed time the selected disk drive is busy servicing write requests. |
When you select the Lock Contention tab on the OpenVMS Node Summary, the Availability Manager displays the OpenVMS Lock Contention. This page, shown in Figure 3-16, displays each resource in the group you have selected for which a potential lock contention problem exists.
Figure 3-16 OpenVMS Lock Contention Page
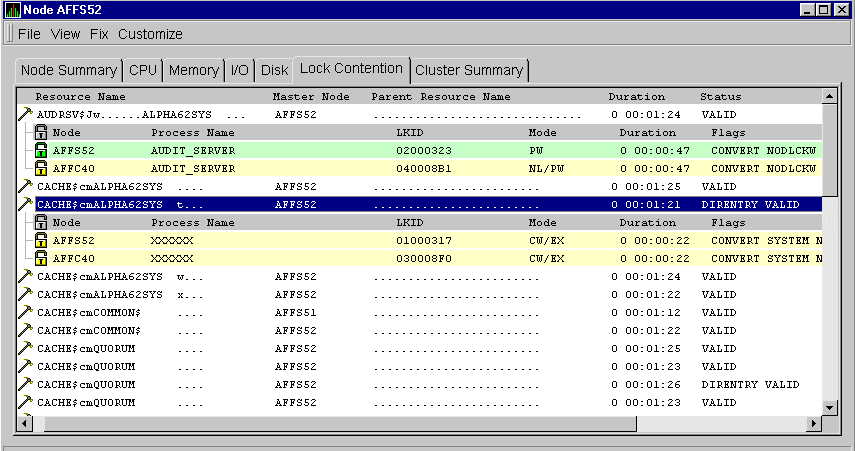
This page displays data under the following headings:
| Heading | Description |
|---|---|
| Resource Name | Resource name associated with the $ENQ system service call. |
| Master Node | Node on which the resource is mastered. |
| Parent Resource | Name of the parent resource. If no name is displayed, the resource listed is the parent resource. |
| Duration | Amount of time elapsed since the Availability Manager first detected the contention situation. |
| Status | Status of the lock. See the $ENQ(W) description in the OpenVMS System Services Reference Manual. |
When you double-click a data item under these headings, the Availability Manager displays additional headings:
| Heading | Description |
|---|---|
| Node | Node name on which the lock is granted. |
| Process Name | Name of the process owning the blocking lock. |
| LKID | Lock ID value (which is useful with SDA). |
| Mode | One of the following modes at which the lock is granted or requested: EX, CW, CR, PW, PR, NL. |
| Duration | Length of time the lock has been in the current queue (since the console application found the lock). |
| Flags | Flags specified with the $ENQ(W) request. |
Under these headings, the lines of data are displayed in one of three colors:
| Color | Meaning |
|---|---|
| Green | Granted |
| Yellow | Converting |
| Pink | Waiting |
To interpret the information displayed on the OpenVMS Lock Contention Summary, you should understand OpenVMS lock management services. For more information, see the OpenVMS System Services Reference Manual.
Lock contention data is accurate only if every node in an OpenVMS Cluster environment is in the same group. Multiple clusters can share a group, but clusters cannot be divided into different groups without losing accuracy. |
When you click the Cluster Summary tab on an OpenVMS Node Summary, the Availability Manager displays the OpenVMS Cluster Summary, as shown in Figure 3-17.
This page contains cluster interconnect information for an entire cluster as well as detailed information about each node in the cluster, including System Communication Services (SCS) connections and LAN virtual circuits for individual nodes. The data items shown on the page correspond to data that the Show Cluster utility displays for the SYSTEMS and MEMBERS classes.
Figure 3-17 Cluster Summary Page
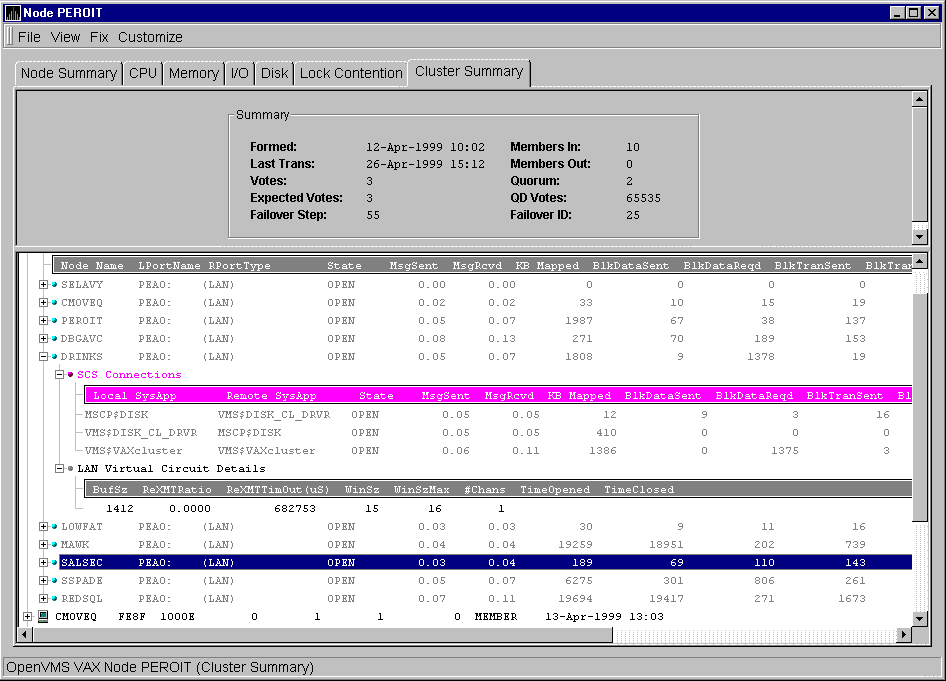
The two panes in the Cluster Summary page display the following information:
The following sections discuss these two panes.
Following are notes about the display of data in the panes:
LOVOTE, 'node' VOTES count is close to or below QUORUM
|
Table 3-4 describes the Summary pane data fields.
| Data Item | Description |
|---|---|
| Formed | Date and time the cluster was formed. |
| Last Trans | Date and time of the most recent cluster state transition. |
| Votes | Total number of quorum votes being contributed by all cluster members and quorum disk. |
| Expected Votes | Number of votes expected to be contributed by all members of the cluster as determined by the connection manager. This value is based on the maximum EXPECTED_VOTES system parameter and the maximized value of the VOTES system parameter. |
| Failover Step | Current failover step index; shows which step in the sequence of failover steps the failover is currently executing. |
| Members In | Number of cluster members to which the Availability Manager has a connection. |
| Members Out | Number of cluster members to which the Availability Manager either has no connection or has lost connection. |
| Quorum | Number of votes required to keep cluster above quorum. |
| QD Votes | Number of votes given to Quorum Disk. A value of 65535 means there is no Quorum Disk. |
| Failover ID | Failover Instance Identification: unique ID of a failover sequence; indicates to system managers whether a failover has occurred since the last time they checked. |
The Cluster Members pane lists all the nodes in the cluster and
provides detailed information about each one.
3.2.7.2.1 Cluster Member Data Fields
The first level of information in the Cluster Members pane contains cluster member data fields, as shown in Figure 3-18.
Figure 3-18 Cluster Member Data Fields

The cluster member data fields are described in Table 3-5.
| Data Item | Description |
|---|---|
| SCS Name | System Communications Services (SCS) name for the node (system parameter SCSNODE) |
| SCSID | System Communications Services identification for the node (system parameter SCSYSTEMID) |
| CSID | Cluster System Identification |
| Votes | Number of votes the member contributes |
| Expect | Member's expected votes as set by the EXPECTED_VOTES system parameter |
| Quorum | Number of votes that must be present for the cluster to function and permit user activity |
| LckDirWt | Lock Manager distributed directory weight as determined by the LCKDIRWT system parameter |
| Status | Current cluster member status: MEMBER, UNKNOWN, or BRK_NON (break nonmember) |
| Transition Time | Time cluster member had last transition |
System Communications Architecture (SCA) VC data include information about members' virtual circuits to other members of the cluster. More than one virtual circuit indicates that more than one path to the other member exists.
You can display virtual circuit data fields by double-clicking the SCS Name of a node. Figure 3-19 is an example of virtual circuit data fields on a Cluster Summary page.
Figure 3-19 Virtual Circuit Data Fields

Table 3-6 describes the virtual circuit data fields. Each line shows either a summary of all system applications (SysApps) using the virtual circuit communication or the communication on the connection between a local and a remote SysApp.
The data displayed is similar to the information that the Show Cluster utility displays for the CIRCUITS, CONNECTIONS, and COUNTERS classes. However, SHOW CLUSTER displays, in Availability Manager Version 1.2 and earlier, show only connections to other OpenVMS nodes; they do not show virtual circuit connections to the DIGITAL Storage Architecture (DSA) or to devices such as FDDI or DSSI disk controllers. This will be fixed in a future release of the Availability Manager software.
| Data Item | Description |
|---|---|
| Node Name | SCS name of the remotely connected node. |
| LPortName | The device name of the local port associated with the circuit. |
| RPortType | The type of remote port associated with the circuit. |
| State | The state of the virtual circuit connection. |
| MsgSent | Version 1.2: Rate (only) of messages sent the virtual circuit. |
| MsgRcvd | Version 1.2: Rate (only) of messages received on the virtual circuit. |
| KB Mapped | Number of kilobytes mapped for block data transfer using the virtual circuit. Note: This field is available in Raw data format only. |
| BlkDataSent | Version 1.2: Raw (only) number of kilobytes sent on the virtual circuit via send block data transfers by this node. |
| BlkDataReqd | Version 1.2: Raw (only) number of kilobytes requested on the virtual circuit via request block data transfers by this node. |
| BlkTransSent | Version 1.2: Raw (only) count of send block data transfers on the virtual circuit by this node. |
| BlkTransReqd | Version 1.2: Raw (only) count of request block data transfers on the virtual circuit by this node. |
| DGSent | Version 1.2: Raw (only) number of datagrams sent on the virtual circuit by this node. |
| DGRcvd | Version 1.2: Raw (only) number of datagrams received from the remote system on the virtual circuit. |
| CreditWt | Version 1.2: Raw (only) number of times any connection on the virtual circuit had to wait for a send credit. |
| BDTWt | Version 1.2: Raw (only) number of times any connection on the virtual circuit had to wait for a buffer descriptor. |
You can display System Communication Services (SCS) connection data fields by double-clicking the "SCS Connections" icon displayed under a Virtual Circuit Node Name. Figure 3-20 is an example of SCS connection data fields on a Cluster Summary page.
Figure 3-20 SCS Connections Data Fields

Table 3-7 describes the SCS connection data fields.
| Data Item | Description |
|---|---|
| Local SysApp | Name of the local system application using the SCS connection. |
| Remote SysApp | Name of the remote system application communicated with using the SCS connection. |
| State | The state of the SCS connection. |
| MsgSent | Number/rate (toggle between) of messages sent to the remote sysapp using the SCS connection. |
| MsgRcvd | Number/rate (toggle between) of messages received from the remote sysapp using the SCS connection. |
| KB Mapped | Number of kilobytes mapped for block data transfer using the SCS connection. Note: This field is available in Raw data format only. |
| BlkDataSent | Number of kilobytes sent on the SCS connection via send block data transfers by this node. |
| BlkDataReqd | Number of kilobytes the data requested on the SCS connection via request block data transfers by this node. |
| BlkTransSent | Count of send block data transfers on the SCS connection by this node. |
| BlkTransReqd | Count of request block data transfers on the SCS connection by this node. |
| DGSent | Number of datagrams sent on the SCS connection by this node. |
| DGRcvd | Number of datagrams received from the remote system on the SCS connection. |
| CreditWt | Number of times the connection had to wait for a send credit. |
| BDTWt | Number of times the connection had to wait for a buffer descriptor. |
You can display virtual circuit details by double-clicking the icon displayed before that heading on the Cluster Summary page. The fields displayed depend of the type of virtual circuit. Currently, this feature is available only for LAN virtual circuits. Figure 3-21 is an example of a virtual circuit data fields display for a LAN virtual circuit.
Figure 3-21 Virtual Circuit Details Data Fields

Table 3-8 describes the virtual circuit details data fields for LAN circuits.
)
| Data Item | Description |
|---|---|
| BufSz | Maximum data buffer size in use by this LAN virtual circuit. |
| ReXMTRatio | Ratio of retransmitted to transmitted packets during the most recent data collection interval. |
| ReXMTTimOut(uS) | Retransmission timeout (in uS): the amount of time the virtual circuit will wait for acknowledgment of a packet's reception before retransmitting the packet. |
| WinSz | Current value of the transmit window (or pipe quota). Maximum number of packets that will be sent before stopping to await an acknowledgment. After a timeout, the transmit window is reset to 1 to decrease congestion and is allowed to grow as acknowledgments are received. |
| WinSzMax | Maximum transmit window size currently allowed for the virtual circuit. |
| #Chans | Number of channels 1 available to the virtual circuit. |
| TimeOpened | Most recent time the virtual circuit was opened. Not implemented in this release. |
| TimeClosed | Most recent time the virtual circuit was closed. Not implemented in this release. |
For more detailed explanations of these data fields, refer to the NISCA
Troubleshooting appendix in the OpenVMS Cluster Systems.
3.2.8 Network Interconnect System Communication Architecture (NISCA) Tabs
The Network Interconnect System Communication Architecture (NISCA) is the transport protocol responsible for carrying messages such as disk I/Os and lock messages across Ethernet and FDDI LANs to other nodes in the cluster. More detailed information about the protocol is in the OpenVMS Cluster Systems manual.
The NISCA tabs show detailed information about the LAN (Ethernet or FDDI) connection between two nodes. The Availability Manager displays one window for each LAN virtual circuit.
The tabs are intended primarily as real-time aids to diagnosing LAN-related problems. The OpenVMS Cluster Systems manual describes the parameters shown in these tabs and tells how to use them to diagnose LAN-related cluster problems. The tabs provide the same information as the OpenVMS System Dump Analyzer (SDA) command SHOW PORTS/VC=VC_node-name. (VC refers to a virtual circuit; node-name refers to a node in the cluster. The system defines VC-node-name after a SHOW PORTS command is given from SDA.)
To display NISCA details, double-click the buffer size (BufSz) under the LAN Virtual Circuit Details heading (see Table 3-8) on the Cluster Summary page. The system displays Transmit Data with five additional tabs to choose from. These tabs are described in the following sections.
Transmit data is data packet transmission information. Figure 3-22 shows an example of a Transmit Data display.
Figure 3-22 Transmit Data
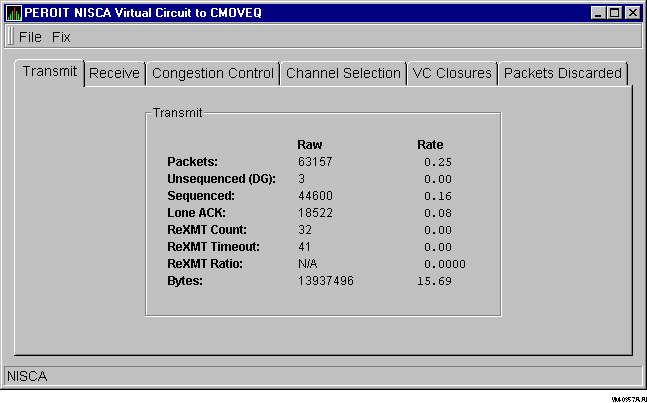
The following table describes the transmit data that the display contains:
| Data Item | Description |
|---|---|
| Packets | Number of packets transmitted through the virtual circuit to the remote node, including both sequenced and unsequenced (channel control) messages, and lone acknowledgments. |
| Unsequenced (DG) | Count (raw) and rate of the number of unsequenced packets transmitted. |
| Sequenced | Count and rate of the number of sequenced packets transmitted. Sequenced packets are guaranteed to be delivered. |
| Lone ACK | Count and rate of the number of packets sent solely for the purpose of acknowledging reception of one or more packets. |
| ReXMT Count | Number of packets retransmitted. Retransmission occurs when the local node does not receive an acknowledgment for a transmitted packet within a predetermined timeout interval. |
| ReXMT Timeout | Number of retransmission timeouts that have occurred. |
| ReXMT Ratio | Ratio of ReXmt Count current and past to the current and past number of sequenced messages sent. |
| Bytes | Count and rate of bytes transmitted through the virtual circuit. |
Receive Data is information about data-packet reception. Figure 3-23 shows an example of a Receive Data display.
Figure 3-23 Receive Data
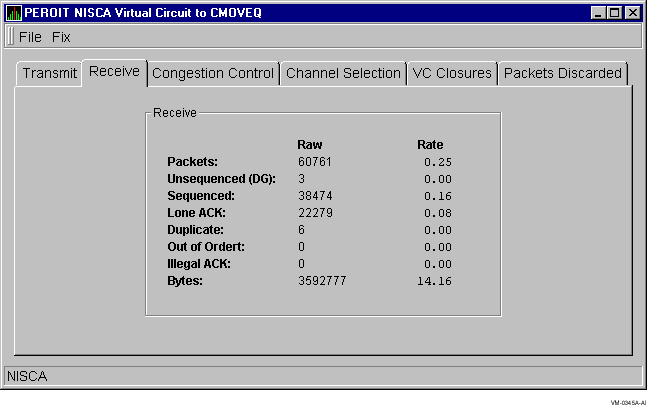
The following table describes the data that the receive display contains:
| Data Item | Description |
|---|---|
| Packets | Number of packets received on the virtual circuit from the remote node, including both sequenced and unsequenced (channel control) messages, and lone acknowledgments. |
| Unsequenced (DG) | Count and rate of the number of unsequenced packets received. |
| Sequenced | Count and rate of the number of sequenced packets received. |
| Lone ACK | Count and rate of the number of lone acknowledgments received. |
| Duplicate | Number of redundant packets received by this system. Duplicates occur when the sending node retransmits a packet and both the original and retransmitted packets are received. |
| Out of Order | Number of packets received out of order by this system. |
| Illegal ACK | Number of illegal acknowledgments received. |
| Bytes | Count and rate of the number of bytes received through the virtual circuit. |
Congestion Control Data is transmit congestion control information. The values indicate the number of messages that can be sent to the remote node before receiving an acknowledgment and the retransmission timeout. Figure 3-24 shows an example of a Congestion Control Data display.
Figure 3-24 Congestion Control Data
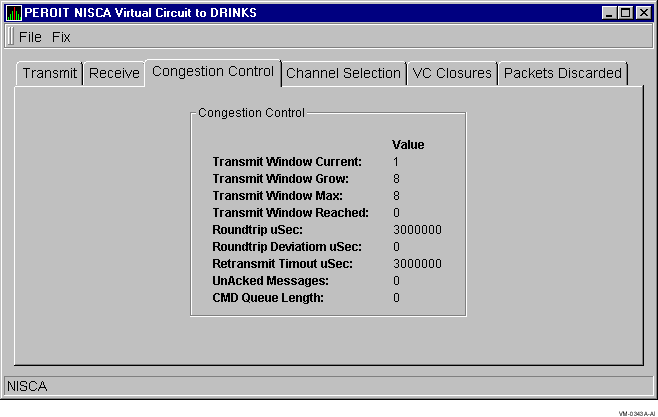
The following table describes the congestion control data that the display contains:
| Data Item | Description |
|---|---|
| Transmit Window Current | Current value of the transmit window (pipe quota). After a timeout, the pipe quota is reset to 1 to decrease congestion and is allowed to increase quickly as acknowledgments are received. |
| Transmit Window Grow | The slow growth threshold. Size at which the window's rate of increase is slowed to avoid congestion on the network again. |
| Transmit Window Max | Maximum transmit window size currently allowed for the virtual circuit based on channel limitations. |
| Transmit Window Reached | Number of times the entire transmit window was full. If this number is small as compared with the number of sequenced messages transmitted, either the local node is not sending large bursts of data to the remote node, or acknowledging packets are being received so that the window limit is never reached. |
| Roundtrip uSec | Average roundtrip time for a packet to be sent and acknowledged. The value is displayed in microseconds. |
| Roundtrip Deviation uSec | Average deviation of the roundtrip time. The value is displayed in microseconds. |
| Retransmit Timeout uSec | Value used to determine packet retransmission timeout. If a packet does not receive either an acknowledging or a responding packet, the packet is assumed to be lost and will be resent. |
| UnAcked Messages | Number of unacknowledged messages. |
| CMD Queue Length | Current length of all command queues. |
The Channel Selection data display provides information about the selection of virtual circuit channels. Figure 3-25 shows an example of a Channel Selection Data display.
Figure 3-25 Channel Selection Data
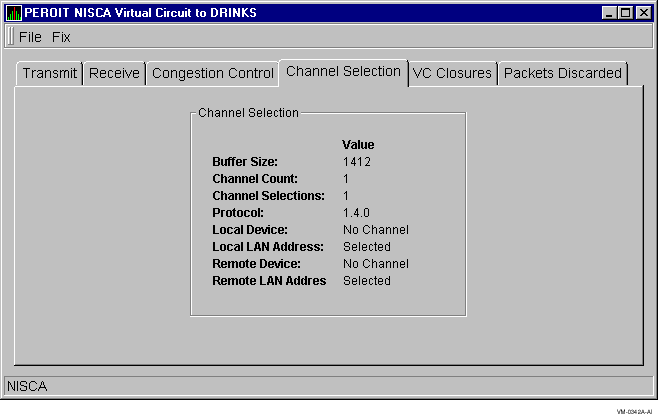
The following table describes the channel selection data that the display contains:
| Data Item | Description |
|---|---|
| Buffer Size | Maximum data buffer size for this virtual circuit. |
| Channel Count | Number of channels available for use by this virtual circuit. |
| Channel Selections | Number of channel selections performed. |
| Protocol | NISCA Protocol version. |
| Local Device | Name of the local LAN device that the channel uses to send and receive packets. |
| Local LAN Address | Address of the local LAN device that performs sends and receives. |
| Remote Device | Name of the remote LAN device that the channel uses to send and receive packets. |
| Remote LAN Address | Address of the remote LAN device performing the sends and receives. |
VC Closures data is information about the number of times a virtual circuit has closed for a particular reason. Figure 3-26 shows an example of a VC Closures Data display.
Figure 3-26 Virtual Connect (VC) Closures Data
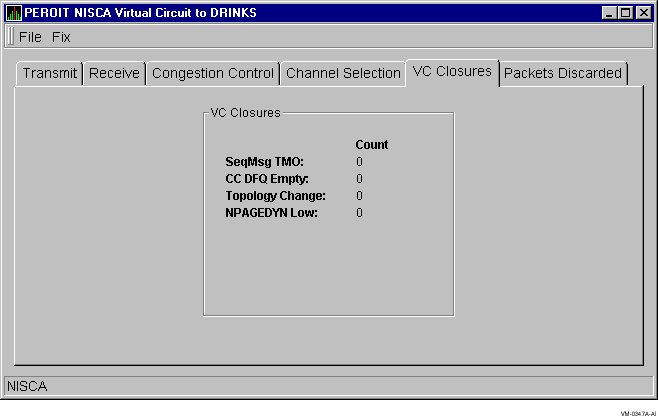
The following table describes the VC closures data that the display contains:
| Data Item | Description |
|---|---|
| SeqMsg TMO | Number of times the VC was closed because of sequenced transmit timeouts. |
| CC DFQ Empty | Number of times the VC was closed because the channel control DFQ was empty. |
| Topology Change | Number of times the VC was closed because PEDRIVER performed a failover from a LAN path with a large packet size to a LAN path with a smaller packet size, necessitating the closing and reopening of the virtual circuit. |
| NPAGEDYN Low | Number of times the virtual circuit was lost because of a pool allocation failure on the local node. |
Packets Discarded data is information about the number of times packets were discarded for a particular reason. Figure 3-27 shows an example of a Packets Discarded Data display.
Figure 3-27 Packets Discarded Data
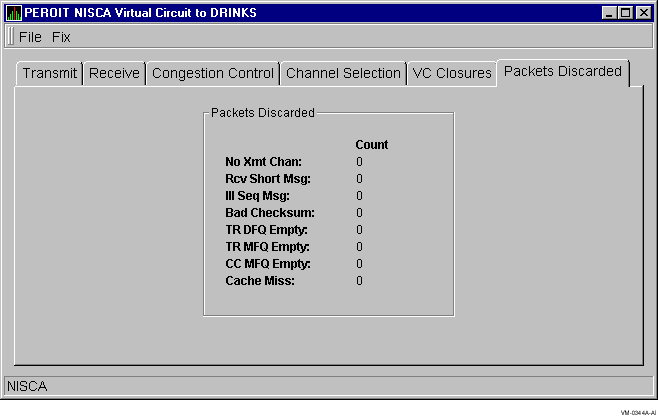
The following table describes the packets discarded data that the display contains:
| Data Item | Description |
|---|---|
| No Xmt Chan | Number of times there was no transmit channel. |
| Ill Seq Msg | Number of times an illegal sequenced message was received. |
| TR DFQ Empty | Number of times the Transmit DFQ was empty. |
| CC MFQ Empty | Number of times the Channel Control MFQ was empty. |
| Rcv Short Msg | Number of times an undersized transport message was received. |
| Bad Checksum | Number of times there was a checksum failure on a received packet. |
| TR MFQ Empty | Number of times the Transmit MFQ was empty. |
| Cache Miss | Number of packets that could not be placed in the VC's received cache because it was full. |
When you double-click a value on the lower pane of the OpenVMS Memory page (Figure 3-8), the Availability Manager displays the first of several Single Process pages:
These pages contain specific data about one process. The information
includes a combination of data elements from the CPU, Memory, and I/O
displays, as well as data for specific quota utilization, current
image, and queue wait time.
3.2.9.1 OpenVMS Process Information
When you click the Process Information tab, the Availability Manager displays the OpenVMS Process Information page, as shown in Figure 3-28. The data on this page are displayed at the default intervals shown for Single Process Data on the Data Collection customizations.
Figure 3-28 OpenVMS Process Information Page
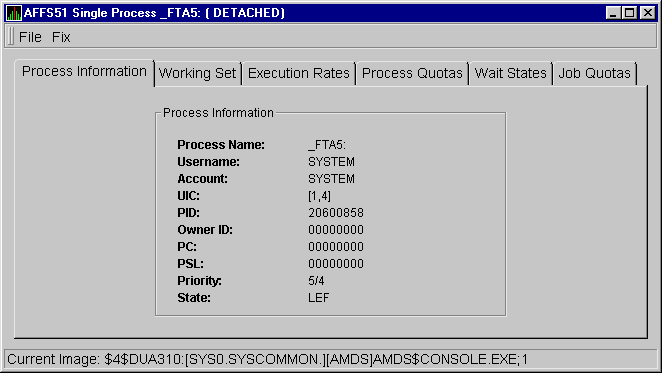
The following table describes the data items on this page:
| Data Item | Description |
|---|---|
| Process name | Name of the process. |
| Username | User name of the user who owns the process. |
| Account | Account string that the system manager assigns to the user. |
| UIC | User identification code (UIC), a pair of numbers or character strings that designate the group and user. |
| PID | Process identifier, a 32-bit value that uniquely identifies a process. |
| Owner ID | Process identifier of the process that created the process displayed on the page. If the PID is 0, then the process is a parent process. |
| PC |
Program counter.
On OpenVMS Alpha systems, this value is displayed as 0 because the data is not readily available to the Data Collector node. |
| PSL | Processor status longword (PSL); a value is displayed only on VAX systems. |
| Priority | Computable and base priority of the process. Priority is an integer between 0 and 31. Processes with higher priority are given more CPU time. |
| State | One of the process states listed in Appendix A. |
When you click the Working Set tab, the Availability Manager displays the OpenVMS Working Set page, as shown in Figure 3-29.
Figure 3-29 OpenVMS Working Set Page
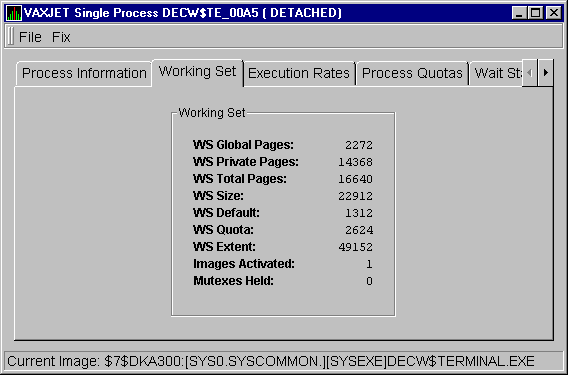
The following table describes the data items on this page:
| Data Item | Description |
|---|---|
| WS Global Pages | Shared data or code between processes, listed in pages or pagelets. |
| WS Private Pages | Amount of accessible memory, listed in pages or pagelets. |
| WS Total Pages | Sum of global and private pages or pagelets. |
| WS Size | Working set size: number of pages or pagelets of memory the process is allowed to use. This value is periodically adjusted by the operating system based on analysis of page faults relative to CPU time used. Increases in large units indicates that a process is taking many page faults, and its memory allocation is increasing. |
| WS Default | Working set default: the initial limit of the number of physical pages or pagelets of memory the process can use. This parameter is listed in the user authorization file (UAF); discrepancies between the UAF value and the displayed value are due to page/longword boundary rounding or other adjustments made by the operating system. |
| WS Quota | Working set quota: the maximum amount of physical pages or pagelets of memory the process can lock into its working set. This parameter is listed in the UAF; discrepancies between the UAF value and the displayed value are due to page/longword boundary rounding or other adjustments made by the operating system. |
| WS Extent | Working set extent: the maximum number of physical pages or pagelets of memory the system will allocate for the process. The system provides memory to a process beyond its quota only when it has an excess of free pages and can be recalled if necessary. This parameter is listed in the UAF; any discrepancies between the UAF value and the displayed value are due to page/longword boundary rounding or other adjustments made by the operating system. |
| Images Activated | Number of times an image is activated. |
| Mutexes Held | Number of mutual exclusions (mutexes) held. Persistent values other than zero (0) require analysis. A mutex is similar to a lock but is restricted to one CPU. When a process holds a mutex, its priority is temporarily incremented to 16. |
When you click the Execution Rates tab, the Availability Manager displays the OpenVMS Execution Rates page, as shown in Figure 3-30.
Figure 3-30 OpenVMS Execution Rates Page
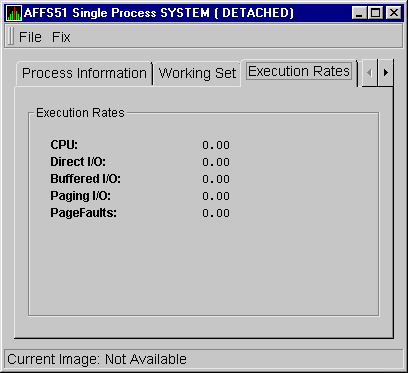
The following table describes the data items on this page.
| Data Item | Description |
|---|---|
| CPU | Percent of CPU time used by this process: the ratio of CPU time to elapsed time. |
| Direct I/O | Rate at which I/O transfers take place from the pages or pagelets containing the process buffer that the system locks in physical memory to the system devices. |
| Buffered I/O | Rate at which I/O transfers take place for the process buffer from an intermediate buffer from the system buffer pool. |
| Paging I/O | Rate of read attempts necessary to satisfy page faults. This is also known as page read I/O or the hard fault rate. |
| Page Faults | Page faults per second for the process. |
When you click the Process Quotas tab, the Availability Manager displays the OpenVMS Process Quotas page, as shown in Figure 3-31.
Figure 3-31 OpenVMS Process Quotas Page

The following table describes the data items on this page. Note that when you display the SWAPPER process, no values are listed in this section. The SWAPPER process does not have quotas defined in the same way as other system and user processes do.
| Data Item | Description |
|---|---|
| DIO Limit | Direct I/O limit: the current count of DIOs used as compared with the limit possible. |
| BIO Limit | Buffered I/O limit: the current count of BIOs used as compared with the limit possible. |
| AST Limit | Asynchronous system traps limit: the current count of ASTs used as compared with the limit possible. |
3.2.9.5 OpenVMS Wait States
When you click the Wait States tab, the Availability Manager
displays the OpenVMS Wait States page, as shown in Figure 3-32.
Figure 3-32 OpenVMS Wait States Page
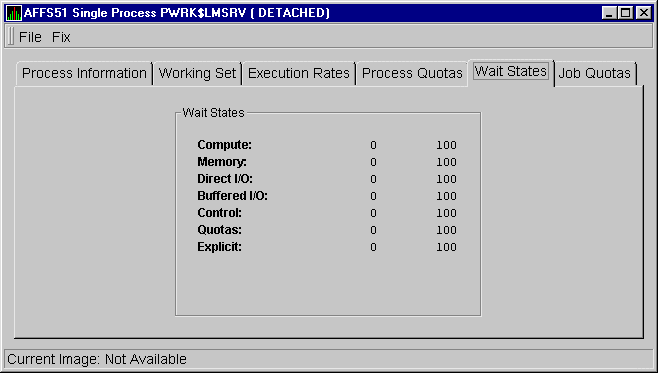
The following table describes the data items in this ialog box. Note that the wait state specifies why a process cannot execute, based on application-specific calculations.
| Data Item | Description |
|---|---|
| Compute | Relative value indicating that the process is waiting for CPU time. Possible states are COM, COMO, or RWCAP. |
| Memory | Relative value indicating that the process is waiting for a page fault that requires data to be read from disk; this is common during image activation. Possible states are PFW, COLPG, FPG, RWPAG, RWNPG, RWMPE, or RWMPB. |
| Direct I/O | Relative value indicating that the process is waiting for data to be read from or written to a disk. The possible state is DIO. |
| Buffered I/O | Relative value indicating that the process is waiting for data to be read from or written to a slower device such as a terminal, line printer, or mailbox. The possible state is BIO. |
| Control | Relative value indicating that the process is waiting for another process to release control of some resource. Possible states are CEF, MWAIT, LEF, LEFO, RWAST, RWMBX, RWSCS, RWCLU, RWCSV, RWUNK, or LEF waiting for an ENQ. |
| Quotas | Relative value indicating that the process is waiting because the process has exceeded some quota. Possible states are QUOTA or RWAST_QUOTA. |
| Explicit | Relative value indicating that the process is waiting because the process asked to wait, such as a hibernate system service. Possible states are HIB, HIBO, SUSP, SUSPO, or LEF waiting for a TQE. |
When you click the Job Quotas tab, the Availability Manager displays the OpenVMS Job Quotas page, as shown in Figure 3-33.
Figure 3-33 OpenVMS Job Quotas Page
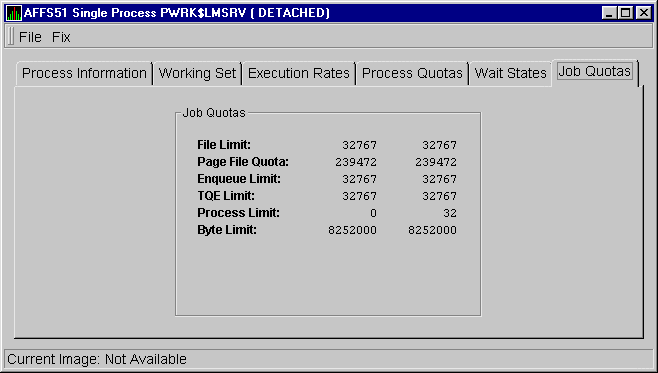
The following table describes the data items on this page.
| Data Item | Description |
|---|---|
| File Limit | Current number of open files as compared with the limit possible. |
| Page File Quota | Current number of disk blocks in the page file that the process can use as compared with the possible limit. |
| Enqueue Limit | Current count of resources (lock blocks) queued compared to the possible limit. |
| TQE Limit | Current count of timer queue entry (TQE) requests as compared with the possible limit. |
| Process Limit | Current count of subprocesses created as compared with the possible limit. |
| Byte Limit | Current count of bytes used for buffered I/O transfers as compared with the possible limit. |
The Availability Manager indicates resource availability problems in the Event pane of the Application window. The Event pane allows you both to identify and to correct a system problem.
The Availability Manager displays a warning message in the Event pane whenever
it detects a resource availability problem.
4.1 Displaying Event Information
The Availability Manager automatically displays events for all nodes currently communicating with the Data Analyzer. When an event of a specific severity occurs, the Availability Manager adds the event to a list in the Event pane, as shown in Figure 4-1.
Figure 4-1 Event Pane
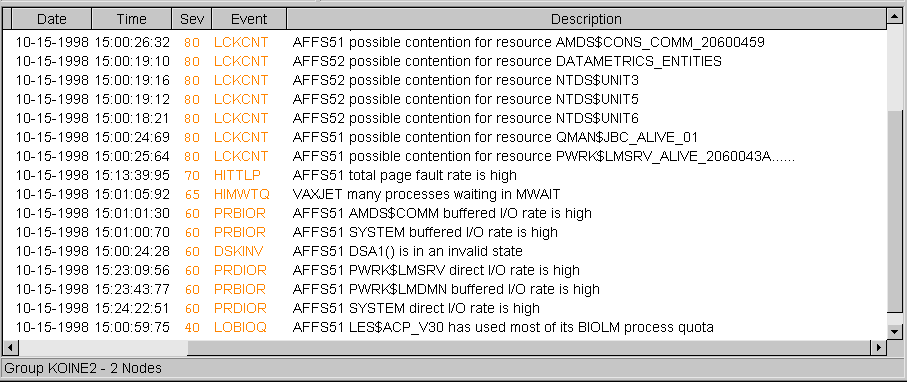
By default, the Event pane displays more serious events in red and less serious events in yellow; more serious events are listed first.
The length of time the Availability Manager displays an event depends on the severity of the event. Less severe events are displayed for a short period of time (30 seconds); more severe events are displayed until you explicitly remove the event from the Event pane (explained in Section 4.2).
On the Event Customization page (see Figure 6-5), you can customize the seriousness of the events that you want the Availability Manager to display. For more information, see Section 6.4.
The following table identifies the data items displayed in the Event pane.
| Data Item | Description |
|---|---|
| Node | Name of the node causing the event |
| Group | Group of the node causing the event |
| Date | Date the event occurred |
| Time | Time that an event was detected |
| Sev | Severity: a value from 0 to 100 |
| Event | Alphanumeric identifier of the type of event |
| Description | Short description of the resource availability problem |
Appendix B contains tables of events that are displayed in the Event
pane. In addition, these tables contain an explanation of each event
and the recommended remedial action.
4.2 Using Event Pane Menu Options
When you click the right mouse button on a node name or data item in the Event pane, the Availability Manager displays a popup menu with the following options:
| Menu Option | Description |
|---|---|
| Display | Displays the Node Summary page associated with that event. |
| Fix | Displays a list of fix options (see Chapter 5.) |
| Remove | Removes an event from the display. |
| Freeze/Unfreeze | Freezes a value in the display until you "unfreeze" it; a snowflake icon is displayed to the left of an event that is frozen. |
| Customize | Allows you to customize events. |
For more detailed information about a specific event, double-click any event data item in the Event pane. The Availability Manager first displays a data page that most closely corresponds to the cause of the event. You can choose other tabs for additional detailed information.
For a description of tabs and the information they contain, see Chapter 3.
You can perform fixes on OpenVMS nodes to resolve resource availability problems and improve system availability.
This chapter discusses the following topics:
Performing certain fixes can have serious repercussions, including possible system failure. Therefore, only experienced system managers should perform fixes. |
When you suspect or detect a resource availability problem, in many cases you can use the Availability Manager to analyze the problem and to perform a fix to improve the situation.
Availability Manager fixes fall into two categories:
You can access fixes, by category, from the pages listed in Table 5-1.
| Fix Category and Name | Available from This Page |
|---|---|
Node fixes:
|
Node Summary
CPU Memory I/O |
| Process fixes: |
All of the process fixes are available from the following pages:
|
Table 5-2 summarizes various problems, recommended fixes, and the expected results of fixes.
| Problem | Fix | Result |
|---|---|---|
| Node resource hanging cluster | Crash Node | Node fails with operator-requested shutdown. |
| Cluster hung | Adjust Quorum | Quorum for cluster is adjusted. |
| Process looping, intruder | Delete Process | Process no longer exists. |
| Endless process loop in same PC range | Exit Image | Exit from current image. |
| Runaway process, unwelcome intruder | Suspend Process | Process is suspended from execution. |
| Process previously suspended | Resume Process | Process starts from point it was suspended. |
| Runaway process or process that is overconsuming | Change Process Priority | Base priority changes to selected setting. |
| Low node memory | Purge Working Set | Frees memory on node; page faulting might occur for process affected. |
| Working set too high or low | Adjust Working Set | Removes unused pages from working set; page faulting might occur. |
| Process quota has reached its limit and has entered RWAIT state | Adjust Process Limits | Process receives greater limit, which in many cases frees the process to continue execution. |
Most process fixes correspond to an OpenVMS system service call, as shown in the following table:
| Process Fix | System Service Call |
|---|---|
| Delete a process | $DELPRC |
| Exit an image | $FORCEX |
| Suspend a process | $SUSPND |
| Resume a process | $RESUME |
| Change a process priority | $SETPRI |
| Purge working set | $PURGWS |
| Adjust working set | $ADJWSL |
Adjust process limits of the following:
|
None |
Each fix that uses a system service call requires that the process execute the system service. A hung process will have the fix queued to it, where the fix will remain until the process is operational again. |
Be aware of the following facts before you perform a fix:
Standard OpenVMS privileges restrict users' write access. When you run the Data Analyzer, you must have the CMKRNL privilege to send a write (fix) instruction to a node with a problem.
The following options are displayed at the bottom of all fix pages:
| Option | Description |
|---|---|
| OK | Applies the fix and then exits the page. Any message associated with the fix is displayed in the Event pane. |
| Cancel | Cancels the fix. |
| Apply | Applies the fix and does not exit the page. Any message associated with the fix is displayed in the Return Status section of the page and in the Event pane. |
The following sections explain how to perform nodes fixes and process
fixes and describe specific fixes you can make.
5.2.1 Node Fixes
The Availability Manager node fixes allow you to deliberately fail (crash) a node or to adjust cluster quorum.
To perform a node fix, follow these steps:
The crash node fix is an operator-requested bugcheck from the driver. It takes place as soon as you click OK in the Crash Node page. After you perform this fix, the node cannot be restored to its previous state. After a crash, the node must be rebooted. |
When you select the Crash Node option, the Availability Manager displays the Crash Node page, shown in Figure 5-1.
Figure 5-1 Crash Node Page
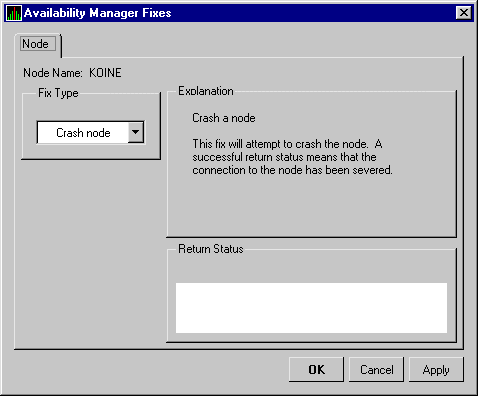
Because the node cannot report a confirmation when a node crash fix is successful, the crash success message is displayed after the timeout period for the fix confirmation has expired. |
The Adjust Quorum fix forces the node to refigure the quorum value. This fix is the equivalent of the Interrupt Priority C (IPC) mechanism used at system consoles for the same purpose. The fix forces the adjustment for the entire cluster so that each node in the cluster will have the same new quorum value.
The Adjust Quorum fix is useful when the number of votes in a cluster falls below the quorum set for that cluster. This fix allows you to readjust the quorum so that it corresponds to the current number of votes in the cluster.
When you select the Adjust Quorum option, the Availability Manager displays the page shown in Figure 5-2.
Figure 5-2 Adjust Quorum Page
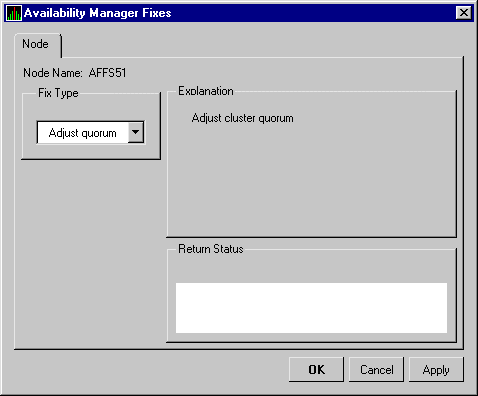
To perform a process fix, follow these steps:
Figure 5-3 Process Priority Page

Some of the fixes, like Process priority, require you to use a slider
to change the default value. When you have finished setting a new
process priority, click one of the options at the bottom of the page.
5.2.3 General Process Fixes
The following sections describe Availability Manager general process fixes.
5.2.3.1 Delete Process
In most cases, a Delete Process fix deletes a process. However, if a
process is waiting for disk I/O or is in a resource wait state (RWAST),
this fix might not delete the process. In this situation, it is useless
to repeat the fix. Instead, depending on the resource the process is
waiting for, a Process Limit fix might free the process. As a last
resort, reboot the node to delete the process.
Deleting a system process on a system process could cause the system to hang or become unstable. |
When you select the Delete Process option, the Availability Manager displays the page shown in Figure 5-4.
Figure 5-4 Delete Process Page

After reading the explanation, select one of the options displayed at
the bottom of the page. A message displayed on the page indicates that
the fix has been successful.
5.2.3.2 Exit Image
Exiting an image on a node can stop an application that a user requires. Check the Single Process page first to determine which image is running on the node.
Exiting an image on a system process could cause the system to hang or become unstable. |
When you select the Exit Image option, the Availability Manager displays the page shown in Figure 5-5.
Figure 5-5 Exit Image Page
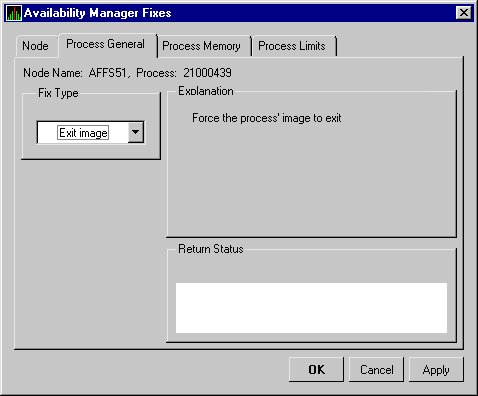
After reading the explanation in the page, select one of the options
displayed at the bottom of the page. A message displayed on the page
indicates that the fix has been successful.
5.2.3.3 Suspend Process
Suspending a process that is consuming excess CPU time can improve perceived CPU performance on the node by freeing the CPU for other processes to use. (Conversely, resuming a process that was using excess CPU time while running might reduce perceived CPU performance on the node.)
Do not suspend system processes, especially JOB_CONTROL, because this might make your system unusable. (See the OpenVMS Programming Concepts Manual for more information.) |
When you select the Suspend Process option, the Availability Manager displays the page shown in Figure 5-6.
Figure 5-6 Suspend Process Page

After reading the explanation, select one of the options displayed at
the bottom of the page. A message displayed on the page indicates that
the fix has been successful.
5.2.3.4 Resume Process
Resuming a process that was using excess CPU time while running might reduce perceived CPU performance on the node. (Conversely, suspending a process that is consuming excess CPU time can improve perceived CPU performance by freeing the CPU for other processes to use.)
When you select the Resume Process option, the Availability Manager displays the page shown in Figure 5-7.
Figure 5-7 Resume Process Page

After reading the explanation, select one of the options displayed at
the bottom of the page. A message displayed on the page indicates that
the fix has been successful.
5.2.3.5 Change Process Priority
If the priority of a compute-bound process is too high, the process can consume all the CPU cycles on the node, affecting performance dramatically. On the other hand, if the priority of a process is too low, the process might not obtain enough CPU cycles to do its job, also affecting performance.
When you select the Process Priority option, the Availability Manager displays the page shown in Figure 5-8.
Figure 5-8 Change Process Priority Page

To change the base priority for a process, drag the slider on the scale to the number you want. The current priority number is displayed in a small box above the slider. You can also click the line above or below the slider to adjust the number by one.
When you are satisfied with the new base priority, select one of the
options displayed at the bottom of the page. A message displayed on the
page indicates that the fix has been successful.
5.2.4 Process Memory Fixes
The following sections describe the Availability Manager process memory fixes.
5.2.4.1 Purge Working Set
This fix purges the working set to a minimal size. You can use this fix to reclaim a process's pages that are not in active use. If the process is in a wait state, the working set remains at a minimal size, and the purged pages become available for other uses. If the process becomes active, pages the process needs are page-faulted back into memory, and the unneeded pages are available for other uses.
Be careful not to repeat this fix too often: a process that continually reclaims needed pages can cause excessive page faulting, which can affect system performance.
When you select the Purge Working Set option, the Availability Manager displays the page shown in Figure 5-9.
Figure 5-9 Purge Working Set Page
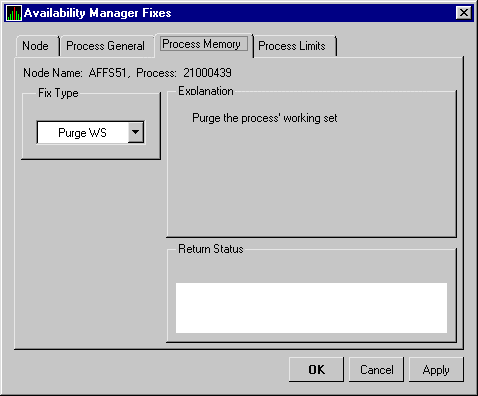
After reading the explanation on the page, select one of the options
displayed at the bottom of the page. A message displayed on the page
indicates that the fix has been successful.
5.2.4.2 Adjust Working Set
Adjusting the working set proves useful in circumstances like the following:
When you select the Adjust Working Set fix, the Availability Manager displays the page shown in Figure 5-10.
Figure 5-10 Adjust Working Set Page

To perform this fix, use the slider to adjust the working set to the limit you want. You can also click the line above or below the slider to adjust the number by one.
When you are satisfied with the new working set limit, select one of the options displayed at the bottom of the page. A message displayed on the page indicates that the fix has been successful.
The following sections describe Availability Manager process limits fixes.
5.2.5 Process Limits Fixes
If a process is waiting for a resource, you can use a Process Limits fix to increase the resource limit so that the process can continue. The increased limit is in effect only for the life of the process, however; any new process is assigned the quota that was set in the UAF.
When you click the Process Limits tab, you can select any of the options described in the following sections.
5.2.5.1 Direct I/O
You can use this fix to adjust the direct I/O count limit of a process.
When you select the Direct I/O option, the Availability Manager displays the page shown in Figure 5-11.
Figure 5-11 Direct I/O Page
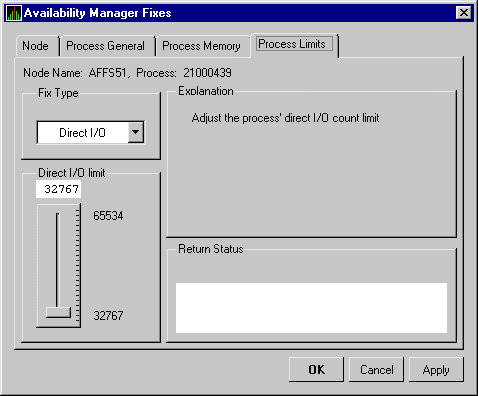
To perform this fix, use the slider to adjust the direct I/O count to the limit you want. You can also click the line above or below the slider to adjust the number by one.
When you are satisfied with the new direct I/O count limit, select one of the options displayed at the bottom of the page. A message displayed on the page indicates that the fix has been successful.
5.2.5.2 Buffered I/O
You can use this fix to adjust the buffered I/O count limit of a
process.
When you select the Buffered I/O option, the Availability Manager displays the page shown in Figure 5-12.
Figure 5-12 Buffered I/O Page
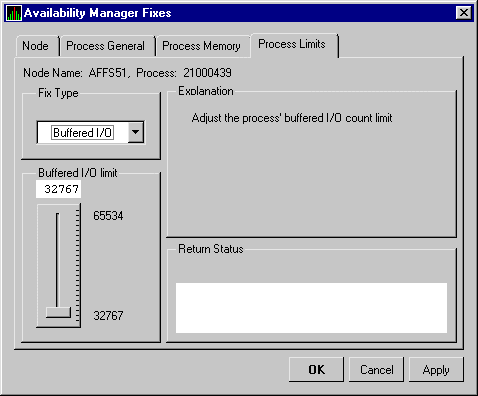
To perform this fix, use the slider to adjust the buffered I/O count to the limit you want. You can also click the line above or below the slider to adjust the number by one.
When you are satisfied with the new buffered I/O count limit, select one of the options displayed at the bottom of the page. A message displayed on the page indicates that the fix has been successful.
5.2.5.3 AST
You can use this fix to adjust the AST queue limit of a process.
When you select the AST option, the Availability Manager displays the page shown in Figure 5-13.
Figure 5-13 AST Page

To perform this fix, use the slider to adjust the AST queue limit to the number you want. You can also click the line above or below the slider to adjust the number by one.
When you are satisfied with the new AST queue limit, select one of the options displayed at the bottom of the page. A message displayed on the page indicates that the fix has been successful.
5.2.5.4 Open File
You can use this fix to adjust the open file limit of a process.
When you select the Open File option, the Availability Manager displays the page shown in Figure 5-14.
Figure 5-14 Open File Page
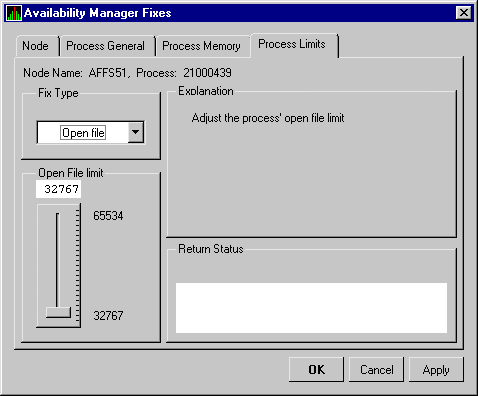
To perform this fix, use the slider to adjust the open file limit to the number you want. You can also click the line above or below the slider to adjust the number by one.
When you are satisfied with the new open file limit, select one of the options displayed at the bottom of the page. A message displayed on the page indicates that the fix has been successful.
5.2.5.5 Lock
You can use this fix to adjust the lock queue limit of a process.
When you select the Lock option, the Availability Manager displays the page shown in Figure 5-15.
Figure 5-15 Lock Page

To perform this fix, use the slider to adjust the lock queue limit to the number you want. You can also click the line above or below the slider to adjust the number by one.
When you are satisfied with the new lock queue limit, select one of the options displayed at the bottom of the page. A message displayed on the page indicates that the fix has been successful.
5.2.5.6 Timer
You can use this fix to adjust the time queue entry limit of a process.
When you select the Timer option, the Availability Manager displays the page shown in Figure 5-16.
Figure 5-16 Timer Page

To perform this fix, use the slider to adjust the timer queue entry limit to the number you want. You can also click the line above or below the slider to adjust the number by one.
When you are satisfied with the new timer queue entry limit, select one of the options displayed at the bottom of the page. A message displayed on the page indicates that the fix has been successful.
5.2.5.7 Subprocess
You can use this fix to adjust the creation limit of the subprocess of
a process.
When you select the Subprocess option, the Availability Manager displays the page shown in Figure 5-17.
Figure 5-17 Subprocess Page

To perform this fix, use the slider to adjust a process's subprocess creation limit to the number you want. You can also click the line above or below the slider to adjust the number by one.
When you are satisfied with the new subprocess creation limit, select one of the options displayed at the bottom of the page. A message displayed on the page indicates that the fix has been successful.
5.2.5.8 I/O Byte
You can use this fix to adjust the buffered I/O limit of a process.
When you select the I/O Byte option, the Availability Manager displays the page shown in Figure 5-18.
Figure 5-18 I/O Byte Page

To perform this fix, use the slider to adjust the buffered I/O byte limit to the number you want. You can also click the line above or below the slider to adjust the number by one.
When you are satisfied with the new buffered I/O byte limit, select one of the options displayed at the bottom of the page. A message displayed on the page indicates that the fix has been successful.
This chapter explains how to customize a number of features of the Availability Manager:
| Feature | Description |
|---|---|
| Groups of nodes or nodes | You can select one or more groups or individual nodes to monitor. |
| Group membership | You can change a node's default group membership. |
| Security features | On Data Analyzer and Data Collector nodes, you can change passwords. On OpenVMS Data Collector nodes, you can edit a file that contains security triplets. |
| Event filters | You can specify the severity of events that are displayed as well as several other filtering settings. |
| Data filters | For OpenVMS nodes, you can specify a number of parameters and values that limit the amount of data that is collected. |
| Types of data collection | For OpenVMS nodes, you can select the types of data you want to collect as well as several types of collection intervals. (On Windows NT nodes, specific types of data are collected by default.) |
How to Specify Which Nodes to Customize
In the Application window (see Figure 2-1), you can select the Customize option in either of these places:
Figure 6-1 Customize Menu
Depending on which Customize menu you use and your choice of menu items, your customizations can affect one or more nodes, as indicated in the following table.
| Nodes Affected | Action |
|---|---|
| All nodes | Click Customize Application... on the menu shown in Figure 6-1. |
| All Windows NT nodes | Click Customize NT... on the menu shown in Figure 6-1. |
| All OpenVMS nodes | Click Customize VMS... on the menu shown in Figure 6-1. |
| One node | Right-click a node name in the Node pane of the Application window (Figure 2-1); then select the Customize option from the popup menu displayed. The customization options you choose will affect only the node you have selected. |
When you select Customize Application on the Customize menu, the Availability Manager displays a Group/Node Lists tab, as shown in Figure 6-2.
Figure 6-2 Group/Node Lists Customization Page
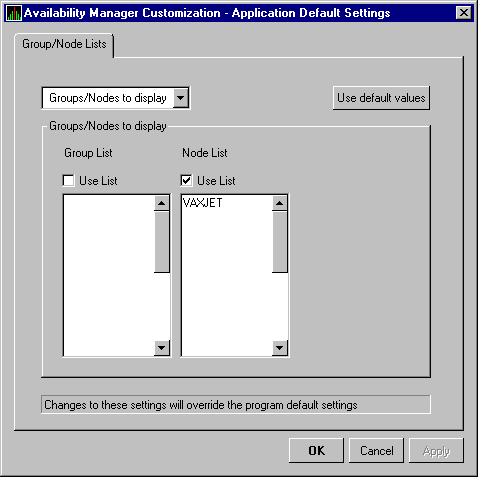
You can check "Use List" under either of the following headings:
If you decide to return to the default, which is to monitor all nodes, click "Use Default Values."
After you enter a list of groups or individual nodes, click one of the following choices:
| Option | Description |
|---|---|
| OK | Accepts the choice of names you have entered and exits the page. |
| Cancel | Cancels the choice of names and does not exit the page. |
| Apply | Accepts the choice of names you nave entered but does not exit the page. |
To put the list into effect, exit the application and restart it.
6.2 Changing a Node's Group Membership
Each Availability Manager Data Collector node is assigned to the DECAMDS group
by default. The following sections explain how to change the
group membership of nodes.
6.2.1 Changing the Group of an OpenVMS Node
You need to edit a logical on each Data Collector node to change the group for that node. To do this, follow these steps:
$ AMDS$DEF AMDS$GROUP_NAME FINANCE ! Group FINANCE; OpenVMS Cluster alias |
The configuration files for DECamds and the Availability Manager are separate; only one set is used, depending on which startup command procedure you use to start the driver. See the Availability Manager Version 1.2 Installation Instructions for OpenVMS Alpha Systems for a further explanation of the configuration files set up for both DECamds and the Availability Manager. |
You need to edit the Registry to change the group of a Windows NT node. To edit the Registry, follow these steps:
The following sections explain how to change these security features:
OpenVMS Data Collector nodes can have more than one password: each password is part of a security triplet. (Windows NT nodes allow you to have only one password per node.) |
You can change the passwords that the Windows NT Data Analyzer uses for
OpenVMS Data Collector nodes and for Windows NT Data Collector nodes.
The following sections explain how to perform both actions.
6.3.1.1 Changing a Data Analyzer Password for an OpenVMS Data Collector Node
When you select Customize VMS on the Customize menu of the Application window, the Availability Manager displays a Security tab, as shown in Figure 6-3.
Figure 6-3 OpenVMS Security Customization Page

To change the default password for the Data Analyzer to use to access OpenVMS Data Collector nodes, enter a password of exactly 8 uppercase alphanumeric characters. The Availability Manager will use this password to access OpenVMS Data Collector nodes. This password must match the password that is part of the OpenVMS Data Collector security triplet (see Section 1.3).
When you are satisfied with your password, click OK at
the bottom of the screen. Exit the Availability Manager, and restart the
application for the password to take effect.
6.3.1.2 Changing a Data Analyzer Password for a Windows NT Data Collector Node
When you select Customize NT on the Customize menu of the Application window, the Availability Manager displays a Security tab, as shown in Figure 6-4.
Figure 6-4 Windows NT Security Customization Page
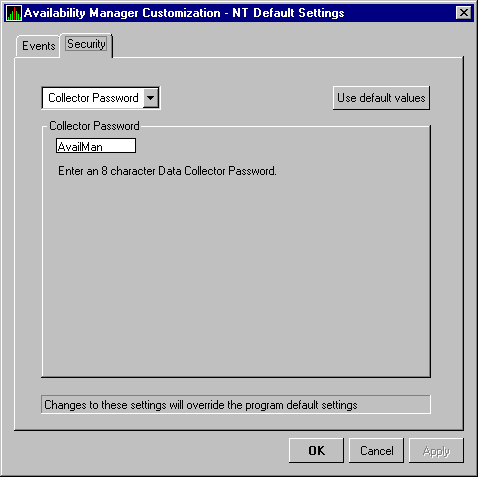
To change the default password for the Data Analyzer to use to access Windows NT Data Collector nodes, enter a mixed-case password of exactly 8 alphanumeric characters. Note that this password is case-sensitive; any time you type it, you must capitalize the same letters that you typed originally.
This password must also match the password for the Windows NT Data Collector node that you want to access. (See Section 6.3.3 for instructions for changing that password.)
When you are satisfied with your password, click OK at
the bottom of the screen. Exit the Availability Manager, and restart the
application for the password to take effect.
6.3.2 Changing Security Triplets on OpenVMS Data Collector Nodes
To change security triplets on OpenVMS Data Collector node, you must
edit the AMDS$DRIVER_ACCESS.DAT file, which is installed on all Data
Collector nodes. The following sections explain what a security triplet
is, how the Availability Manager uses it, and how to change it.
6.3.2.1 Understanding OpenVMS Security Triplets
A security triplet determines which nodes can access system data from an OpenVMS Data Collector node. The file AMDS$DRIVER_ACCESS.DAT on OpenVMS Data Collector nodes lists security triplets.
On OpenVMS Data Collector nodes, the AMDS$AM_CONFIG logical translates to the location of the default security file, AMDS$DRIVER_ACCESS.DAT. This file is installed on all OpenVMS Data Collector nodes.
A security triplet is a three-part record whose fields are separated by backslashes (\). A triplet consists of the following fields:
The exclamation point (!) is a comment delimiter; any characters to the right of the comment delimiter are ignored.
All Data Collector nodes in Group FINANCE have the following AMDS$DRIVER_ACCESS.DAT file:
*\FINGROUP\R   ! Let anyone with FINGROUP password read
               !
2.1\DEVGROUP\W ! Let only DECnet node 2.1 with
               ! DEVGROUP password perform fixes (writes)
|
The configuration files for DECamds and the Availability Manager are separate; only one set is used, depending on which startup command procedure you use to start the driver. See the Availability Manager Version 1.2 Installation Instructions for OpenVMS Alpha Systems for a further explanation of the configuration files set up for both DECamds and the Availability Manager. |
On each Data Collector node on which you want to change security, you must edit the AMDS$DRIVER_ACCESS.DAT file. The data in the AMDS$DRIVER_ACCESS.DAT file is set up as follows:
Network address\password\access
|
Use a backslash character (\) to separate the three fields.
To edit the AMDS$DRIVER_ACCESS.DAT file, follow these steps:
$ ANALYZE/SYSTEM SDA> SHOW LAN |
SDA> SHOW LAN/DEVICE=xxA0 |
OpenVMS Data Collector nodes accept more than one password. Therefore, you might have several security triplets in a AMDS$DRIVER_ACCESS.DAT file for one Data Collector node; for example:
*\1DECAMDS\R *\KOINECLS\R *\KOINEFIX\W |
Data Analyzer nodes with the passwords 1DECAMDS and KOINECLS would be able to see the Data Collector data, but only the Data Analyzer node with the KOINEFIX password would be able to write or change information on the Data Collector node, including performing fixes.
You can, if you like, set up your AMDS$DRIVER_ACCESS.DAT file to allow anyone in the world to read from your system but allow only a certain node or nodes to write or change information on your system.
After editing the AMDS$DRIVER_ACCESS.DAT file, you must stop and then restart the Data Collector. This action loads the new data into the driver. |
The Availability Manager follows these steps when using security triplets to ensure security among Data Analyzer and Data Collector nodes:
Table 6-1 describes how the Data Collector node interprets a security triplet match.
| Security Triplet | Interpretation |
|---|---|
| 08-00-2B-12-34-56\HOMETOWN\W | The Data Analyzer has write access to the node only when the Data Analyzer is run from a node with this hardware address (multiadapter or DECnet-Plus system) and with the password HOMETOWN. |
| 2.1\HOMETOWN\R | The Data Analyzer has read access to the node when run from a node with DECnet for OpenVMS Phase IV address 2.1 and the password HOMETOWN. |
| *\HOMETOWN\R | Any Data Analyzer with the password HOMETOWN has read access to the node. |
To edit the Registry with the new password, follow these steps:
You can customize a number of characteristics of events displayed in the Event pane.
When you select the Customize VMS or Customize NT option from the Application window Customize menu, the Availability Manager displays a tabbed page similar to the one shown in Figure 6-5.
Figure 6-5 Sample Event Customization Page

You can change the values for any data item that is available (does not appear dimmed) on this page. The following table describes these items.
The section of the page called "Event explanation and
investigation hints" includes a description of the event and a
hint about how to correct any problems that the event signals.
6.5 Customizing OpenVMS Data Filters
When you select the Customize VMS menu option and click the Filter tab, the Availability Manager displays a page that allows you to select the following filters:
The following sections describe these filter pages. Figure 6-6 shows a sample filter page.
Each filter page contains the following note: "Changes to these settings will override the program default settings." This means that settings that are changed on the Node level override settings made at the Application and Program (or GUI) level.
At any time, you can display the default values for the data items on the page. To do this, click "Use default values."
When you finish a filter page, click one of the following options at the bottom of the page:
| Option | Description |
|---|---|
| OK | To confirm any changes you have made and exit the page. |
| Cancel | To cancel any changes you have made and exit the page. |
| Apply | To confirm and apply any changes you have made and continue to display the page. |
The OpenVMS CPU Filters page allows you to display only those processes whose process states you select. When you select CPU Filters, the Availability Manager displays the OpenVMS CPU Filters page, as shown in Figure 6-6.
Figure 6-6 Sample OpenVMS CPU Filters Page
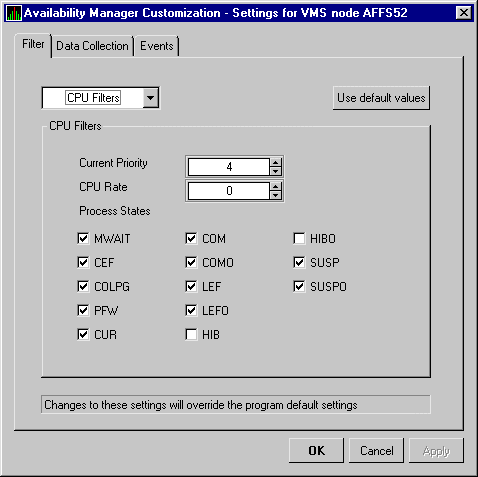
For a process to be displayed in the Event pane, it must have a Current Priority of 4 or more and be in one of the process states indicated except HIB, HIBO, or SUSPO.
To turn a process state on or off, click the box in front of it. A
check mark indicates the process state is on.
6.5.2 OpenVMS Memory Filters
The OpenVMS Memory Filters page allows you to change the values for the data items shown in the following table:
| Data Item | Description |
|---|---|
| Working Set Count | The number of physical pages or pagelets of memory that the process is using. |
| Working Set Size | The number of pages or pagelets of memory the process is allowed to use. The operating system periodically adjusts this value based on an analysis of page faults relative to CPU time used. An increase in this value in large units indicates a process is receiving a lot of page faults and its memory allocation is increasing. |
| Working Set Extent | The number of pages or pagelets of memory in the process's WSEXTENT quota as defined in the user authorization file (UAF). The number of pages or pagelets will not exceed the value of the system parameter WSMAX. |
| Page Fault Rate | The number of page faults per second for the process. |
| Page I/O Rate | The rate of read attempts necessary to satisfy page faults (also known as Page Read I/O or the Hard Fault Rate). |
When you click CPU Filters, the Availability Manager displays the OpenVMS Memory Filters page, as shown in Figure 6-7.
Figure 6-7 Sample OpenVMS Memory Filters Page
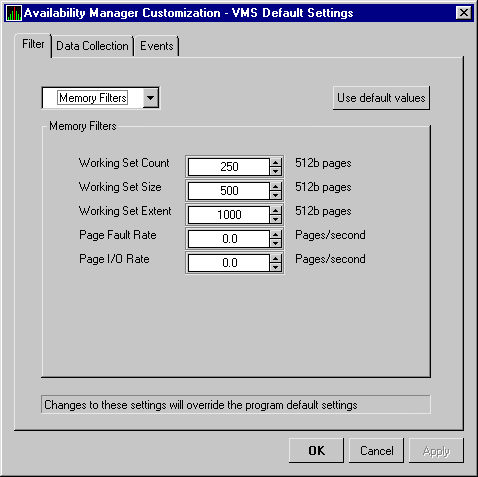
The OpenVMS I/O Filters page allows you to change the values for the data items shown in the following table:
| Data Item | Description |
|---|---|
| Direct I/O Rate | The rate at which I/O transfers occur between the system devices and the pages or pagelets that contain the process buffer that the system locks in physical memory. |
| Buffered I/O Rate | The rate at which I/O transfers occur between the process buffer and an intermediate buffer from the system buffer pool. |
| Paging I/O Rate | The rate of read attempts necessary to satisfy page faults (also known as Page Read I/O or the Hard Fault Rate). |
| Open File Count | The number of open files. |
| BIO limit Remaining | The number of remaining buffered I/O operations available before the process reaches its quota. BIOLM quota is the maximum number of buffered I/O operations a process can have outstanding at one time. |
| DIO limit Remaining | The number of remaining direct I/O limit operations available before the process reaches its quota. DIOLM quota is the maximum number of direct I/O operations a process can have outstanding at one time. |
| BYTLM Remaining | The number of buffered I/O bytes available before the process reaches its quota. BYTLM is the maximum number of bytes of nonpaged system dynamic memory that a process can claim at one time. |
| Open File limit | The number of additional files the process can open before reaching its quota. FILLM quota is the maximum number of files that can be opened simultaneously by the process, including active network logical links. |
When you click IO, the Availability Manager displays the OpenVMS I/O Filters page, as shown in Figure 6-8.
Figure 6-8 Sample OpenVMS I/O Filters Page
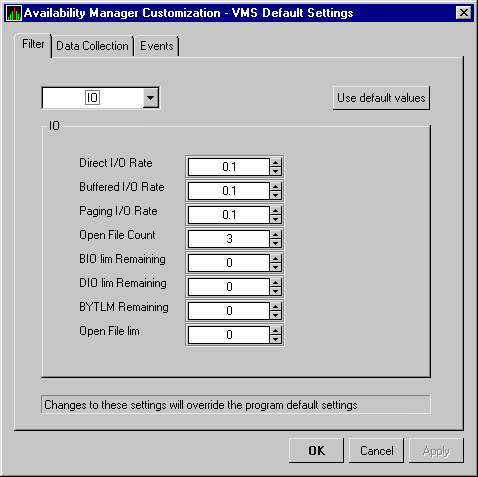
The OpenVMS Disk Status page allows you to change the values for the data items shown in the following table:
| Data Item | Description |
|---|---|
| Error Count | The number of errors generated by the disk (a quick indicator of device problems). |
| Transaction | The number of currently-in-progress file system operations for the disk. |
| Mount Count | The number of nodes that have the specified disk mounted. |
| RWAIT Count | An indicator that a system I/O operation is stalled, usually during normal connection failure recovery or volume processing of host-based shadowing. |
You can also change the following disk states to be on (checked) or off (unchecked):
| Disk State | Description |
|---|---|
| Invalid | Disk is in an invalid state (Mount Verify Timeout is likely). |
| Shadow Member | Disk is a member of a shadow set. |
| Unavailable | Disk is set /UNAVAILABLE. |
| Wrong Vol(ume) | Disk has been mounted with the wrong volume name. |
| Mounted | Disk is logically mounted by a MOUNT command or service call. |
| Mount Verify | Disk is waiting for a mount verification. |
| Offline | Disk is no longer physically mounted in device drive. |
| Online | Disk is physically mounted in device drive. |
When you click Disk Status, the Availability Manager displays the OpenVMS Disk Status Filter page, as shown in Figure 6-9.
Figure 6-9 Sample OpenVMS Disk Status Filter Page
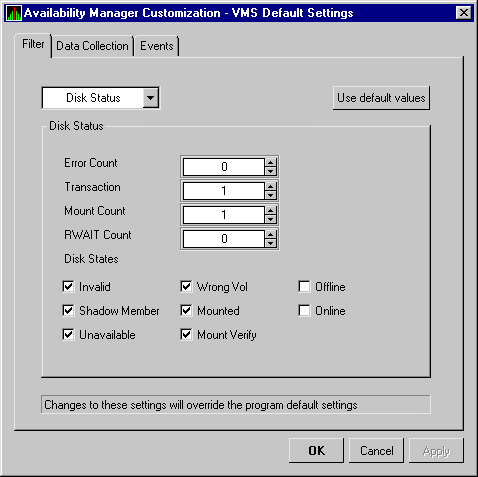
The OpenVMS Disk Volume Filter page allows you to change the values for the data items shown in the following table:
| Data Item | Description |
|---|---|
| Used Blocks | The number of volume blocks in use. |
| Disk % Used | The percentage of the number of volume blocks in use in relation to the total volume blocks available. |
| Free Blocks | The number of blocks of volume space available for new data. |
| Queue Length | Current length of all queues. |
| Operations Rate | The rate at which the operations count to the volume has changed since the last sampling. The rate measures the amount of activity on a volume. The optimal load is device-specific. |
When you click Disk Volume, the Availability Manager displays the OpenVMS Disk Volume Filter page, as shown in Figure 6-10.
Figure 6-10 Sample OpenVMS Disk Volume Filter Page
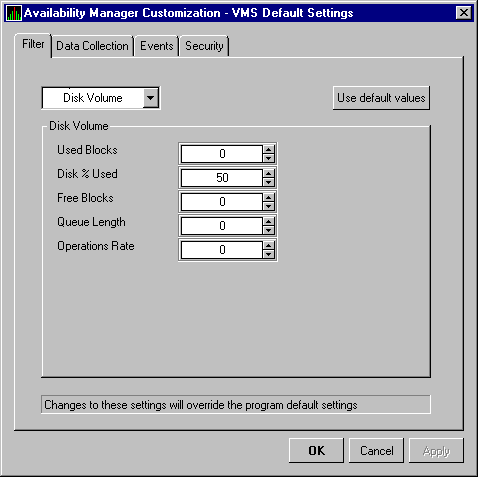
The OpenVMS Page/Swap File Filters page allows you to change the values for the data items shown in the following table:
| Data Item | Description |
|---|---|
| Used Blocks | The number of used blocks within the file. |
| Page File % Used | The percentage of the blocks from the Page File that have been used. |
| Swap File % Used | The percentage of the blocks from the Swap File that have been used. |
| Total Blocks | The total number of blocks in paging and swapping files. |
| Reservable Blocks | Number of reservable blocks in each paging and swapping file currently installed. Reservable blocks can be logically claimed by a process for a future physical allocation. A negative value indicates that the file might be overcommitted. Note that a negative value is not an immediate concern but indicates that the file might become overcommitted if physical memory becomes scarce. |
You can also change the following options to be on (checked) or off (unchecked):
When you click Page/Swap File, the Availability Manager displays the OpenVMS Page/Swap File Filters page, as shown in Figure 6-11.
Figure 6-11 Sample OpenVMS Page/Swap File Filters Page
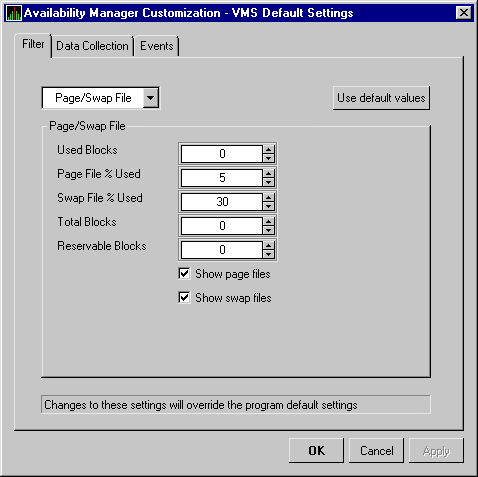
The OpenVMS Lock Contention Filters page allows you to edit the list of lock filters that is displayed. Filters on this list will be filtered out of the lock contention displayed in Figure 3-16.
When you click Lock Contention, the Availability Manager displays the OpenVMS Lock Contention Filters page, as shown in Figure 6-12.
Figure 6-12 Sample OpenVMS Lock Contention Filters Page
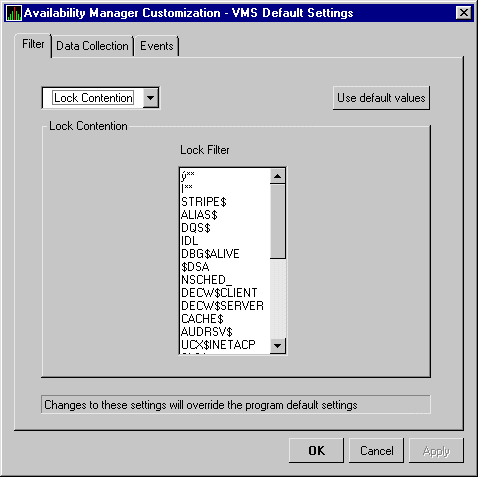
When you select the Customize VMS menu option in the Application window and click Data Collection tab, the Availability Manager displays the first of several pages that let you select the type of data you want to collect, change default Availability Manager values (such as collection intervals), and so on.
Figure 6-13 shows a sample OpenVMS Data Collection page.
Figure 6-13 Sample OpenVMS Data Collection Page
Because you must turn on the collection of specific data items before the Availability Manager can display any data, please refer to Chapter 2 for basic information about this option.
Table 6-2 describes the data collection pages and indicates whether or not collection of each type of data is the default.
| Type of Data Collection | Default | Function |
|---|---|---|
| Cluster summary data | No | Data collection for the Cluster Summary page |
| CPU mode data | No | Data collection for the CPU Modes Summary page |
| CPU summary data | No | Data collection for the CPU Process States page |
| Disk status data | No | Data collection for the Disk Status Summary page |
| Disk volume data | No | Data collection for the Disk Volume Summary page |
| I/O data | No | Data collection for the I/O Summary page |
| Lock contention data | No | Data collection for the Lock Contention page |
| Memory data | No | Data collection for the Memory Summary page |
| Node summary data | Yes | Data collection for the Node pane, Node Summary page, and the top pane of the CPU, Memory, and I/O pages |
| Page/Swap file data | No | Data collection for the I/O Page Faults page. |
| Single disk data | 1 | Data collection for the Single Disk Summary page |
| Single process data | 2 | Data collection for the Process Information page |
You can change the default data collection by checking the Collect data checkbox on the Data Collection page (Figure 6-13). A check mark indicates that this type of data collection is currently being collected.
A brief explanation of each page is displayed below the Collect data checkbox. If you click Collect data for a type of data, the Availability Manager displays default values for the following types of collection intervals:
| Interval | Description |
|---|---|
| Display (in seconds) | How often the data display is refreshed. |
| Event (in seconds) | If events occur related to the screen, how often data is collected. |
| NoEvent (in seconds) | If no events occur related to the screen, how often data is collected. |
You can increase or decrease a collection interval by clicking the up or down arrow on the page (see Figure 6-13). Table 6-3 shows default values (in seconds) for intervals for each data collection page.
| Collection Data | Display Interval | Event Interval | NoEvent Interval |
|---|---|---|---|
| Cluster summary | 10.0 | 20.0 | 60.0 |
| CPU mode | 5.0 | 5.0 | 5.0 |
| CPU summary | 5.0 | 10.0 | 30.0 |
| Disk status | 15.0 | 15.0 | 60.0 |
| Disk volume | 15.0 | 15.0 | 60.0 |
| I/O | 10.0 | 10.0 | 30.0 |
| Lock contention | 10.0 | 20.0 | 60.0 |
| Memory | 5.0 | 10.0 | 30.0 |
| Node summary | 5.0 | 5.0 | 5.0 |
| Page/Swap file | 30.0 | 30.0 | 2400.0 |
| Single disk | 5.0 | 5.0(future) | 60.0(future) |
| Single process | 5.0 | 5.0 | 60.0 |
When you finish, select one of the following options at the bottom of the page:
| Option | Description |
|---|---|
| OK | To confirm any changes you have made and exit the page. |
| Cancel | To cancel any changes you have made and exit the page. |
| Apply | To confirm and apply any changes you have made and not exit the page. |
The CPU process states shown in the following table are displayed in the OpenVMS CPU Process States page (see Figure 3-6) and in the OpenVMS Process Information page (see Figure 3-28).
| Process State | Description |
|---|---|
| CEF | Common Event Flag, waiting for a common event flag |
| COLPG | Collided Page Wait, involuntary wait state; likely to indicate a memory shortage, waiting for hard page faults |
| COM | Computable; ready to execute |
| COMO | Computable Outswapped, COM, but swapped out |
| CUR | Current, currently executing in a CPU |
| FPW | Free Page Wait, involuntary wait state; most likely indicates a memory shortage |
| LEF | Local Event Flag, waiting for a Local Event Flag |
| LEFO | Local Event Flag Outswapped; LEF, but outswapped |
| HIB | Hibernate, voluntary wait state requested by the process; it is inactive |
| HIBO | Hibernate Outswapped, hibernating but swapped out |
| MWAIT | Miscellaneous Resource Wait, involuntary wait state, possibly caused by a shortage of a systemwide resource such as no page or swap file capacity or synchronizations for single threaded code |
| PFW | Page Fault Wait, involuntary wait state; possibly indicates a memory shortage, waiting for hard page faults |
| RWAST | Resource Wait State, waiting for delivery of an asynchronous system trap (AST) that signals a resource availability; usually an I/O is outstanding or a process quota is exhausted |
| RWBRK | Resource Wait for BROADCAST to finish |
| RWCAP | Resource Wait for CPU Capability |
| RWCLU | Resource Wait for Cluster Transition |
| RWCSV | Resource Wait for Cluster Server Process |
| RWIMG | Resource Wait for Image Activation Lock |
| RWLCK | Resource Wait for Lock ID data base |
| RWMBX | Resource Wait on MailBox, either waiting for data in mailbox (to read) or waiting to place data (write) into a full mailbox (some other process has not read from it; mailbox is full so this process cannot write). |
| RWMPB | Resource Wait for Modified Page writer Busy |
| RWMPE | Resource Wait for Modified Page list Empty |
| RWNPG | Resource Wait for Non Paged Pool |
| RWPAG | Resource Wait for Paged Pool |
| RWPFF | Resource Wait for Page File Full |
| RWQUO | Resource Wait for Pooled Quota |
| RWSCS | Resource Wait for System Communications Services |
| RWSWP | Resource Wait for Swap File space |
| SUSP | Suspended, wait state process placed into suspension; it can be resumed at the request of an external process |
| SUSPO | Suspended Outswapped, suspended but swapped out |
This appendix contains the following tables:
Each table provides the following information:
| Event | Description | Explanation | Recommended Action |
|---|---|---|---|
| CFGDON | Configuration done | The server application has made a connection to the node and will start collecting the data according to the Customize Data Collection options. | An informational event to indicate that the node is recognized. No further investigation is required. |
| DPGERR | Error executing driver program | The Data Collector has detected a program error while executing the data collection program. | This event can occur if you have a bad driver program library, or there is a bug in the driver program. Make sure you have the program library that shipped with the kit; if it is correct, contact your customer support representative with the full text of the event. |
| DSKERR | High disk error count | The error count for the disk device exceeds the threshold. | Check error log entries for device errors. A disk device with a high error count could indicate a problem with the disk or with the connection between the disk and the system. |
| DSKINV | Disk is invalid | The valid bit in the disk device status field is not set. The disk device is not considered valid by the operating system. | Make sure that the disk device is valid and is known to the operating system. |
| DSKMNV | Disk in mount verify state | The disk device is performing a mount verification. | The system is performing a mount verification of the disk device because another cluster member dismounted the disk device. |
| DSKOFF | Disk device is off line | The disk device has been placed in the off line state. | Check whether the disk device should be off line. This event is also signalled when the same device name is used for two different physical disks. The volume name in the event is the second node to use the same device name. |
| DSKQLN | High disk queue length | The average number of pending I/Os to the disk device exceeds the threshold. | More I/O requests are being queued to the disk device than the device can service. Reasons include a slow disk or too much work being done on the disk. |
| DSKRWT | High disk RWAIT count | The RWAIT count on the disk device exceeds the threshold. | RWAIT is an indicator that an I/O operation has stalled, usually during normal connection failure recovery or volume processing of host-based shadowing. A node has probably failed and shadowing is recovering data. |
| DSKUNA | Disk device is unavailable | The disk device has been placed in the Unavailable state. | The disk device state has been set to /NOAVAILABLE. See DCL help for the SET DEVICE/AVAILABLE command. |
| DSKWRV | Wrong volume mounted | The disk device has been mounted with the wrong volume label. | Set the correct volume name by entering the DCL command SET VOLUME/LABEL on the node. |
| ELIBCR | Bad CRC for exportable program library | The CRC calculation for the exportable program library does not match the CRC value in the library. | The exportable program library may be corrupt. Restore the exportable program library from its original source. |
| ELIBNP | No privilege to access exportable program library | Unable to access the exportable program library. | Check to make sure that the Availability Manager has the proper security access to the exportable program library file. |
| ELIBUR | Unable to read exportable program library | Unable to read the exportable program library for the combination of hardware architecture and OpenVMS version. | The exportable program library may be corrupt. Restore the exportable program library from its original source. |
| FXCPKT | Received a corrupt fix response packet from node | The Availability Manager tried to perform a fix, but the fix acknowledgment from the node was corrupt. | This event could occur if there is network congestion or some problem with the node. Confirm the connection to the node, and reapply the fix if necessary. |
| FXCRSH | Crash node fix | The Availability Manager has successfully performed a Crash Node fix on the node. | An informational message to indicate a successful fix. Expect to see a Path Lost event for the node. |
| FXDCPR | Decrement process priority fix | The Availability Manager has successfully performed a Decrement Process Priority fix on the process. | An informational message to indicate a successful fix. Setting a process priority too low takes CPU time away from the process. |
| FXDCWS | Decrement process working set size fix | The Availability Manager has successfully decreased the working set size of the process on the node by performing an Adjust Working Set fix. | An informational message to indicate a successful fix. This fix disables the automatic working set adjustment for the process. |
| FXDLPR | Delete process fix | The Availability Manager has successfully performed a Delete Process fix on the process. | An informational message to indicate a successful fix. If the process is in RWAST state, this fix does not work. This fix also does not work on processes created with the no delete option. |
| FXEXIT | Exit image fix | The Availability Manager has successfully performed an Exit Image fix on the process. | An informational message to indicate a successful fix. Forcing a system process to exit its current image can corrupt the kernel. |
| FXINPR | Increment process priority fix | The Availability Manager has successfully performed an Increment Process Priority fix on the process. | An informational message to indicate a successful fix. Setting a process priority too high takes CPU time away from other processes. Set the priority above 15 only for "real-time" processing. |
| FXINQU | Increment process quota limits fix | The Availability Manager has successfully increased the quota limit of the process on the node by placing a new limit value in the limit field of the quota. | An informational message to indicate a successful fix. This fix is only for the life of the process. If the problem continues, change the limit for the account in the UAF file. |
| FXINWS | Increment process working set size fix | The Availability Manager has successfully increased the working set size of the process on the node by performing an Adjust Working Set fix. | An informational message to indicate a successful fix. This fix disables the automatic working set adjustment for the process. The adjusted working set value cannot exceed WSQUOTA for the process or WSMAX for the system. |
| FXPGWS | Purge working set fix | The Availability Manager has successfully performed a Purge Working Set fix on the process. | An informational message to indicate a successful fix. The purged process might page fault to retrieve memory it needs for current processing. |
| FXPRIV | No privilege to attempt fix | The Availability Manager cannot perform a fix on the node due either to no CMKRNL privilege or to unmatched security triplets. | See Chapter 6 for details about setting up security. |
| FXQUOR | Adjust quorum fix | The Availability Manager has successfully performed an Adjust Quorum fix on the node. | An informational message to indicate a successful fix. Use this fix when you find many processes in RWCAP state on a cluster node. |
| FXRESM | Resume process fix | The Availability Manager has successfully performed a Resume Process fix on the process. | An informational message to indicate a successful fix. If the process goes back into suspend state, check the AUDIT_SERVER process for problems. |
| FXSUSP | Suspend process fix | The Availability Manager has successfully performed a Suspend Process fix on the process. | An informational message to indicate a successful fix. Do not suspend system processes. |
| FXTIMO | Fix timeout | The Availability Manager tried to perform a fix, but no acknowledgment for the fix was received from the node within the timeout period. | This event can occur if there is network congestion, if some problem is causing the node not to respond, or if the fix request failed to reach the node. Confirm the connection to the node, and reapply the fix if necessary. |
| FXUERR | Unknown error code for fix | The Availability Manager tried to perform a fix, but no acknowledgment for the fix was received from the node within the timeout period. | This event can occur if there is network congestion, if some problem is causing the node to not respond, or if the fix request failed to reach the node. Confirm the connection to the node, and reapply the fix if necessary. |
| HIBIOR | High buffered I/O rate | The node's average buffered I/O rate exceeds the threshold. | A high buffered I/O rate can cause high system overhead. If this is affecting overall system performance, use the I/O Summary to determine the high buffered I/O processes, and adjust their priorities or suspend them as needed. |
| HICOMQ | Many processes waiting in COM or COMO | The average number of processes on the node in the COM or COMO queues exceeds the threshold. | Use the CPU Mode Summary to determine which processes are competing for CPU resources. Possible adjustments include changing process priorities and suspending processes. |
| HIDIOR | High direct I/O rate | The average direct I/O rate on the node exceeds the threshold. | A high direct I/O rate can cause high system overhead. If this is affecting overall system performance, use the I/O Summary to determine the high direct I/O processes, and adjust their priorities or suspend them as needed. |
| HIHRDP | High hard page fault rate | The average hard page fault rate on the node exceeds the threshold. | A high hard page fault indicates that the free or modified page list is too small. Check Chapter 6 for possible actions. |
| HIMWTQ | Many processes waiting in MWAIT | The average number of processes on the node in the Miscellaneous WAIT (MWAIT) queues exceeds the threshold. | Use the CPU and Single Process pages to determine which resource is awaited. See Chapter 6 for more information about wait states. |
| HINTER | High interrupt mode time | The average percentage of time the node spends in interrupt mode exceeds the threshold. | Consistently high interrupt time prohibits processes from obtaining CPU time. Determine which device or devices are overusing this mode. |
| HIPWIO | High paging write I/O rate | The average paging write I/O rate on the node exceeds the threshold. | Use the Process I/O and Memory Summary pages to determine which processes are writing to the page file excessively, and decide whether their working sets need adjustment. |
| HIPWTQ | Many processes waiting in COLPG, PFW, or FPG | The average number of processes on the node that are waiting for page file space exceeds the threshold. | Use the CPU Process States and Memory Summary to determine which processes are in the COLPG, PFW, or FPG state. COLPG and PFW processes might be constrained by too little physical memory, too restrictive working set quotas, or lack of available page file space. FPG processes indicate too little physical memory is available. |
| HISYSP | High system page fault rate | The node's average page fault rate for pageable system areas exceeds the threshold. | These are page faults from pageable sections in loadable executive images, page pool, and the global page table. The system parameter SYSMWCNT might be set too low. Use AUTOGEN to adjust this parameter. |
| HITTLP | High total page fault rate | The average total page fault rate on the node exceeds the threshold. | Use the Memory Summary to find the page faulting processes, and make sure that their working sets are set properly. |
| HMPSYN | High multiprocessor (MP) synchronization mode time | The average percentage of time the node handles multiprocessor (MP) synchronization exceeds the threshold. | High synchronization time prevents other devices and processes from obtaining CPU time. Determine which device is overusing this mode. |
| LCKBLK | Lock blocking | The process holds the highest priority lock in the resource's granted lock queue. This lock is blocking all other locks from gaining access to the resource. | Use the Single Process Windows to determine what the process is doing. If the process is in an RW xxx state, try exiting the image or deleting the process. If this fails, crashing the blocking node might be the only other fix option. |
| LCKCNT | Lock contention | The resource has a contention situation, with multiple locks competing for the same resource. The competing locks are the currently granted lock and those that are waiting in the conversion queue or in the waiting queue. | Use Lock Contention to investigate a potential lock contention situation. Locks for the same resource might have the NODLCKWT wait flag enabled and be on every member of the cluster. Usually this is not a lock contention situation, and these locks can be filtered out. |
| LCKWAT | Lock waiting | The process that has access to the resource is blocking the process that is waiting for it. Once the blocking process releases its access, the next highest lock request acquires the blocking lock. | If the blocking process holds the resource too long, check to see whether the process is working correctly; if not, one of the fixes might solve the problem. |
| LOASTQ | Process has used most of ASTLM quota | Either the remaining number of asynchronous system traps (ASTs) the process can request is below the threshold, or the percentage of ASTs used compared to the allowed quota is above the threshold. | If the amount used reaches the quota, the process enters RWAST state. If the process requires a higher quota, you can increase the ASTLM quota for the process in the UAF file. ASTLM is only a count; system resources are not compromised by increasing this count. |
| LOBIOQ | Process has used most of BIOLM quota | Either the remaining number of Buffered I/Os (BIO) the process can request is below the threshold, or the percentage of BIOs used is above the threshold. | If the amount used reaches the quota, the process enters RWAST state. If the process requires a higher quota, you can increasing the BIOLM quota for the process in the UAF file. BIOLM is only a count; system resources are not compromised by increasing this count. |
| LOBYTQ | Process has used most of BYTLM quota | Either the remaining number of bytes for the buffered I/O byte count (BYTCNT) that the process can request is below the threshold, or the percentage of bytes used is above the threshold. | If the amount used reaches the quota, the process enters RWAST state. If the process requires a higher quota, you can raise the BYTLM quota for the process in the UAF file. BYTLM is the number of bytes in nonpaged pool used for buffered I/O. |
| LODIOQ | Process has used most of DIOLM quota | Either the remaining number of Direct I/Os (DIOs) the process can request is below the threshold, or the percentage of DIOs used is above the threshold. | If the amount used reaches the quota, the process enters RWAST state. If the process requires a higher quota, you can increase the DIOLM quota for the process in the UAF file. DIOLM is only a count; system resources are not compromised by increasing this count. |
| LOENQU | Process has used most of ENQLM quota | Either the remaining number of lock enqueues (ENQ) the process can request is below the threshold, or the percentage of ENQs used is above the threshold. | If the limit reaches the quota, the process is not able to make further lock queue requests. If the process requires a higher quota, you can increase the ENQLM quota for the process in the UAF file. |
| LOFILQ | Process has used most of FILLM quota | Either the remaining number of files the process can open is below the threshold, or the percentage of files open is above the threshold. | If the amount used reaches the quota, the process must first close some files before being allowed to open new ones. If the process requires a higher quota, you can increase the FILLM quota for the process in the UAF file. |
| LOMEMY | Free memory is low | For the node, the percentage of free memory compared to total memory is below the threshold. | Use the automatic Purge Working Set fix, or use the Memory and CPU Summary to select processes that that are either not currently executing or not page faulting, and purge their working sets. |
| LOPGFQ | Process has used most of PGFLQUOTA quota | Either the remaining number of pages the process can allocate from the system page file is below the threshold, or the percentage of pages allocated is above the threshold. | If the process requires a higher quota, you can raise the PGFLQUOTA quota for the process in the UAF file. This value limits the number of pages in the system page file that the account's processes can use. |
| LOPGSP | Low page file space | Either the remaining number of pages in the system page file is below the threshold, or the percentage of page file space remaining is below the threshold. | Either extend the size of this page file or create a new page file to allow new processes to use the new page file. |
| LOPRCQ | Process has used most of PRCLM quota | Either the remaining number of subprocesses the current process is allowed to create is below the threshold, or the percentage of created subprocesses is above the threshold. | If the amount used reaches the quota, the process is not allowed to create more subprocesses. If the process requires a higher quota, you can increase the PRCLM quota for the process in the UAF file. |
| LOSTVC | Lost virtual circuit to node | The virtual circuit between the listed nodes has been lost. | Check to see whether the second node listed has failed or whether the connection between the nodes is broken. The VC name listed in parentheses is the communication link between the nodes. |
| LOSWSP | Low swap file space | Either the remaining number of pages in the system page file is below the threshold, or the percentage of page file space remaining is below the threshold. | Either increase the size of this page file, or create a new page file to allow new processes to use the new page file. |
| LOTQEQ | Process has used most of TQELM quota | Either the remaining number of Time Queue Entries (TQEs) the process can request is below the threshold, or the percentage of TQEs used to the allowed quota is above the threshold. | If the amount used reaches the quota, the process enters RWAST state. If the process requires a higher quota, you can raise the TQELM quota for the process in the UAF file. TQELM is only a count; system resources are not compromised by raising it. |
| LOVLSP | Low disk volume free space | Either the remaining number of blocks on the volume is below the threshold, or the percentage of free blocks remaining on the volume is below the threshold. | You must free up some disk volume space. If part of the purpose of the volume is to be filled, such as a page/swap device, then you can filter the volume from the display. |
| LOVOTE | Low cluster votes | The difference between the number of VOTES and the QUORUM in the cluster is below the threshold. | Check to see whether voting members have failed. To avoid the hang that results if VOTES goes below QUORUM, use the Adjust Quorum fix. |
| LOWEXT | Low process working set extent | The process page fault rate exceeds the threshold, and the percentage of working set size compared to working set extent exceeds the threshold. | This event indicates that the WSEXTENT value in the UAF file might be too low. The process needs more physical memory but cannot obtain it; therefore, the process page faults excessively. |
| LOWSQU | Low process working set quota | The process page fault rate exceeds the threshold, and the percentage of working set size exceeds the threshold. |
This event indicates the process needs more memory but might not be
able to obtain it because one of the following is true:
|
| LRGHSH | Remote lock hash table too large to collect data on | The Availability Manager cannot investigate the node's resource hash table (RESHASHTBL). It is either too sparse or too dense to investigate efficiently. | This event indicates that the Availability Manager will take too many collection iterations to analyze lock contention situations efficiently. Make sure that the SYSGEN parameter RESHASHTBL is set properly for the node. |
| NOEVNT | No event entry for this event | This event has no associated event entry. | This event can be used for debugging or prototyping. |
| NOPGFL | No page file | The Availability Manager cannot find a page file on the node. | Use SYSGEN to create and connect a page file on the node. |
| NOPLIB | No program library | The program library for the combination of hardware architecture and OpenVMS version was not found. | Check to see that all the program library files exist in the program library directory. |
| NOPRIV | Not allowed to monitor node | The Availability Manager cannot monitor the node due to unmatched security triplets. | See Chapter 6 for details on setting up security. |
| NOPROC | Specific process not found | The Availability Manager cannot find the process name selected in the Process Name Search dialog box on the Node Summary page. | This event can occur because the listed process no longer exists, or the process name is listed incorrectly in the dialog box. |
| NOSWFL | No swap file | The Availability Manager cannot find a swap file on the node. | If you do not use swap files, you can ignore this event. Otherwise, use SYSGEN to create and connect a swap file for the node. |
| PLIBNP | No privilege to access program library | Unable to access the program library. | Check to see that the Availability Manager has the proper security access to the program library file. |
| PLIBUR | Unable to read program library | Unable to read the program library for the combination of hardware architecture and OpenVMS version. | The program library is either corrupt or from a different version of the Availability Manager. Restore the program library from the last installation. |
| PRBIOR | High process buffered I/O rate | The average buffered I/O rate of the process exceeds the threshold. | If the buffered I/O rate is affecting overall system performance, lowering the process priority or suspending the process would allow other processes to obtain access to the CPU. |
| PRBIOW | Process waiting for buffered I/O | The average percentage of time the process is waiting for a buffered I/O to complete exceeds the threshold. | Use SDA on the node to ensure that the device to which the process is performing buffered I/Os is still available and is not being overused. |
| PRCCOM | Process waiting in COM or COMO | The average number of processes on the node in the COM or COMO queues exceeds the threshold. | Use the CPU Summary to determine which processes should be given more CPU time, and adjust process priorities and states accordingly. |
| PRCCUR | Process has a high CPU rate | The average percentage of time the process is currently executing in the CPU exceeds the threshold. | Make sure that the listed process is not looping or preventing other processes from gaining access to the CPU. Adjust process priority or state as needed. |
| PRCMUT | Process waiting for a mutex | The average percentage of time the process is waiting for a particular system mutex exceeds the threshold. | Use SDA to help determine which mutex the process is waiting for and to help determine the owner of the mutex. |
| PRCMWT | Process waiting in MWAIT | The average percentage of time the process is in a Miscellaneous WAIT (MWAIT) state exceeds the threshold. | Check the Single Process pages to determine which resource the process is waiting for and if the resource is still available for the process. |
| PRCPUL | Most of CPULIM process quota used | The remaining CPU time available for the process is below the threshold. | Make sure the CPU time allowed for the process is sufficient for its processing needs. If not, increase the CPU quota in the UAF file of the node. |
| PRCPWT | Process waiting in COLPG, PFW or FPG | The average percentage of time the process is waiting to access the system page file database exceeds the threshold. | Check to make sure the system page file is large enough for all the resource requests being made. |
| PRCQUO | Process waiting for a quota | The average percentage of time the process is waiting for a particular quota exceeds the threshold. | Use the Single Process pages to determine which quota is too low. Then adjust the quotas of the account in the UAF file. |
| PRCRWA | Process waiting in RWAST | The average percentage of time the process is waiting in the RWAST state exceeds the threshold. RWAST indicates the process is waiting for an asynchronous system trap to complete. | Use the Single Process pages to determine if RWAST is due to the process quota being set too low. If not, use SDA to determine if RWAST is due to a problem between the process and a physical device. |
| PRCRWC | Process waiting in RWCAP | The average percentage of time the process is waiting in the RWCAP state exceeds the threshold. RWCAP indicates that the process is waiting for CPU capability. | When many processes are in this state, the system might be hung because not enough nodes are running in the cluster to maintain the cluster quorum. Use the Adjust Quorum fix to correct the problem. |
| PRCRWM | Process waiting in RWMBX | The average percentage of time the process is waiting in the RWMBX state exceeds the threshold. RWMBX indicates the process is waiting for a full mailbox to be empty. | Use SDA to help determine which mailbox the process is waiting for. |
| PRCRWP | Process waiting in RWPAG, RWNPG, RWMPE, or RWMPB | The average percentage of time the process is waiting in the RWPAG, RWNPG, RWMPE, or RWMPB state exceeds the threshold. RWPAG and RWNPG are for paged or nonpaged pool; RWMPE and RWMPB are for the modified page list. | Processes in the RWPAG or RWNPG state can indicate you need to increase the size of paged or nonpaged pool, respectively. Processes in the RWMPB state indicate that the modified page writer cannot handle all the modified pages being generated. Refer to Chapter 6 for suggestions. |
| PRCRWS | Process waiting in RWSCS, RWCLU, or RWCSV | The average percentage of time the process is waiting in the RWSCS, RWCLU, or RWCSV state exceeds the threshold. RWCSV is for the cluster server; RWCLU is for the cluster transition; RWSCS is for cluster communications. The process is waiting for a cluster event to complete. | Use the Show Cluster utility to help investigate. |
| PRCUNK | Process waiting for a system resource | The average percentage of time the process is waiting for an undetermined system resource exceeds the threshold. | The state in which the process is waiting is unknown to the Availability Manager. |
| PRDIOR | High process direct I/O rate | The average direct I/O rate of the process exceeds the threshold. | If the I/O rate is affecting overall system performance, lowering the process priority might allow other processes to obtain access to the CPU. |
| PRDIOW | Process waiting for direct I/O | The average percentage of time the process is waiting for a direct I/O to complete exceeds the threshold. | Use SDA on the node to ensure that the device to which the process is performing direct I/Os is still available and is not being overused. |
| PRLCKW | Process waiting for a lock | The average percentage of time the process is waiting in the control wait state exceeds the threshold. | The control wait state indicates that a process is waiting for a lock. Although no locks might appear in Lock Contention, the awaited lock might be filtered out of the display. |
| PRPGFL | High process page fault rate | The average page fault rate of the process exceeds the threshold. | The process is memory constrained; it needs an increased number of pages to perform well. Make sure that the working set quotas and extents are set correctly. To increase the working set quota temporarily, use the Adjust Working Set fix. |
| PRPIOR | High process paging I/O rate | The average page read I/O rate of the process exceeds the threshold. | The process needs an increased number of pages to perform well. Make sure that the working set quotas and extents are set correctly. To increase the working set quota temporarily, use the Adjust Working Set fix. |
| PTHLST | Path lost | The connection between the server and collection node has been lost. | Check to see whether the node failed or whether the LAN segment to the node is having problems. This event occurs when the server no longer receives data from the node on which data is being collected. |
| RESDNS | Resource hash table dense | The percentage of occupied entries in the hash table exceeds the threshold. | A densely populated table can result in a performance degradation. Use the system parameter RESHASHTBL to adjust the total number of entries. |
| RESPRS | Resource hash table sparse | The percentage of occupied entries in the hash table is less than the threshold. | A sparsely populated table wastes memory resources. Use the system parameter RESHASHTBL to adjust the total number of entries. |
| UEXPLB | Using OpenVMS program export library | The program library for the combination of hardware architecture and OpenVMS version was not found. | Check to see that all the program library files exist in the program library directory. |
| UNSUPP | Unsupported node | The Availability Manager does not support this combination of hardware architecture and OpenVMS version. | Check the product SPD for supported system configurations. |
| Event | Description | Explanation | Recommended Action |
|---|---|---|---|
| CFGDON | Configuration done | The server application has made a connection to the node and will start collecting the data according to the Customize Data Collection options. | An informational event to indicate that the node is recognized. No further investigation is required. |
| NODATA | Unable to collect performance data | The Availability Manager is unable to collect performance data from the node. | The performance data is collected by the PerfServ service on the remote node. Check to see that the service is up and running properly. |
| NOPRIV | Not allowed to monitor node | The Availability Manager cannot monitor the node due to a password mismatch between the Data Collector and the Data Analyzer. | See Chapter 6 for details on setting up security. |
| PTHLST | Path lost | The connection between the Data Analyzer and the Data Collector has been lost. | Check if the node crashed or if the LAN segment to the node is having problems. This event occurs when the server no longer receives data from the node on which data is being collected. |
| PVRMIS | Packet version mismatch | This version of the Availability Manager is unable to collect performance data from the node because of a data packet version mismatch. | The version of the Availability Manager Data Collector is more recent than the Data Analyzer. To process data from the node, upgrade the Data Analyzer to correspond to the Data Collector. |
| Index | Contents |
|
|
| privacy and legal statement | ||
| 6552PROFILE.HTML | ||