![[Compaq]](../../images/compaq.gif)
![[Go to the documentation home page]](../../images/buttons/bn_site_home.gif)
![[How to order documentation]](../../images/buttons/bn_order_docs.gif)
![[Help on this site]](../../images/buttons/bn_site_help.gif)
![[How to contact us]](../../images/buttons/bn_comments.gif)
![[OpenVMS documentation]](../../images/ovmsdoc_sec_head.gif)
| Document revision date: 28 June 1999 | |
![[Compaq]](../../images/compaq.gif) |
![[Go to the documentation home page]](../../images/buttons/bn_site_home.gif)
![[How to order documentation]](../../images/buttons/bn_order_docs.gif)
![[Help on this site]](../../images/buttons/bn_site_help.gif)
![[How to contact us]](../../images/buttons/bn_comments.gif)
|
![[OpenVMS documentation]](../../images/ovmsdoc_sec_head.gif)
|
|
This book describes the Netscape administration server and covers basic concepts common to all Netscape SuiteSpot servers.
Revision/Update Information: This is a new manual.
Software Version: OpenVMS Alpha Version 7.2
Compaq Computer Corporation
Houston, Texas
Compaq Computer Corporation makes no representations that the use of its products in the manner described in this publication will not infringe on existing or future patent rights, nor do the descriptions contained in this publication imply the granting of licenses to make, use, or sell equipment or software in accordance with the description.
Possession, use, or copying of the software described in this publication is authorized only pursuant to a valid written license from Compaq or an authorized sublicensor.
Compaq conducts its business in a manner that conserves the environment and protects the safety and health of its employees, customers, and the community.
© Compaq Computer Corporation 1999. All rights reserved.
The following are trademarks of Compaq Computer Corporation: Alpha, Compaq, DECdtm, DECdirect, DECwindows, DIGITAL, OpenVMS, VAX, VAX DOCUMENT, VAXcluster, VMS, and the Compaq logo.
The following are third-party trademarks:
Display POSTSCRIPT is a registered trademark of Adobe Systems Incorporated.
All other trademarks and registered trademarks are the property of their respective holders.
ZK6562
The OpenVMS documentation set is available on CD-ROM.
| Contents |
The administration server, included with all Netscape SuiteSpot servers, is a unique, web-based server (HTTP protocol) that you use to configure all of your Netscape SuiteSpot 3.x servers. You access the administration server just like you'd access any web site--you use a browser such as Netscape Navigator or Netscape Communicator.
Use this book to learn the concepts for managing your Netscape servers. You should read the first chapter of this book before you install any Netscape server because it contains information about preparing for installation and lists guidelines for installing multiple servers on a single computer. You should read about cluster management if you plan to install servers on multiple computers and want to manage the servers from a central computer.
This book describes the Netscape administration server and covers basic concepts common to all Netscape SuiteSpot servers. The online help describes the user interface for the administration server and documents how to use it to configure the administration server. It also contains in-depth information about command-line tools. Together, this book and the online help provide a complete documentation set for managing Netscape servers using the administration server.
This book also explains how to:
Read the first chapter of this book before you install any server. It contains basic information about the administration server and its features. After reading that chapter, you should plan how you will install your servers. You should then read the installation documentation provided with the individual servers you want to install.
Once you install the servers you can read the rest of this book to learn how to configure the administration server and use it to manage your other Netscape servers.
To configure any of the SuiteSpot servers, you need a network browser, such as Netscape Navigator or Navigator Gold 3.0 or later, Netscape Communicator, or any other browser that supports Java and JavaScript. If you don't have a browser installed on your computer, install the version of Netscape Navigator from your SuiteSpot CD. In most cases, this is in the /nav30 directory. Because all configuration forms use Java or JavaScript, you must enable that feature in your browser before you can administer your Netscape SuiteSpot servers. To do this in Navigator:
Compaq welcomes your comments on this manual.
Print or edit the online form SYS$HELP:OPENVMSDOC_COMMENTS.TXT and send us your comments by:
| Internet | openvmsdoc@zko.mts.dec.com |
| Fax | 603 884-0120, Attention: OSSG Documentation, ZKO3-4/U08 |
|
Compaq Computer Corporation
OSSG Documentation Group, ZKO3-4/U08 110 Spit Brook Rd. Nashua, NH 03062-2698 |
Use the following World Wide Web address to order additional documentation:
http://www.openvms.digital.com:81/ |
If you need help deciding which documentation best meets your needs, call 800-DIGITAL (800-344-4825).
The name of the OpenVMS AXP operating system has been changed to the OpenVMS Alpha operating system. Any references to OpenVMS AXP or AXP are synonymous with OpenVMS Alpha or Alpha.
VMScluster systems are now referred to as OpenVMS Cluster systems. Unless otherwise specified, references to OpenVMS Clusters or clusters in this document are synonymous with VMSclusters.
In this manual, every use of DECwindows and DECwindows Motif refers to DECwindows Motif for OpenVMS software.
The following conventions are also used in this manual:
| Ctrl/ x | A sequence such as Ctrl/ x indicates that you must hold down the key labeled Ctrl while you press another key or a pointing device button. |
| [Return] | In examples, a key name enclosed in a box indicates that you press a key on the keyboard. (In text, a key name is not enclosed in a box.) |
| ... |
Horizontal ellipsis points in examples indicate one of the following
possibilities:
|
|
.
. . |
Vertical ellipsis points indicate the omission of items from a code example or command format; the items are omitted because they are not important to the topic being discussed. |
| ( ) | In command format descriptions, parentheses indicate that, if you choose more than one option, you must enclose the choices in parentheses. |
| [ ] | In command format descriptions, brackets indicate optional elements. You can choose one, none, or all of the options. (Brackets are not optional, however, in the syntax of a directory name in an OpenVMS file specification or in the syntax of a substring specification in an assignment statement.) |
| { } | In command format descriptions, braces surround a required choice of options; you must choose one of the options listed. |
| bold text | This text style represents the introduction of a new term or the name of an argument, an attribute, or a reason. |
| italic text | Italic text emphasizes important information and indicates complete titles of manuals and variables. Variables include information that varies in system messages (Internal error number), in command lines (/PRODUCER= name), and in command parameters in text (where device-name contains up to five alphanumeric characters). |
| UPPERCASE TEXT | Uppercase text indicates a command, the name of a routine, the name of a file, or the abbreviation for a system privilege. |
| - | A hyphen in code examples indicates that additional arguments to the request are provided on the line that follows. |
| numbers | All numbers in text are assumed to be decimal unless otherwise noted. Nondecimal radixes---binary, octal, or hexadecimal---are explicitly indicated. |
| | | The vertical bar is used as a separator for user interface elements. For example, "choose Server Status | Logging Options" means you should click the Server Status button in the top frame of the Server Manager and then click the Logging Options link in the left frame. |
| / | Forward slash is used to separate directories in a path. If you use the NT operating system, you might be more familiar with the backslash in paths, but NT supports both forward and back slashes. |
This chapter describes the concepts behind the administration server and its Server Manager forms you use to configure your Netscape SuiteSpot servers. This chapter also gives you an overview of some new features and tells you how to start and stop the server. For online directions on using specific forms in the Server Manager, click the Help button at the bottom of the form.
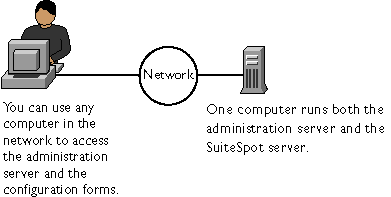
Because every Netscape SuiteSpot server is configured using an administration server and the Server Manager forms, you can easily configure your servers remotely, using any computer in your network.
Figure 1-1 shows how you can configure your SuiteSpot servers from any computer in the network.
Figure 1-1 Configuring Server
There are multiple versions of the administration server (2.x and 3.x),
and various SuiteSpot servers are configured using different versions.
Because of the different versions, this chapter lists suggestions to
follow before installing two servers that use different versions of the
administration server. For a list of the servers that use the different
versions of the administration server, see the printed Quick Start card
that comes with SuiteSpot. If you have an individual server, check its
documentation for the administration server version it uses.
1.1 Using the administration server
The administration server is a web-based server that contains the Java and JavaScript forms you use to configure your Netscape SuiteSpot servers. Because the forms for each SuiteSpot server have a consistent look and feel, you can quickly learn to configure and manage another server.
The administration server is installed when you install your first SuiteSpot server. The directory where you install the servers is called the server root directory. If you install a second SuiteSpot server and you want to configure it using the same administration server as the first SuiteSpot server, you install the second one in the same server root directory as the first.
After installing a SuiteSpot server and administration server, you use your browser to navigate to the administration server and use its forms to configure your SuiteSpot servers. When you submit the forms, the administration server modifies the configuration for the SuiteSpot server you were administering.
The URL you use to navigate to the administration server depends on the computer host name and the port number you choose when you install any SuiteSpot server. For example, if you installed the administration server on port 12345, the URL would look like this:
http://myserver.mozilla.com:12345 |
Before you can get to any forms, the administration server prompts you to authenticate yourself. This means you need to type a user name and password. You set up the "superuser" user name and password when you install the first SuiteSpot server and administration server on your computer. After installation, you can use distributed administration to give multiple people access to different forms in the administration server.
The first page you see when you access the administration server is called the Server Administration page. The Server Administration page has three or four sections, depending on the servers you have installed. Figure 1-2 shows all four sections, which are described here:
The Server Administration page lets you manage your Netscape servers.
Figure 1-2 Server Administration Page

As stated earlier, the collection of forms used to configure a single server is called the Server Manager. The administration server contains a Server Manager for each Netscape server installed on the computer, including one for the administration server itself.
The Server Administration page, shown in Figure 1-2, contains links to each Server Manager.
To get to the Server Manager forms for the administration server, click any of the category buttons on the Server Administration page.
Figure 1-3 Category Buttons

To get to the Server Manager forms for a particular server, click the button in the General Administration (Figure 1-4) section that has the server's name on it. For directions on configuring a particular server, see that server's documentation or click Help in any online form.
Figure 1-4 General Administration

After clicking on a button, you'll see the Server Manager, which is a three-frame page with buttons in the top frame and links in the left frame.
Figure 1-5 shows the administration server's Server Manager forms that appear in a three-frame page.
Figure 1-5 Server Manager
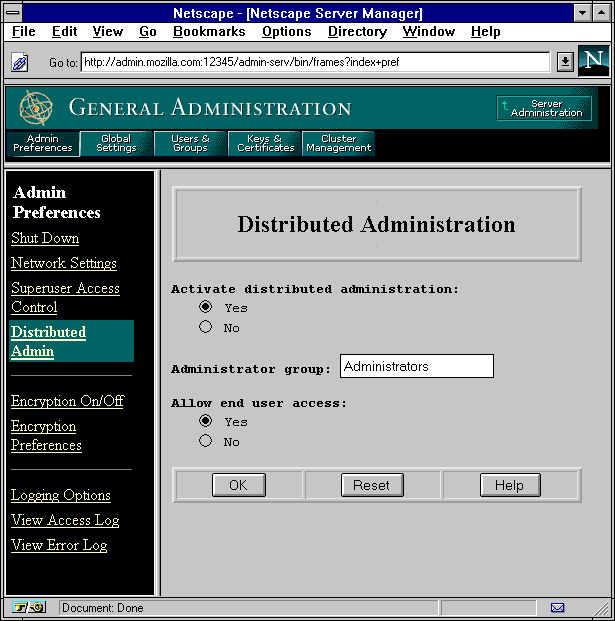
To use the Server Manager, you click a category button (Figure 1-6) in the top frame (for example, Server Preferences), and then you click a link in the left frame (for example, Distributed Admin). A form appears in the remaining frame where you select options and specify values that configure the server. To submit your changes in the form, click the OK button. Click the Help button in any form to get specific directions on using that form.
Figure 1-6 Button

To return to the Server Administration page (Figure 1-5), click the
Server Administration button in the top frame of the Server Manager.
1.3 Features new to the 3.x administration server
The new 3.x features refer to the version of the administration server, not necessarily to the version of the Netscape server products. As of this writing, the SuiteSpot servers using the 3.x administration server are:
Check your product documentation or the SuiteSpot Quick Start card for the administration version a particular server uses. See the next section for information on installing multiple versions of servers on the same computer.
The following items are some of the new features in the 3.x version of Netscape servers:
This section describes the issues you need to resolve before you
install your Netscape SuiteSpot servers. You should also read the
Administrator's Guide for each server before installation, because they
might include other special considerations specific to that server type.
1.4.1 Setting up the SuiteSpot user and group
If you plan on installing multiple SuiteSpot servers on a single computer, create a SuiteSpot system group that includes the system user account you plan to use for each server installed on the computer. (During installation, you specify the user account you want the SuiteSpot server to use.) This gives any servers installed on the computer read and execute permissions to the files or directories owned by other servers (for example, the local directory of users and groups used in access control).
For example, if you're installing Netscape Messaging Server and Netscape Enterprise Server on the same computer, you might create a group called suitespot with system users mail and web.
Creating the user and group is more important on Unix systems, but you can also do this on Windows NT systems.
When you create these accounts, you should create them so that no other
system users or groups have write access to the files owned by the
servers. In particular, you'll want to write-protect the administration
server's password file located at
<server_root>/admin-serv/config/admpw. And you should consider
protecting any encryption key-pair files and certificates (in the
directory <server_root>/alias), and the local database (in the
directory <server_root>/userdb).
1.4.2 Installing 2.x and 3.x servers together
There are times when you'll want to install both 2.x and 3.x servers and their administration servers on the same computer. For example:
When you first connect to the administration server, you must provide a user name and a password. If the administration server uses distributed administration, the forms that you see and the administrative privileges that you have depend on the user name you use when logging in.
Distributed administration lets multiple people log in to the administration server. Access control rules determine what forms each person can use. There are three general levels of users:
\login_table)
| Option | Superuser | Administrator (distributed administration) | End User |
|---|---|---|---|
| The user name and password is checked against entry in: | <server_root>/admin-serv/config/admpw | LDAP directory or local database. | LDAP directory or local database. |
| Can user create users and groups in a local database? | Yes | Yes | No |
| Can user create users and groups in an LDAP directory? | Yes, but only if there is an entry matching the superuser. | Yes, provided the administrators group has create permission. | No |
| If LDAP directory is down, can the user access the administration server? | Yes | No | No |
| What forms are viewable in administration server? | All,except User & Groups depends on the superuser having an account in the LDAP directory (if used). | Depends on access control. If no access control is used, see all forms. | End-user forms only. |
If you want to check different areas of the administration server,
create a group and user for distributed administration and then create
an end-user. To log in as different users and see what they get, insert
the username in the URL for the administration server. For example,
http://user1@myserver.mozilla.com:12345. If you don't insert the user's
name, most web browsers will authenticate you using the last password
you entered for that URL. (Netscape Navigator and Netscape Communicator
cache the user name, password, and URL for a single-session, so when
you close the application, the information is discarded.)
1.5.1 When distributed administration is off
When distributed administration is turned off, you can only log in to the administration server using its superuser name and password. You configure this user name and password when you first install your administration server. For information on how to change this user name and password after your administration server is installed, see Changing the superuser settings.
Logging in as the superuser gives you full access to all the forms and servers running under the administration server. The exception to this is the Users & Groups area of the administration server. Although you have full access to the Users & Groups forms, you might not have the appropriate permissions set in the directory that allow you to manage users. This is an issue only if you are using a directory server to manage users and groups--if you are using the local directory, you automatically have full access to directory management because the local directory does not support access control lists.
If you are using a directory server to manage users and groups, then
make sure to create a user entry in your directory that corresponds to
your administration server superuser, and grant that entry full read,
write, search, and compare permissions for the directory. Netscape
Directory Server version 1.02 or later has the ability to automatically
create the minimum required superuser user name and access-control
information. For more information, see the online documentation that is
available with your Netscape Directory Server.
1.5.2 When distributed administration is on
If you enabled distributed administration, then you can log in as the superuser, an administrator, or an end user. The administration server identifies what type of a user you are by using the following process:
If you are using a directory server to manage users and groups, then make sure to create a user entry in your directory that corresponds to your administration server superuser. Also make sure to create the appropriate administrators group (discussed below) and grant that group full read, write, search, and compare permissions for the directory. Finally, make sure you add your dministration server's superuser to the administrator's group. Netscape Directory Server version 1.02 or later has the ability to automatically perform these minimum actions for you. For more information, see the online documentation that is available with your Netscape Directory Server. |
For detailed information on binding to the directory server, creating
directory server users and groups, setting directory server access
control privileges, and performing directory searches, see the Netscape
Directory Server Administrator's Guide.
1.6 Stopping the administration server
If you enable end-user access to the administration server, you should keep the administration server running as often as possible. If you don't enable end-user access, consider shutting down the administration server when you aren't using it. This minimizes chances of a break in, which could happen if someone learns any of your superuser or administrator passwords.
To shut down the administration server from the Server Manager:
Before you read the rest of this book, you need to install at least one of your SuiteSpot servers. The following steps offer installation guidelines to follow.
This document describes the forms in the Admin Preferences and Global
Settings categories of the administration server's Server Manager.
2.1 Removing a server from your system
You can remove a server from your system using the Server Administration page. Be sure that you don't need the server again before you remove it--this process cannot be undone.
Some NT servers have an uninstall program that you can use to remove a server and it's administration server. Check with your product documentation.
To remove a server from your machine, perform the following steps:
Network settings affect the way the administration server runs. You can change the system user account that runs the administration server. This is a user account you set up with your computer's operating system. (By default, the user is nobody on Unix and LocalSystem on Windows NT.)
You can also change the port number that the administration server
listens to. The port number can be any number between 1 and 65535, but
it is typically a random number greater than 1024. For security
reasons, consider changing the port number regularly.
2.3 Changing the superuser settings
You can configure superuser access for your administration server. These settings affect only the superuser account. That is, if your administration server uses distributed administration, you need to set up access control for the administrators you allow. The following settings apply only to the superuser for the administration server.
With version 2.x administration servers, an administrator could configure all aspects of a server because there was only one user name to use when logging in (the superuser). Distributed administration in 3.x servers lets multiple administrators hange specific parts of the server. With distributed administration you have three levels of users:
The superuser's username and password are kept in a file called <server_root>/admin-serv/config/admpw. If you forget the username, you can view this file, but the password is encrypted and unreadable. The file has the format user:password.
If you forget the password, you can edit the admpw file and simply
delete the encrypted password. You can then go to the Server Manager
forms and specify a new password. Because you can do this, it is very
important that you keep the server computer in a secure place and
restrict access to its file system. On Unix systems, consider changing
the file ownership so that it's writable only by root or whatever
system user runs the administration server daemon. On NT systems,
restrict the file ownership to the user account the administration
server uses.
2.4.2 Enabling distributed administration
To enable distributed administration:
Server log files can help you monitor your server's activity. You can use these logs to monitor your server and troubleshoot problems. Server logs are in a Common Logfile Format, a commonly supported format that provides a fixed amount of information about the server.
The error log file, located in admin/logs in the server root directory,lists all the errors the server has encountered.
The access log, located in admin/logs in the server root directory, records information about requests to the server and the responses from the server. You can specify what is included in the access log file from the Server Manager.
To configure logging options for the administration server:
You can view the server's active and archived access log files from the Server Manager.
To view an access log:
The following is a sample of an access log in the Common Logfile Format:
     a.moz.com - [16/May/1997:21:18:26 -0800]
"GET /admin-serv/icons/dot.gif HTTP/1.0" 200 2575

     a.moz.com - [17/May/1997:11:04:38 -0800]
"GET /admin-serv/bin/frames?index+pref HTTP/1.0" 204 342

     a.moz.com - [20/May/1997:14:36:53 -0800]
"GET /admin-serv/manual/ag/config.htm HTTP/1.0" 200 890

     arrow.a.com -[20/May/1997:14:36:53 -0800]
"GET /admin-serv/manual/ag/so.gif HTTP/1.0" 401 571
|
The last line of the access log file has several fields.
| Access Log Field | Example |
|---|---|
| Hostname or IP address of client | user.mozilla.com In this case, the hostname is shown because the server is using DNS lookups; if DNS cannot resolve the name or if DNS lookups are disabled, the client's IP address would appear. |
| RFC 931 information | RFC 931 identity--not implemented |
| Username | john (username entered by the client for authentication) |
| Date/time of request | 29/Mar/1998:4:36:53 -0800 |
| Request | GET /help |
| Protocol | HTTP/1.0 |
| Status code | 401 |
| Bytes transferred | 571 |
The error log file contains errors the server has encountered since the log file was created. It also contains informational messages about the server, such as when the server was started and who tried unsuccessfully to log in to the server.
To view the error log file from the Server Manager:
[13/May/1997:16:56:51] info: successful server startup [13/May/1997:16:56:51] info: Netscape-Administrator/3.0 97.117.0455 [13/Mar/1997:19:08:52] security: for host user.mozilla.com trying to GET /admin-serv/bin/ index, acl-state reports: access of /usr/suitespot/bin/admin/admin/bin/index denied by ACL admin-serv directive 3 [13/May/1997 20:05:43] failure: for host ceo.mozilla.com trying to POST /admin-serv/bin/distadm, cgi-parse-output reports: the CGI program /usr/suitespot/bin/admin/admin/bin/distadm did not produce a valid header (program terminated without a valid CGI header. Check for core dump or other abnormal termination) |
This chapter describes clusters of Netscape servers and explains how you can use them to share configurations among the various types of servers.
The administration server stores the information about clusters and provides the interface for managing the servers in the clusters. Because this feature is new to 3.x servers, not all Netscape servers fully support it; however, Netscape Enterprise Server version 3.0 supports all of the cluster-management features.
You can use clusters to do the following:
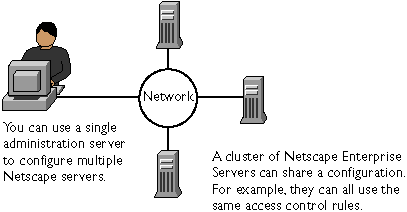
Clusters are groups of Netscape servers that can be administered from a single Netscape administration server. All servers in a cluster must be of the same type (web, proxy, mail, directory, and so on), and the administration server can store a cluster for each type of Netscape server. This enables you to have a central administration server for administering all of your Netscape servers. The servers can be installed on any computer in a network, but the administration server containing the clusters must have access to the administration servers for each of the servers in the cluster, as shown in the following figure.
Figure 3-1 shows how Netscape servers in a cluster can share all or part of their configurations.
Figure 3-1 Servers in a Cluster
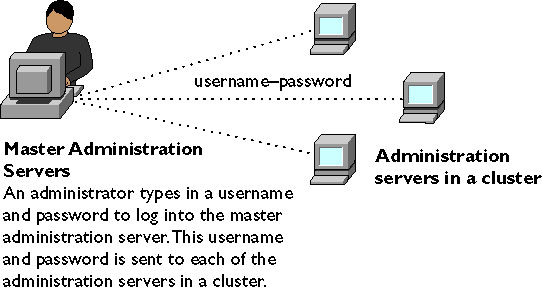
When you configure a cluster, the administration server containing the cluster (the master administration server) communicates with the administration servers for each of the servers in the cluster. Because of this, each administration server in the cluster must have an administrative user and password that the master administration server can use to authenticate itself. When you log in to your administration server and you supply a username and password, that information is sent to any remote administration servers in a cluster, as shown in Figure 3-2.
You use one password to log into the administration servers.
Figure 3-2 Master Administration Servers
Before you can create a cluster, you must first install all of the servers you want to include in the cluster. For example, if you want one administration server where you can configure two Netscape Enterprise Servers, a Netscape Messaging Server, and a Netscape Collabra Server, you would first need to install all of the servers (and their respective administration servers) on the computers where they'll run, and then you would configure one of the administration servers as the master for the clusters. In this example, you'd have one administration server with a cluster containing two Netscape Enterprise Servers, another cluster containing only the Netscape Messaging Server, and another containing the Netscape Collabra Server. It doesn't matter which administration server you choose as the master.
The following list offers some guidelines to follow when configuring a cluster:
To set up a cluster:
When you add a server to a cluster, you specify its administration server and port number. If that administration server contains more than one server, all of its servers are added to the cluster. (You can remove the individual servers later.) For example, if a remote administration server has a Netscape Collabra Server and a Netscape Enterprise Server, then both servers are added to the cluster in the master administration server.
If the remote administration server contains a cluster, the servers in the remote cluster are not added. The master administration server adds only those servers that are physically installed on the remote administration server computer; it doesn't add servers that might be installed in a cluster on the remote administration server.
To add a remote server to the list:
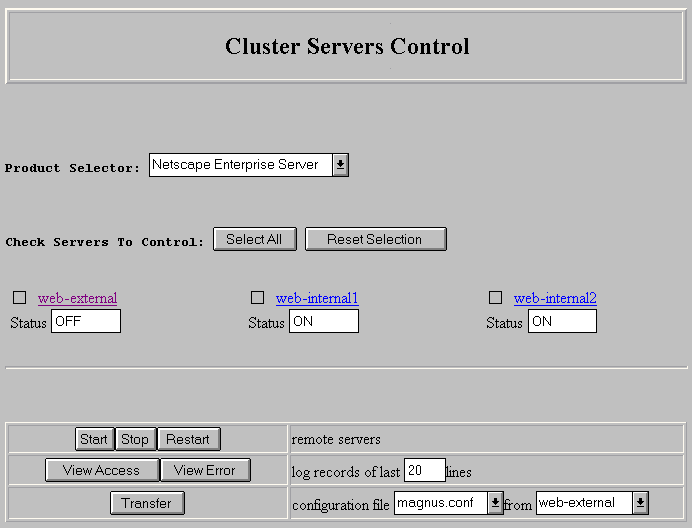
Figure 3-3 shows servers in a cluster appearing on the form with links to their respective Server Manager forms.
Figure 3-3 Cluster Servers Control
If you change an administration server's host name, port number, or protocol used (HTTP or HTTPS), you also need to modify the information about that administration server that is stored in the cluster.
To modify information about a server in a cluster:
To remove a server from the cluster:
To manage a cluster of servers:
You can control who accesses the administration server forms. This
chapter discusses the various methods you can use to determine who has
access to forms in the administration server. For example, you can
specify who has full control of all the servers installed on a computer
and who has partial control of one or more servers. Before you can use
access control on the administration server, you must enable
distributed administration and set up an administrators group in your
LDAP directory. This chapter assumes you've already configured
distributed administration and have entries in the users and groups
directory.
4.1 What is access control?
Access control lets you determine who can access the administration server and which servers and forms (also called programs) they can access. You can use two attributes for controlling access:
You can require users to authenticate themselves before getting access to your administration server. Authentication means that users verify their identity by entering a username and password.
If you require users to enter a username and password to get access to your server, you store the list of users and groups in an LDAP database, which can be either a file stored on the administration server computer or an LDAP server on a remote computer (for example, a computer running Netscape Directory Server). To use this type of authentication, you need a database containing the users and groups you want to reference when restricting access to your server.
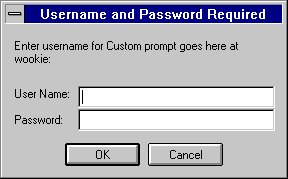
When users attempt to access a form that has User-Group authentication, the web browser displays a dialog box asking the user to enter a username and password. After entering the information, the user either sees the Server Administration page or a message that says they don't have access. (You can customize the access-denied message that they see.) Figure 4-1 shows the authentication window. This window shows a custom message.
Users see this window when authenticating themselves to the server.
Figure 4-1 Authentication Window
If your server doesn't use SSL encryption, the username and password
that the end user types are sent unencrypted across the network.
Someone could intercept the network packets and read the username and
password being sent to the administration server. For this reason,
User-Group authentication is most effective when combined with SSL
encryption or Host-IP authentication, or both.
4.1.2 Host-IP authentication
You can limit access to forms on your administration server by making them available only to people using specific computers. You specify hostnames or IP addresses for the computers that you want to allow or deny. You can use wildcard patterns to specify multiple computers or entire networks. If you want to use this feature, you must have DNS running in your network and your computer must be configured to use it.
It's possible for more than one person to have access to a particular
computer. For this reason, Host-IP authentication is most effective
when combined with User-Group authentication. If both methods of
authentication are used, the end user will have to enter a username and
password before getting access.
4.1.3 Access control files
When you use access control on your administration server, the settings are stored in a file with the extension .acl. Access control files are stored in the directory <server_root>/<server_type> acl where <server_type> is the name of the server. For example, the administration server uses the directory adminacl. Netscape Enterprise server uses httpacl.
The administration server uses three ACL files, all located in the directory <server_root>/adminacl:
When the server evaluates an incoming request, it determines access based on a hierarchy of rules called access-control entries (ACEs), and then it uses the last entry to determine if the request is allowed or denied. Each ACE specifies whether or not the server should continue to the next ACE in the hierarchy. The collection of ACEs is called an access-control list (ACL). By default, the server has one ACL file that contains multiple ACLs.
When the server gets a request for a form, the server uses the ACL file and the rules in that file to determine if it should grant access or not. The rules can reference the hostname or IP address of the computer sending the request. The rules can also reference users and groups stored in the LDAP directory or local database.
For example, the following ACL file contains the two default entries for the administration server (admin-serv) plus one that allows users in the "admin-reduced" group administer the Admin Preferences forms in the administration server.
Version 3.0;

acl "admin-serv"

deny with file = "/usr/suitespot/adminacl/admin-denymsg.html";

deny (all)

    (user = "anyone");

deny absolute (all)

group != "admin";

allow (all)

    (group = "admin-reduced") and

    (program = "Admin Preferences")
|
The first line that starts with "deny" tells the server what file to return if a user isn't allowed access to the server. The second deny message denies everyone access, but because the rule isn't absolute (like the next one), the server continues down the list to see if the user is allowed in a subsequent line. The third line is an absolute statement that denies anyone who isn't in the "admin" group in the LDAP directory. In this case, the "admin" group is the group specified for distributed administration.
The last rule explicitly allows access to the forms in the Admin
Preferences section of the administration server to anyone in the
"admin-reduced" group.
4.2 Restricting access
This section takes you through the process of restricting access to your administration server. The sections following this one describe in detail each option available when using access control. Keep in mind that most access-control rules use only a subset of the available options.
To create an access-control rule:
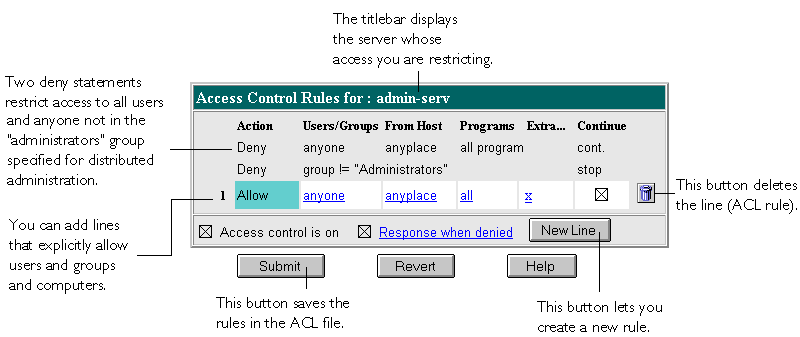
The ACL form shown in Figure 4-2 contains links that, when clicked, display another form in the bottom frame (not shown).
Figure 4-2 ACL Form
Check the option you want, and then click Update.
Check the options you want, and then click Update.
Check the options you want, and then click Update.
Click Update to add the programs options to the rules for the line you're editing.
You can restrict access to your administration server based on the user who requests a form. The administration server uses a list of users in the administrators group (the group you set up for distributed administration) to determine access rights for the user requesting a resource. The list of users are stored either in a database on the server computer or in an LDAP server, such as Netscape Directory Server. You should make sure the database has users and the administrators group in it before you set access control.
You can allow or deny access to everyone in the administrators group, or you can allow or deny specific people by using wildcard patterns or lists of users.
To configure access control with users and groups, follow the general directions for restricting access. When you click the Users/Groups field, a form appears in the bottom frame. The following list describes the options in the form.
You can restrict access to your administration server based on which computer the request comes from. You specify this restriction by using wildcard patterns that match the computers host names or IP addresses. For example, to allow or deny all computers in a specific domain, you would enter a wildcard pattern that matched all hosts from that domain, such as *.netscape.com.
This setting doesn't affect the Host/IP setting for the administration server's superuser. That is, you can set different hostnames and IP addresses that the superuser must use when accessing the administration server.
To specify users from hostnames or IP addresses, follow the general directions for restricting access. When you click the From Host field (the link called anyplace), a form appears in the bottom frame. Check the Only from option and then type either a wildcard pattern or a comma-separated list of hostnames and IP addresses. Restricting by hostname is more flexible than by IP address--if a user's IP address changes, you won't have to update this list. Restricting by IP address, however, is more reliable--if a DNS lookup fails for a connected client, hostname restriction cannot be used.
The hostname and IP addresses should be specified with a wildcard pattern or a comma-separated list. The wildcard notations you can use are specialized; you can only use the *. Also, for the IP address, the * must replace an entire byte in the address. That is, 198.95.251.* is acceptable, but 198.95.251.3* is not. When the * appears in an IP address, it must be the right-most character. For example, 198.* is acceptable, but 198.*.251.30 is not.
For hostnames, the * must also replace an entire component of the name.
That is, *.netscape.com is acceptable, but *sers.netscape.com is not.
When the * appears in a hostname, it must be the left-most character.
For example, *.netscape.com is acceptable, but users.*.com is not.
4.3.2 Access to programs
You can select areas of the administration server that administrators can access. You can choose groups of forms that appear in the top frame of the Server Manager (such as Cluster Management), or you can choose specific forms that appear as links in the left frame of the Server Manager (such as "New User" under User & Groups).
Access to programs affects the server you choose when restricting access. For example, if your administration server contains a Netscape Enterprise Server and a Netscape Collabra Server, you choose the server you want to restrict, and then you set up the access control rules for that server. In this case, you could allow some administrators to configure agents in the Netscape Enterprise Server, and then you could allow a different set of administrators to configure newsgroups in the Netscape Collabra Server.
To control access to a program in a server:
Figure 4-3 Form Name

| Next | Contents |
![[Go to the documentation home page]](../../images/buttons/bn_site_home.gif)
![[How to order documentation]](../../images/buttons/bn_order_docs.gif)
![[Help on this site]](../../images/buttons/bn_site_help.gif)
![[How to contact us]](../../images/buttons/bn_comments.gif)
|
| privacy and legal statement | ||
| 6562PRO.HTML | ||