|
Document revision date: 28 June 1999
|
![[Compaq]](../../images/compaq.gif) |
![[Go to the documentation home page]](../../images/buttons/bn_site_home.gif)
![[How to order documentation]](../../images/buttons/bn_order_docs.gif)
![[Help on this site]](../../images/buttons/bn_site_help.gif)
![[How to contact us]](../../images/buttons/bn_comments.gif)
|
![[OpenVMS documentation]](../../images/ovmsdoc_sec_head.gif)
|
FastTrack Administrator's Guide
Chapter 6
User and Group Management
The Netscape administration server lets you manage the users and groups
that access the services provided by your Netscape servers. Because you
manage users and groups from the administration server, you use the
same interface for user and group management regardless of the type of
servers, or the number of servers, that you are running at your site.
This common management scheme provides simplified server administration
by letting you maintain a single directory of users for all your
Netscape servers.
This chapter contains basic information about the differences between
using a local database and a director service such as Netscape
Directory Server. The online help contains directions for creating and
managing users and groups from the administration server forms.
6.1 The directory service
The Users & Groups area of the administration server is actually an
interface to a directory service. Directory services are a type of
software that allows you to maintain information, such as contact
information or identification information for the people in your
organization. You use a directory service in the administration server
to store user information, such as user IDs, email addresses,
certificates and so forth. This information is typically used when
controlling access to a server.
You have a choice of the type of directory service you can use with
your administration server: You can use a Netscape Directory Serverm or
you can use the local database.
6.1.1 Netscape Directory Server
Based on an open-systems server protocol called the Lightweight
Directory Access Protocol (LDAP), Netscape Directory Server is a
robust, scalable server designed to manage an enterprise-wide directory
of users and resources. Using the directory server, you can manage all
of your user information from a single source. You can also configure
the directory server to allow your users to retrieve directory
information from multiple, easily accessible network locations.
The use of a directory server to manage your servers' users and groups
is recommended for large organizations consisting of up to a million
users. Directory server is also ideal for organizations spread across
physically different locations, and for organizations where balancing
the access load to their directory is important. Finally, the directory
server is recommended for those organizations interested in enhancing
directory availability by placing their directory services on multiple
servers.
For more information about the directory server, or about directory
services in general, see the Netscape Directory Server
Administrator's Guide, which comes with Netscape Directory Server.
6.1.2 The local directory
The Netscape local directory is bundled with every administration
server, and it provides many of the core directory functions available
from the directory server. The local directory is intended for sites
running a stand-alone Netscape server (such as a enterprise or
messaging server).
The local directory has the following limitations when compared to the
Netscape Directory Server:
- The local directory cannot communicate across the network (it does
not use the LDAP protocol). This means your users cannot use an LDAP
client to perform directory access. They can, however, access the
information through the administration server.
- The local directory supports no more than 1,000 entries.
- The local directory is slower on lookups than the directory server
because the local directory does not cache entries.
- The local directory does not perform schema checking. This means
that the directory will not stop you from using object classes and
attributes that are unknown to it.
- The local directory does not perform any kind of access-control
checking; however, you can configure access to the directory using the
administration server.
- The local directory cannot be replicated.
- You can use only two of the directory server's command-line
utilities with the local directory: ldapsearch, which allows you to
search the directory, and ldapmodify, which allows you to add, delete,
and modify directory entries.
6.2 Directory service clients
You must use a directory service client to obtain information from and
to put information into a directory service. If you are using the
Netscape Directory Server, then any directory client that can use the
LDAP protocol can use your directory. This is one of the primary
differences between a true directory service and the local database
bundled with the administration server: The database can communicate
only with the local administration server, whereas the directory server
can communicate with any LDAP-capable client.
6.2.1 Gateways
The administration server is actually a type of directory service
client known as a gateway. That is, the administration server acts as a
gateway between the communication protocol used by your web browser
(HTML) and the protocol used by the directory server (LDAP). Of course,
if you are using the local database then the gateway skips the LDAP
protocol and accesses the local database directly.
When you first install your administration server, you must configure
your server to communicate either with the local directory or with the
directory server. If you use a directory server, you need to make sure
it has at least one user account that the administration server can use
to access it. This is usually the administration server superuser
account. Beyond that, you'll experience no difference when using the
Users & Groups forms.
For more information on how to use the Users & Groups forms, see
the online documentation that is available with your administration
server.
6.2.2 Command-line clients
Both the directory server and the Netscape local directory offer
command-line tools that allow you to search the directory and perform
directory modifications from the command line. This allows you to
create custom shell scripts or batch files to perform routine,
automated tasks on your directory.
Netscape Directory Server provides many command-line tools to help you
administer and maintain your directory. The local directory, however,
provides two tools for your use: ldapmodify and ldapsearch. These are
actually identical to the ldapmodify and ldapsearch command-line tools
shipped with the directory server, except that the -C option has been
added so that they can work with the local directory.
For more information on the ldapmodify and ldapsearch command- line
tools bundled with your administration server, see the online
documentation. For more information on the command-line tools bundled
with the directory server, see the Netscape Directory Server
Administrator's Guide.
6.3 Authenticating users to directory services
Any time you perform an operation on a directory service, you must
identify yourself to the service. This identification process is known
as authentication. You can also think of this process as logging into
the directory service.
Authentication allows a directory service to know if you have
sufficient permissions to perform operations in the directory. Examples
of directory operations are:
- searching the directory
- adding entries (such as users and groups) to the directory
- deleting entries from the directory
- modifying entries in the directory Usually authentication is not
required if all you want to do is search the directory. When you access
a directory without providing authentication credentials, you are
performing anonymous access.
When you log in to the administration server, the username and password
that you provide are automatically used by the Users & Groups forms
when they are communicating with a directory server.
If you need to change your superuser password, make sure you change it
in the directory server before you change it in the administration
server.
For information on allowing anonymous access to the directory server,
see the Netscape Directory Server's Administrator's Guide.
6.4 Distinguished names
A distinguished name (DN) is the string representation for the name of
an entry in a directory server or in a local directory. You use DNs
when naming entries using the LDAP Data Interchange Format (LDIF), when
using the LDAP command-line clients, when configuring the directory
server, and so forth.
Traditionally, a DN consists of the following items in this order:
- A common name or a user ID
- A list of regional or organizational attributes
- A country designation This string of identifying attributes
uniquely locates the entry within your directory. If you choose, you
can also use this naming structure to uniquely identify your entries
within the global directory tree as defined in the X.500 standard.
6.4.1 Distinguished name syntax
The traditional syntax for a DN string representation is as follows:
cn=common name, [street=address, l=locality, st = state or
province, ou=organizational unit, o=organization], c=country
name
|
A DN can consist of virtually any attributes you want to use. However,
if you are using the Netscape Directory Server and schema checking is
turned on, then the attributes must be recognized by the directory
server, and the attribute must be allowed by the entry's object classes.
(For more information on object classes and attributes, and your
directory server's schema, see Appendix A of the online documentation.)
Generally, however, a DN begins with a specific common name and gives
increasingly broader areas of identification, ending with the country
name. Note, however, that the DN attributes you use, and the order in
which you organize them, is up to you. The only requirement is that DN
attributes must be separated by a comma and can optionally use a space
following the separator.
6.4.2 Using uid-based distinguished names
One common variation on the traditional distinguished name identified
here is to use a user ID (uid) in the place of a common name (cn).
Because user IDs are typically unique values across an enterprise,
basing your distinguished name on user IDs allows you to avoid cn
collision p roblems caused by people who share the same name. By
default, the administration server uses cn-based distinguished names,
but you can change this behavior so that it creates uid-based
distinguished names instead. You do this by editing the file:
server_root>/admin-serv/config/dsgw-orgperson.conf
|
and setting the useUidForDN variable to
true.
6.4.3 Distinguished name usage
Once you have organized your directory structure, you must always
specify the DN attributes in the same order because a DN represents a
path through the directory tree. For example, the following DNs do not
represent the same entry:
cn=Ralph Swenson, ou=Accounting, o=Ace Industry, c=US

cn=Ralph Swenson, o=Ace Industry, ou=Accounting, c=US
|
Also, distinguished names representing branch points in the directory
do not typically begin with a common name value. Rather, they usually
begin with some subelement in the directory path. For example, if your
directory contained entries of the form:
cn=name, ou=Marketing, o=Ace Industry, c=US
|
then your directory would also contain the entries:
o=Ace Industry, c=US

ou=Marketing, o=Ace Industry, c=US
|
These two entries must appear in the directory before the entries
represented by a common name can appear.
For more information on your directory's organization, see Section 6.5.
6.4.4 Distinguished name examples
The following are some examples of distinguished names:
cn=Wally Henderson,ou=Product Development,o=Bait and Tackle Inc,
st=Minnesota,c=US

cn=Retch Sweeny, ou=Product Test, o=Bait and Tackle Inc,
st=Michigan,
c=US

cn=printer3b, l=room 308, o=Acme Programming Ltd, c=US
|
6.4.5 Distinguished name attributes
The various standard attributes that comprise a DN are as follows:
Table 6-1 Standard Attributes
| Attribute |
Name |
Definition |
|
c
|
country
|
Identifies the name of the country under which the entry resides. Must
be the two-letter country code. For example: c=US c=GB
|
|
cn
|
common name
|
Identifies the person or object defined by the entry. For example:
cn=Wally Henderson cn=Database Administrators cn=printer3b
|
|
uid
|
user ID
|
Identifies the person or object defined by the entry. DNs based on uids
are often preferred over cn-based DNs because they avoid duplicated
distinguished names caused by people who share the same name.
|
|
l
|
locality
|
Identifies the locality in which the entry resides. The locality could
be a city, county, township, or other geographic region. For example:
l=Tucson l=Pacific Northwest l=Anoka County
|
|
o
|
organization
|
Identifies the organization in which the entry resides. For example:
o=Netscape Communications Corp o=Public Power & Gas
|
|
ou
|
organizational unit
|
Identifies a unit within the organization. For example: ou=Sales
ou=Manufacturing
|
|
st
|
state or province name
|
Identifies the state or province in which the entry resides. For
example: st st=Iowa st=British Columbia
|
|
street
|
street address
|
Identifies the street address at which the entry resides. For example:
street=494 Rice Creek Terrace
|
6.4.6 Using commas in distinguished names
If a distinguished name contains a comma, then the part of the name
that uses the comma must also be enclosed in double- quotation marks.
For example, to include the string Ace Industry, Corp in your
distinguished name, you would quote it as follows:
o="Ace Industry, Corp", c=US
|
6.5 Planning your directory structure
Directories are usually organized in a tree-like structure. The top of
the tree is known as the root. Figure 6-1 shows this structure.
Figure 6-1 Directory Structure
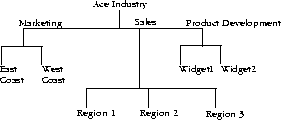
Notice that there are several branch points in the tree below the root.
These branch points usually represent major organizational units within
the larger organization. For example, if you work at a corporation,
then your company is probably subdivided into organizations such as
Marketing, Sales, Product Development, and so forth. Each of these
organizations may themselves contain further subdivisions, such as
Product Development for Widget 1, Product Development for Widget 2, and
so forth. An organizational unit, then, is a large, relatively static
division or unit within your organization.
For information on how to create branch points in your directory, see
Section 7.5 in the administration server online documentation. The
following sections discuss the pros and cons to creating subdivisions
within your directory.
6.5.1 Disadvantages of organizational units
Be aware that the flatter the structure of a directory, the easier your
directory is to manage. The following are some of the reasons for this:
- Moving directory entries from one organizational unit to another
involves deleting the entry from the original organizational unit and
recreating it under the new organizational unit.
- To delete or rename organizational units, you must delete every
entry from beneath the organizational unit, rename or delete the unit,
and then recreate all of the deleted entries in another part of the
directory tree. Because this task is tedious, you should be careful
about creating organizational units in your directory tree if your
company tends to frequently reorganize. If you are using Netscape
Directory Server, then you can create tools to perform these tasks,
either by using shell scripts or batch files to call the appropriate
command-line utilities, or by writing programs that make use of the
Netscape Directory Server client SDK.
6.5.2 Advantages of organizational units
A directory tree with many subdivisions has many advantages. An obvious
one is that you can easily search for everyone who works for a specific
organization. If you are using a directory server, there are several
other benefits to a subdivided directory, including:
- If you are using replication, then you can manage subtrees on
servers local to the organizations that they represent. This allows for
local control of organizational information.
- You can also replicate specific subtrees to other directory
servers. If you have certain entries that you want other organizations
to view, and other entries that you want to remain private, then you
can easily provide access to the public entries by replicating them to
a public directory server. This strategy is especially useful if you
want to make some information available outside of a firewall, while
making other information available only inside the firewall.
- Even if replication is not in use, you can easily restrict or
allow access to entries representative of an organization if they are
logically organized together in the directory tree. For information on
replication and directory access control, see the Netscape
Directory Server Administrator's Guide.
6.5.3 Recommendations for using organizational units
A flat directory structure is the easiest to administer but not
necessarily the easiest to use. You should therefore consider the
following when planning your directory:
- Use a directory structure that is subdivided along the lines of
the major functional activities in your organization. These
subdivisions can represent actual division names, but refrain from
using these names if your organization tends to frequently reorganize.
- If you work for an organization that frequently reorganizes, or if
your organization is young and still growing, then use generic names to
represent major activities. For example, if your company has the
following organizations:
- Product Marketing for Widget 1
- Product Marketing for Widget 2
- Product Development and Documentation for Widget 1
- Product Development and Documentation for Widget 2
- Product Sales, East Coast
- Product Sales, West Coast
- Product Sales, Europe
- Product Sales, Pacific Rim
then try to use generic divisions within your directory, such as:
- Marketing
- Development
- Sales
Doing so will make it easier to manage your directory as new
products are announced and as people transfer from one area to another
(for example, from Product Sales, East Coast to Product Sales, West
Coast).
- Consider geographic divisions as an alternative to organizational
divisions, especially if your organization has major geographic points
of activity. For example, if you have business offices in several
cities, consider branch points based on the city names. Just because
the gateway labels branch points as "organizational units" does not
mean that your branch points must correspond to organizational units.
- Try not to divide your directory down to the smallest business
unit or department name. This extreme level of division creates
maintenance difficulties. For the same reason, try to avoid branching
your directory more than two or three levels deep.
6.5.4 Configuring directory services
You can choose to use either the local database to organize your users
and groups, or you can use Netscape Directory Server. When you first
install your administration server, you configure the server to use
either the local directory, or a directory server. You can also change
this configuration after the administration server is installed. The
following sections describe how to configure your administration server
to use these two directory services.
6.5.5 Using the local database
To configure a local database (also called local directory):
- From the administration Server Manager, choose Global Settings |
Configure Directory Service.
- Click the Local Database radio button.
- A dialog box appears to warn you that you will lose your directory
service configuration information. Click Yes to continue.
- You can optionally enter a base DN. The distinguished name you
enter here is used as a suffix for your local directory and also as for
the point from which directory lookups will occur by default. An
example of a suffix that you could enter here is:
o=your company name, c=US.
|
If you do not enter a value in this field, then your suffix will be
a null string, and all searches will begin from the top or root point
of the directory.
- Click the Save Changes button.
6.5.6 Using a directory server
If you want to configure a Netscape Directory Server:
- From the administration Server Manager, go to Global
Settings | Configure Directory Service .
- Click the LDAP Directory Server radio button.
- A dialog box appears to confirm that you want to use a Directory
Server. Click Yes to continue.
- Enter the host name where the directory server is running. You
must enter a host name even if the directory server is running on the
local machine.
- The default port number of 389 is automatically filled in for you.
If your directory server is using a different port number, enter that
port number here. Note that if you are going to use SSL communications
with a directory server, then you should enter the port number that the
directory server is using for SSL communications. By default, this is
port number 636. For information on SSL, see the Netscape
Directory Server Administrator's Guide.
- Click Yes if you want to use SSL for
communications with the directory server. If you click Yes here, then
you must also configure your administration server to use SSL
communications. For information on how to set this up, see Chapter 5.
- Enter a base DN. The distinguished name you enter here is the
point from which directory lookups will occur by default, and is the
location where all the administration server's entries will be placed
in your directory tree.
An example of a base DN that you could
enter here is:
o=your company name, c=US.
|
For more information on distinguished names, LDAP searches, and
base DNs, see the Netscape Directory Server Administrator's
Guide.
- Optionally enter the Bind DN that the administration server will
use to initially bind (or log in) to the directory server. This bind DN
only requires read and search access to the directory. Because this DN
and associated password (if any) is easily compromised, it is best to
simply leave this field blank and then setup your directory server to
allow anonymous search access. If you do not want to allow anonymous
search access to your directory, then specify a bind DN entry here that
only has read and search access to your directory. Do not specify your
directory server's unrestricted user (Root DN) in this field.
Note
This bind DN is used only to initially search for the User Name you
entered to the administration server authentication dialog box. Once
the entry corresponding to this user name is located, the
administration server rebinds to the directory server using the
retrieved entry. Therefore, if the user name you supplied when you
first logged into the administration server does not have access to the
directory server, you will not have any access to the directory server,
regardless of the bind DN information provided in this field.
|
For more information on how the administration server binds to the
directory server, see Section 1.5. For information on granting
permissions to a directory server entry, see the Netscape
Directory Server Administrator's Guide.
- If you have entered a bind DN in the previous field, then enter
the password for the Bind DN entry.
- Click the Save Changes button. The changes take
effect immediately.
Note
If you change directory service from a local file to a directory server
and vice-versa, you need to restart all SuiteSpot servers, including
the administration server.
|
6.6 Converting a database
All 3.x administration servers use either a local database or an LDAP
directory to store user and group information. You can upgrade a 2.0
user database by using one of two procedures:
- You can convert them individually using a form in the
administration server.
- You can convert them all automatically when you migrate a 2.x
server. When you migrate a 2.x server, all entries in all of the
databases under the 2.x directory <server_root>/authdb are
migrated to the default LDAP directory. When a database is upgraded,
the entries in the old database are added to the default 3.x LDAP
directory, which is either the LDAP directory server (such as Netscape
Directory Server) or a local database file.
During the upgrade, several .ldif files are created in the 3.x
directory <server_root>/authdb/<dbname>, where
<dbname> is the name of the 2.x database. The following LDIF
files are created:
- UserDel.ldif and GroupDel.ldif contain all of the new user and
group entries created in the LDAP directory. You can use this file with
the LDIF command-line tools to delete the entries that were created
during the upgrade.
- User.ldif and Group.ldif contain the same entries as the
UserDel.ldif and GroupDel.ldif files, but the format is one that you
can use to recreate the user entries. You might need to use this file
if you have specific entries you need to edit before adding them to the
directory.
For example, you could delete the entries that were
automatically added to the directory, and then edit the User.ldif and
Group.ldif files. After you edit the files, you would use them to add
the new entries to your directory.
- UserDup.ldif and GroupDup.ldif contain any entries that couldn't
be added to the directory for some reason. The entries could be
duplicates of ones already in the LDAP directory.
- GroupMod.ldif contains group membership information for user
entries that weren't created. You can use this file along with the
UserDup.ldif file to make sure all the correct users and groups were
added to the directory.
- importdb is an LDIF script that you can use to import one of the
generated .ldif files to the LDAP directory. You need to edit this
script to include the .ldif file name. You might also have to add the
directory administrators password.
6.6.1 Converting individual databases
To convert a database from the administration server:
- In the Server Administration page, choose Users & Groups |
Convert 2.0 Database.
- Type the absolute path to your 2.x server root directory. For
example, type /usr/ns-home.
- Choose the name of the database file using the drop-down list. If
you have only one 2.x database file, choose default.
- In the Import at field, enter the DN for the branch point in the
LDAP directory where you want to start adding entries. If this is
blank, the entries are added starting at the top of the LDAP tree. For
example, if you want the entries to be added under the organizational
unit branch for sales, you would enter something like this:
ou=sales, o=mozilla, c=us.
|
Click OK. The Base DN specified in the "Configure Directory
Service" form is appended to your Import entry. So if you specified a
Base DN o=mozilla, c=us, then you would only need to enter ou=sales in
the Import field.
The administration server runs a program that creates the various LDIF
files and adds them to your default LDAP directory (this is the
directory specified in the "Configure Directory Service" form).
6.6.2 Migrating a server configuration
If you have both 2.x and 3.x servers running on a single computer, you
can migrate the configuration from an older (2.x) server to the newer
(3.x) server. When you migrate a server, all entries in the databases
on the 2.x server are converted and added to your 3.x LDAP directory.
If you use the local database, the entries are added starting from the
top of the tree. If you're using an LDAP directory, the entries are
added starting at the Base DN you specified when you configured the
directory service. If you want the entries to start at a different
branch, temporarily change the default Base DN while you do the
migration.
To migrate a server:
- In the Server Administration page, click the link called "Migrate
from a previous version" located at the bottom of the page.
- In the form that appears, enter the absolute path to the 2.x
server root directory. Click Find Servers.
- Check the 2.x server whose configuration you want to migrate. For
example, you can upgrade the configuration from the 2.x administration
server by checking Import admin.
- A form appears with information about the server you want to
migrate. Enter information in the fields. For more directions on these
forms, see the documentation for the specific server type you are
migrating.
- Click Import. The administrations server runs a process to convert
the old configuration to the new server. You should restart your
servers after this process.
Chapter 7
Managing Users and Groups
This chapter describes how to use the forms in the administration
server Users and Groups area. The following topics are covered in this
chapter:
- Creating users
- Managing users
- Finding user entries
- Managing a user's password
- Editing user information
- Renaming users
- Managing user licenses
- Removing users
- Creating groups
- Managing groups
- Finding group entries
- Editing group attributes
- Adding group members
- Removing entries from the group members list
- Managing owners
- Adding groups to the group members list
- Managing see alsos
- Removing groups
- Renaming groups
- Creating organizational units
- Managing organizational units
- Finding organizational units
- Editing organizational unit attributes
- Renaming organizational units
- Deleting organizational units
- Importing a directory from LDIF
- Exporting a database to LDIF
7.1 Creating users
To create a user entry within the directory, do the following:
- From the administration server manager, go to Users &
Groups | New User.
- At a minimum, you must specify the user's:
- surname or last name
- full name
- user ID
Note
If you enter a given name (or first name) and a surname, then the
gateway automatically fills in the user's full name and user ID for
you. The user ID is generated as the first initial of the user's first
name followed by the user's last name. For example, if the user's name
is Babs Jensen, then the user ID is automatically set to bjensen. You
can replace this user ID with an ID of your own choosing if you wish.
|
Note
The user ID must be unique. The administration server ensures that the
user ID is unique by searching the entire directory from the search
base (base DN) down to see if the user ID is in use. Be aware, however,
that if you use the ldapmodify command line utility to create a user,
that it does not ensure unique user IDs. If duplicate user Ids exist in
your directory, the effected users will not be able to authenticate to
the directory.
|
- If any organizational units have been defined for your directory,
you can specify where you want the new user to be placed using the
Add New User To list. The default location is your
directory's root point.
- Click Create User to add the user and
immediately return to the New User form. Click Create and Edit
User to add the user and then proceed to the Edit User form
for the user you have just added.
For information on editing users, see Section 7.2.
7.1.1 Notes on user entries
The following notes may be of interest to the directory administrator:
- User entries use the inetOrgPerson, organizationalPerson, and
person object classes. For more information on how these are used, see
Appendix A, Object Classes and Attributes.
- By default, the distinguished name for users is of the form:
cn=full name, ou=organization, ...,o=base organization,
c=country
|
For example, if a user entry for Babs Jensen is created within the
organizational unit Engineering, and the directory's suffix is o=Ace
Industry, c=US, then the person's DN is:
cn=Babs Jensen, ou=Engineering, o=Ace Industry, c=US
|
However, you can change this format to a uid-based distinguised
name. For information on how to set this default, see Section 6.4.2.
- Suffixes are optional if you are using the local directory. If you
did not configure a suffix for your local directory, then you literally
use the string "" (quote quote) to represent the search base on calls
to ldapsearch.
- The values on the user form fields are stored as the following
LDAP attributes:
| User Field |
Corresponding LDAP Attribute |
|
Given Name
|
givenName
|
|
Surname
|
sn
|
|
Full Name
|
cn
|
|
User ID
|
uid
|
|
Password
|
userPassword
|
|
E-Mail
|
Addressmail
|
The following fields are also available when editing the user entry:
| User Field |
Corresponding LDAP Attribute |
|
Title
|
title
|
|
Telephone
|
telephoneNumber
|
For information on these attributes, see Appendix A, Object Classes
and Attributes.
7.2 Managing users
You edit user attributes from the Manage Users form. From this form you
can:
- Find user entries
- Change user attribute values
- Change the user's password
- Manage the user's licenses
- Rename the user's entry
- Delete the user's entry
- Potentially change product-specific information. Some, but not
all, Netscape servers add additional forms to this area that allow you
to manage product-specific information. For example, if a messaging
server is installed under your administration server, then an
additional form is added that allows you to edit messaging
server-specific information. See the server documentation for details
on these additional management capabilities. The following sections
describe these activities in detail.
For more information regarding user entries when using a directory
server, see Section 7.1.1.
7.2.1 Finding user entries
Before you can edit a user entry, you must display the entry. To find
an entry:
- From the administration server manager, go to Users &
Groups | Manage Users.
- In the Find User field, enter some descriptive
value for the entry that you want to edit. You can enter any of the
following in the search field:
- A name. Enter a full name or a partial name. All entries that
equally match the search string will be returned. If no such entries
are found, all entries that contain the search string will be found. If
no such entries are found, any entries that sounds like the search
string are found.
- A user ID.
- A telephone number. If you enter only a partial number, any
entries that have telephone numbers ending in the search number will be
returned.
- An email address. Any search string containing an at (@) symbol is
assumed to be an email address. If an exact match cannot be found, then
a search is performed to find all email addresses that begin with the
search string.
- An asterisk (*) to see all of the entries currently in your
directory. You can achieve the same effect by simply leaving the field
blank.
- Any LDAP search filter. Any string that contains an equal sign (=)
is considered a search filter.
As an alternative, use the pull
down menus in Find all users whose: to narrow the results of your
search.
- In the Look within field, select the
organizational unit under which you want to search for entries. The
default is the directory's root point (or top most entry).
- In the Format: field, choose either
On-Screen or Printer.
- Click Find. All the users in the selected
organizational unit are displayed.
- In the resulting table, click the name of the entry that you want
to edit.
- The user edit form is displayed. Change the displayed fields as
desired and click Save Changes . The changes are made
immediately.
7.2.1.1 The "Find all users whose" field
The Find all users whose: field allows you to build
a custom search filter. Use this field to narrow down the search
results returned by Find user .
Find all users whose: provides the following search
criteria:
- The left-most pull-down list (shown in Figure 7-1) allows you to
specify the attribute on which the search will be based.
Figure 7-1 Left-Most Pull-Down List

Options are:
full name
Search each
entry's full name for a match.
last name
Search each entry's last name, or surname for a match.
user id
Search each entry's user id for a match.
phone number
Search each entry's phone number
for a match.
email address
Search each
entry's email address for a match.
- In the center pull-down list (shown in Figure 7-2, select the
type of search you want to perform.
Figure 7-2 Center Pull-Down List

Options are:
contains
Causes a
substring search to be performed. Entries with attribute values
containing the specified search string are returned. For example, if
you know an user's name probably contains the word "Steve", use this
option with the search string "Steve" to find the user's entry.
is
Causes an exact match to be found. That is,
this option specifies an equality search. Use this option when you know
the exact value of an user's attribute. For example, if you know the
exact spelling of the user's name, use this option.
isn't
Returns all the entries whose attribute value does not
exactly match the search string. That is, if you want to find all the
users in the directory whose name is not "Babs Jensen", use this
option. Be aware, however, that use of this option can cause an
extremely large number of entries to be returned to you.
sounds like
Causes an approximate, or phonetic, search to
be performed. Use this option if you know an attribute's value, but you
are unsure of the spelling. For example, if you are not sure if a
user's name is spelled "Sarret", "Sarette", or "Sarett", use this
option.
starts with
Causes a substring
search to be performed. Returns all the entries whose attribute value
starts with the specified search string. For example, if you know a
user's name starts with "Mike", but you do not know the rest of the
name, use this option.
ends with Causes a
substring search to be performed. Returns all the entries whose
attribute value ends with the specified search string. For example, if
you know a user's name ends with "Anderson", but you do not know the
rest of the name, use this option.
- In the right-most text field (shown in Figure 7-3, enter your
search string.
Figure 7-3 Right-Most Text Field

To display all of the users entries contained in the Look Within
directory, enter either an asterisk (*) or simply leave this text field
blank.
7.2.2 Editing user information
To change a user's entry:
- Display the user entry as described in "Finding user entries".
- Edit the field corresponding to the attribute that you wish to
change.
- Click Save Changes.
Note
It is possible that you will want to change an attribute value that is
not displayed by the edit user form. In this situation, use the
ldapmodify command line utility.
You can change the user's first, last, and full name field from this
form, but to fully rename the entry (including the entry's
distinguished name), you need to use the Rename User form. For more
information on how to rename an entry, see Section 7.2.5.
|
7.2.3 Managing a user's password
The password you set for user entries is used by the various Netscape
servers for user authentication.
To change or create a user's password:
- Display the user entry as described in Section 7.2.1.
- Click the Password link at the top of the user
edit form.
- Enter the new password and then the confirmation password.
- Click Set Password. The change takes effect
immediately. You can also disable the user's password by clicking the
Disable Password button. Doing this prevents the
user from logging into a Netscape server without deleting the user's
directory entry. You can reinstate the password by using the Password
Management Form to enter a new password.
To return to the general information form, click
General.
7.2.4 Managing user licenses
This area allows you to track which Netscape server products your users
are licensed to use. To manage the licenses available to the user:
- Display the user entry as described in Section 7.2.1.
- Click the Licenses link at the top of the User
Edit form.
- Click next to the Suitespot servers that you want this user to be
able to use.
- Click Save Changes.
Note that currently Netscape servers do not enforce these licenses.
To return to the general information form, click
General.
7.2.5 Renaming users
To rename a user entry:
- Display the user entry as described in Section 7.2.1.
- Click the Rename User button.
- Enter the new name in the resulting dialog box. If you are using
common name-based DNs, specify the user's full name. If you are using
uid-based distinguished names, enter the new uid value that you want to
use for the entry.
- Change the Given Name, Surname, full name, or UID fields as is
appropriate to match the new distinguished name for the entry.
If
you are using common name-based distinguished names, and you change the
distinguished name to use a new common name, then you should make sure
that this new common name is listed as the first choice in the list of
full names. This ensures that the appropriate name is displayed when a
list is generated that shows this entry. You can tell the
administration server to not retain the old full name or uid values
when you rename the entry by setting the keepOldValueWhenRenaming
parameter to false. You can find this parameter in the following file:
NSHOME/admin-serv/config/dsgw-orgperson.conf
|
Note
The rename feature changes only the user's name; all other fields are
left intact. In addition, the user's old name is still preserved so
searches against the old name will still find the new entry.
When
you rename a user entry, you can only change the user's name; you
cannot use the rename feature to move the entry from one organizational
unit to another. For example, suppose you have:
- organizational units for Marketing and Accounting
- an entry named Babs Jensen under the Marketing organizational unit
then you can rename the entry from Babs Jensen to Barbara Jensen,
but you cannot rename the entry such that Babs Jensen under the
Marketing organizational unit becomes Babs Jensen under the Accounting
organizational unit.
|
To return to the general information form, click
General.
7.2.6 Removing users
To delete a user entry:
- Display the user entry as described in Section 7.2.1.
- Click the Delete User button.
- Click O.K. in the resulting confirmation box. The user entry is
immediately deleted.
7.3 Creating groups
To create a group entry within the directory, do the following:
- From the administration server manager, go to Users &
Groups | New Group.
- Enter the group's name. You can optionally also add a description
for the group.
- If any organizational units have been defined for your directory,
you can specify where you want the new group to be placed using the
Add New Group To: list. The default location is your
directory's root point, or top-most entry.
- Click Create Group to add the group and
immediately return to the New Group form. Click
Create and Edit Group to add the group and then
proceed to the Edit Group form for the group you
have just added.
For information on editing groups, see Section 7.4.2.
7.4 Managing groups
You edit groups and manage group memberships from the Group
Edit form. From this form you can:
- Find groups
- Change group attributes
- Add and delete owners of the group
- Add and delete see also information
- Add and delete members of the group
- Rename the group
- Delete the group
- Change the group's description
The following sections describe these activities in detail.
7.4.1 Finding group entries
To find group entries:
- Go to Users & Groups | Manage Groups.
- Enter the name of the group that you want to find in the
Find Group field. You can enter any of the following in the
search field:
- A name. Enter a full name or a partial name. All entries that
equally match the search string are returned. If no such entries are
found, all entries that contain the search string will be found. If no
such entries are found, any entries that sounds like the search string
are found.
- An asterisk (*) to see all of the groups currently residing in
your directory. You can achieve the same effect by simply leaving the
field blank.
- Any LDAP search filter. Any string that contains an equal sign (=)
is considered to be a search filter. As an alternative, use the pull
down menus in Find all groups whose to narrow the results of your
search.
- In the Look within field, select the
organizational unit under which you want to search for entries. The
default is the directory's root point, or top-most entry.
- In the Forma: field, choose either
On-Screen or Printer.
- Click Find. All the groups matching your search
criteria are displayed.
- In the resulting table, click the name of the entry that you want
to edit.
7.4.1.1 The "Find all groups whose" field
The Find all groups whose: field allows you to build
a custom search filter. Use this field to narrow down the search
results that are otherwise returned by Find groups:
Find all groups whose: provides the following search
criteria:
- The left-most pull-down list (shown in Figure 7-4) allows you to
specify the attribute on which the search is based.
Figure 7-4 Left-Most Pull-Down List

Options are:
full name
Searches each
entry's full name for a match.
description
Searches each group entry's description for a match..
- In the middle pull-down list (shown in Figure 7-5), select the
type of search you want to perform.
Figure 7-5 Middle Pull-Down List

Options are:
contains
Causes a
substring search to be performed. Entries with attribute values
containing the specified search string are returned. For example, if
you know an group's name probably contains the word "Administrator",
use this option with the search string "Administrator" to find the
group entry.
is
Causes an exact match to
be found. That is, this option specifies an equality search. Use this
option when you know the exact value of an group's attribute. For
example, if you know the exact spelling of the group's name, use this
option.
isn't
Returns all the entries
whose attribute value does not exactly match the search string. That
is, if you want to find all the groups in the directory whose name does
not contain "administrator", use this option. Be aware, however, that
use of this option can cause an extremely large number of entries to be
returned to you.
sounds like
Causes an
approximate, or phonetic, search to be performed. Use this option if
you know an attribute's value, but you are unsure of the spelling. For
example, if you are not sure if a group's name is spelled "Sarret's
list", "Sarette's list", or "Sarett's list", use this option.
starts with
Causes a substring search to be
performed. Returns all the entries whose attribute value starts with
the specified search string. For example, if you know a group's name
starts with "Product", but you do not know the rest of the name, use
this option.
ends with
Causes a substring
search to be performed. Returns all the entries whose attribute value
ends with the specified search string. For example, if you know a
group's name ends with "development", but you do not know the rest of
the name, use this option.
- In the right-most text field (shown in Figure 7-6), enter your
search string.
Figure 7-6 Right -Most Text Field

To display all of the group entries contained in the Look Within
directory, enter either an asterisk (*) or simply leave this text field
blank.
For more information on how to find a group entry, see Section 7.4.1.
7.4.2 Editing group attributes
To change a group entry, do the following:
- Locate the group you want to edit as described in Section 7.4.1.
- The Group Edit form is displayed. Change the displayed fields as
desired and click Save Changes. The changes are made immediately.
Note
It is possible that you will want to change an attribute value that is
not displayed by the group edit form. In this situation, use the
ldapmodify command line utility.
|
7.4.3 Adding group members
To add members to the group:
- Locate the group you want to manage as described in Section 7.4.1.
- Click the Edit button under Group Members. A
new form is displayed that allows you to search for entries. If you
want to add user entries to the list, make sure Users is shown in the
Find pull-down menu. If you want to add group
entries to the group, make sure Group is shown.
- In the right-most text field, enter a search string. Enter any of
the following:
- A name. Enter a full name or a partial name. All entries whose
name matches the search string will be returned. If no such entries are
found, all entries that contain the search string will be found. If no
such entries are found, any entries that sounds like the search string
are found.
- A user ID if you are searching for user entries.
- A telephone number. If you enter only a partial number, any
entries that have telephone numbers ending in the search number will be
returned.
- An email address. any search string containing an at (@) symbol is
assumed to be an email address. If an exact match cannot be found, then
a search is performed to find all email addresses that begin with the
search string.
- enter either an asterisk (*) or simply leave this text field blank
to see all of the entries or groups currently residing in your
directory.
- Any LDAP search filter. Any string that contains an equal sign (=)
is considered to be a search filter.
- Click Find and Add to find all the matching
entries and add them to the group.
If the search returns any
entries that you do not want add to the group, click the box in
the Remove from list? column. You can also construct
a search filter to match the entries you want removed and then
click Find and Remove .
- When the list of group members is complete, click Save
Changes . The currently displayed entries are now members of
the group.
7.4.4 Adding groups to the group members list
You can add groups (instead of individual members) to the group's
members list. Doing so causes any users belonging to the included group
to become a member of the receiving group. For example, if Babs Jensen
is a member of the Marketing Managers group, and you make the Marketing
Managers group a member of the Marketing Personnel group, then Babs
Jensen is also a member of the Marketing Personnel group.
To add a group to the members list of another group, add the group as
if it were a user entry. See Section 7.4.3 for more information.
7.4.5 Removing entries from the group members list
To delete an entry from the group members list, do the following:
- Locate the group you want to manage as described in Section 7.4.1.
- Click Edit under Group Members.
- For each member that you want to remove from the list, click the
corresponding box under the Remove from list?
column. Alternatively, you can construct a filter to find the entries
you want to remove and click the Find and Remove
button. For more information on creating a search filter, see
Section 7.4.3.
- Click Save Changes . The entry(s) are deleted
from the group members list.
7.4.6 Managing owners
You manage a group's owners list the same way as you manage the group
members list. The following table shows you which section to read for
more information:
7.4.7 Managing see alsos
See alsos are references to other directory entries that may be
relevant to the current group. They allow users to easily find entries
for people and other groups that are related to the current group.
You manage see alsos the same way as you manage the group members list.
The following table shows you which section to read for more
information:
7.4.8 Removing groups
To delete a group, do the following:
- Locate the group you want to delete as described in Section 7.4.1.
- Click Delete Group .
- Click O.K. in the resulting confirmation box.
The group entry is immediately deleted.
7.4.9 Renaming groups
To rename a group, do the following:
- Locate the group you want to manage as described in Section 7.4.1.
- Click the Rename Group button.
- Enter the new group name in the resulting dialog box.
When you
rename a group entry, you only change the group's name; you cannot use
the rename feature to move the entry from one organizational unit to
another. For example, suppose you have:
- organizational units for Marketing and Accounting
- an group named Bean Counters under the Accounting organizational
unit
then you can rename the group from Bean Counters to Counters of
Beans, but you cannot rename the entry such that Bean Counters under
the Accounting organizational unit becomes Bean Counters under the
Marketing organizational unit.
7.5 Creating organizational units
For information on organizational units and how they should be used,
see Section 6.5. To create an organizational unit, do the following:
- From the administration server manager, go to Users &
Groups | New Organizational Unit.
- In the Unit Name field, enter the name of the
organizational unit.
- In the Description field, you can optionally
add a description of the unit.
- In the Add Organizational Unit to list, select
the organization under which this new organization will reside.
- Click Create Organizational Unit . The new entry
is added immediately.
7.5.1 Notes on organizational units
The following notes may be of interest to the directory administrator:
- New organizational units are created using the organizationalUnit
object class.
- The distinguished name for new organizational units is of the form:
ou=new organization, ou=parent organization, ...,o=base
organization,      c=country
|
For example, if you create a new organization called Accounting within
the organizational unit West Coast, and your Base DN is o=Ace Industry,
c=US, then the new organization unit's DN is:
ou=Accounting, ou=West Coast, o=Ace Industry, c=US
|
7.6 Managing organizational units
You edit and manage organizational units from the Organizational Unit
Edit form. From this form, you can:
- Find organizational units
- Remove organizational units
- Edit organizational unit attributes
- Rename organizational units
- Delete organizational units
7.6.1 Finding organizational units
To find organizational units:
- Go to Users & Groups | Manage Organizational
Units.
- Enter the name of the unit you want to find in the Find
organizational unit field. You can enter any of the following in the
search field:
- A name. Enter a full name or a partial name. All entries that
equally match the search string will be returned. If no such entries
are found, all entries that contain the search string will be found. If
no such entries are found, any entries that sounds like the search
string are found.
- An asterisk (*) to see all of the groups currently residing in
your directory. You can achieve this same result by simply leaving the
field blank.
- Any LDAP search filter. Any string that contains an equal sign (=)
is considered to be a search filter.
As an alternative, use the pull down menus in Find all units
whose: to narrow the results of your search.
- In the Look within: field, select the
organizational unit under which you want to search for entries. The
default is the root point of the directory.
- In the Format: field, choose either
On-Screen or Printer.
- Click Find . All the organizational units
matching your search criteria are displayed.
- In the resulting table, click the name of the organizational unit
that you want to find.
7.6.2 The Find all units whose: field
The Find all units whose: field allows you to build
a custom search filter. Use this field to narrow down the search
results that are otherwise returned by Find organizational
unit:
Find all units whose: provides the following search
criteria:
- The left-most pull-down list (shown in Figure 7-7) allows you to
specify the attribute on which the search will be based.
Figure 7-7 Left-Most Pull-Down List

Options are:
unit name
Search each
entry's name for a match.
description
Search each organizational unit entry's description for a match.
- In the middle pull-down list shown in Figure 7-8, select the
type of search you want to perform.
Figure 7-8 Middle Pull-Down List

Options are:
contains
Causes a
substring search to be performed. Entries with attribute values
containing the specified search string are returned. For example, if
you know an organizational unit's name probably contains the word
"Marketing", use this option with the search string "Marketing" to find
the organizational unit entry.
is
Causes
an exact match to be found. That is, this option specifies an equality
search. Use this option when you know the exact value of an
organizational unit's attribute. For example, if you know the exact
spelling of the organizational unit's name, use this option.
isn't
Returns all the entries whose attribute
value does not exactly match the search string. That is, if you want to
find all the organizational units in the directory whose name does not
contain "Marketing", use this option. Be aware, however, that use of
this option can cause an extremely large number of entries to be
returned to you.
sounds like
Causes an
approximate, or phonetic, search to be performed. Use this option if
you know an attribute's value, but you are unsure of the spelling. For
example, if you are not sure if a organizational unit's name is spelled
"Sarret's Org", "Sarette's Org", or "Sarett's Org", use this option.
starts with
Causes a substring search to
be performed. Returns all the entries whose attribute value starts with
the specified search string. For example, if you know a organizational
unit's name starts with "Product", but you do not know the rest of the
name, use this option.
ends with
Causes a
substring search to be performed. Returns all the entries whose
attribute value ends with the specified search string. For example, if
you know a organizational unit's name ends with "Development 1", but
you do not know the rest of the name, use this option.
- In the right-most text field shown in Figure 7-9, enter your
search string.
Figure 7-9 Right-Most Text Field

To display all of the organizational unit entries contained in the
Look Within directory, enter either an asterisk (*)
or simply leave this text field blank.
For more information on how to find an organizational unit entry, see
Section 7.6.1.
7.6.3 Editing organizational unit attributes
To change a organizational unit entry:
- Locate the organizational unit you want to edit as described in
Section 7.6.1.
- The organizational unit edit form is displayed. Change the
displayed fields as desired and click Save Changes .
The changes are made immediately.
Note
It is possible that you will want to change an attribute value that is
not displayed by the organizational unit edit form. In this situation,
use the ldapmodify command line utility.
|
7.6.4 Renaming organizational units
To rename an organizational unit entry, do the following:
- Make sure no other entries exist in the directory under the
organizational unit that you want to rename.
- Locate the organizational unit you want to edit as described in
Section 7.6.1.
- Click the Rename button.
- Enter the new organizational unit name in the resulting dialog
box.
When you rename an organizational unit entry, you can only
change the organizational unit's name; you cannot use the rename
feature to move the entry from one organizational unit to another. For
example, suppose you have:
- organizational units for Marketing and Accounting
- an organizational unit called Widget 1 under the Marketing
organizational unit
then you can rename the entry from Widget 1 to Widget 2, but you
cannot rename the entry such that Widget 1 under the Marketing
organizational unit becomes Widget 1under the Accounting organizational
unit.
7.6.5 Deleting organizational units
To delete an organizational unit entry do the following:
- Make sure no other entries exist in the directory under the
organizational unit that you want to rename.
- Locate the organizational unit you want to delete as described in
Section 7.6.1.
- Click the Delete button.
- Click O.K. in the resulting confirmation box. The organizational
unit is immediately deleted.
7.6.6 Importing a directory from LDIF
If you do not currently have a directory, or if you want to add a new
subtree to an existing directory, you can use the Users and Groups
import function. This function accepts a file containing LDIF and
attempts to build a directory or a new subtree from the LDIF entries.
If you are using the Netscape local directory, the import function will
optionally overwrite any existing directories. If you are using a
directory server and you attempt to import an entry that already
exists, then that operation will fail.
To merge LDIF formatted entries into an existing directory (either for
a local directory, or for directory server), it is best to convert the
LDIF to LDIF update statements and use ldapmodify to perform the merge.
To create an new directory or subtree from Users and Groups, do the
following:
- Go to Users & Groups | Import.
- Enter the full path name to the LDIF file containing the entries
you want to add to your directory.
- Check Stop on errors if you want the import to
fail completely if any single add operation fails.
- If you are using the local directory, then Erase existing
database is available to you. Check this field if you want
your existing database to be erased when a new directory is imported
from LDIF. If Erase existing database is not
checked, then the import function will attempt to add the contents of
the LDIF file to the existing directory. However, if the import
function attempts to add an entry to the directory that already exists,
then an error is returned. Whether the import function continues or
stops immediately is dependent on whether Stop on errors
is checked.
- Click Begin Import . The import proceeds
immediately.
7.7 Exporting a database to LDIF
You can export your current directory to LDIF using the Users and
Groups export function. This function creates an LDIF-formatted file
that represents your directory.
To export your directory to an LDIF file:
- Go to Users & Groups | Export.
- Enter the full path name to the file in which you want the LDIF to
be placed. Note that if you do not enter a full path name here, the
file is placed in NSHOME\db\ldap\tools where NSHOME is your
administration server's installation root directory.
- The Suffix to add field is available if you are
exporting a local directory to the directory server.
In this
situation, you must specify a suffix to successfully import your local
directory into directory server. The suffix you specify must match at
least one of the suffixes configured for your directory server.
- Click OK. The export proceeds immediately.
960