![[Compaq]](../../images/compaq.gif)
![[Go to the documentation home page]](../../images/buttons/bn_site_home.gif)
![[How to order documentation]](../../images/buttons/bn_order_docs.gif)
![[Help on this site]](../../images/buttons/bn_site_help.gif)
![[How to contact us]](../../images/buttons/bn_comments.gif)
![[OpenVMS documentation]](../../images/ovmsdoc_sec_head.gif)
| Document revision date: 28 June 1999 | |
|
|
|
|
|
|
This manual explains how to install and configure the Netscape FastTrack Server and provides some basic information you will need to get started. After configuring your server, use this manual to help maintain your server.
Revision/Update Information: This is a new manual.
Software Version: OpenVMS Alpha Version 7.2
Compaq Computer Corporation
Houston, Texas
Compaq Computer Corporation makes no representations that the use of its products in the manner described in this publication will not infringe on existing or future patent rights, nor do the descriptions contained in this publication imply the granting of licenses to make, use, or sell equipment or software in accordance with the description.
Possession, use, or copying of the software described in this publication is authorized only pursuant to a valid written license from Compaq or an authorized sublicensor.
Compaq conducts its business in a manner that conserves the environment and protects the safety and health of its employees, customers, and the community.
© Compaq Computer Corporation 1999. All rights reserved.
The following are trademarks of Compaq Computer Corporation: Alpha, Compaq, DECdtm, DECdirect, DECwindows, DIGITAL, OpenVMS, VAX, VAX DOCUMENT, VAXcluster, VMS, and the Compaq logo.
The following are third-party trademarks:
Display POSTSCRIPT is a registered trademark of Adobe Systems Incorporated.
All other trademarks and registered trademarks are the property of their respective holders.
ZK6563
The OpenVMS documentation set is available on CD-ROM.
| Contents |
This manual explains how to install and configure Netscape FastTrack Server and provides some basic information you will need to get started. After configuring your server, use this manual to help maintain your server.
Here is a partial list of what Netscape FastTrack Server offers:
To configure any of the SuiteSpot servers, you need a network browser, such as Netscape Navigator or Navigator Gold 3.0 or later, Netscape Communicator, or any other browser that supports Java and JavaScript. If you don't have a browser installed on your computer, install the version of Netscape Navigator from your SuiteSpot CD. In most cases, this is in the /nav30 directory. Because all configuration forms use Java or JavaScript, you must enable that feature in your browser before you can administer your Netscape SuiteSpot servers. To do this in Navigator:
Compaq welcomes your comments on this manual.
Print or edit the online form SYS$HELP:OPENVMSDOC_COMMENTS.TXT and send us your comments by:
| Internet | openvmsdoc@zko.mts.dec.com |
| Fax | 603 884-0120, Attention: OSSG Documentation, ZKO3-4/U08 |
|
Compaq Computer Corporation
OSSG Documentation Group, ZKO3-4/U08 110 Spit Brook Rd. Nashua, NH 03062-2698 |
Use the following World Wide Web address to order additional documentation:
http://www.openvms.digital.com:81/ |
If you need help deciding which documentation best meets your needs, call 800-DIGITAL (800-344-4825).
The name of the OpenVMS AXP operating system has been changed to the OpenVMS Alpha operating system. Any references to OpenVMS AXP or AXP are synonymous with OpenVMS Alpha or Alpha.
VMScluster systems are now referred to as OpenVMS Cluster systems. Unless otherwise specified, references to OpenVMS Clusters or clusters in this document are synonymous with VMSclusters.
In this manual, every use of DECwindows and DECwindows Motif refers to DECwindows Motif for OpenVMS software.
The following conventions are also used in this manual:
| Ctrl/ x | A sequence such as Ctrl/ x indicates that you must hold down the key labeled Ctrl while you press another key or a pointing device button. |
| [Return] | In examples, a key name enclosed in a box indicates that you press a key on the keyboard. (In text, a key name is not enclosed in a box.) |
| ... |
Horizontal ellipsis points in examples indicate one of the following
possibilities:
|
|
.
. . |
Vertical ellipsis points indicate the omission of items from a code example or command format; the items are omitted because they are not important to the topic being discussed. |
| ( ) | In command format descriptions, parentheses indicate that, if you choose more than one option, you must enclose the choices in parentheses. |
| [ ] | In command format descriptions, brackets indicate optional elements. You can choose one, none, or all of the options. (Brackets are not optional, however, in the syntax of a directory name in an OpenVMS file specification or in the syntax of a substring specification in an assignment statement.) |
| { } | In command format descriptions, braces surround a required choice of options; you must choose one of the options listed. |
| bold text | This text style represents the introduction of a new term or the name of an argument, an attribute, or a reason. |
| italic text | Italic text emphasizes important information and indicates complete titles of manuals and variables. Variables include information that varies in system messages (Internal error number), in command lines (/PRODUCER= name), and in command parameters in text (where device-name contains up to five alphanumeric characters). |
| UPPERCASE TEXT | Uppercase text indicates a command, the name of a routine, the name of a file, or the abbreviation for a system privilege. |
| - | A hyphen in code examples indicates that additional arguments to the request are provided on the line that follows. |
| numbers | All numbers in text are assumed to be decimal unless otherwise noted. Nondecimal radixes---binary, octal, or hexadecimal---are explicitly indicated. |
| | | The vertical bar is used as a separator for user interface elements. For example, "choose Server Status | Logging Options" means you should click the Server Status button in the top frame of the Server Manager and then click the Logging Options link in the left frame. |
| / | Forward slash is used to separate directories in a path. If you use the NT operating system, you might be more familiar with the backslash in paths, but NT supports both forward and back slashes. |
This chapter provides a basic introduction to the World Wide Web and the Internet. The information is divided into the following sections:
One computer by itself is a useful tool. You can work with and store a
great deal of information. A network, or group of computers working
together, is an even greater tool. You and other people can share and
work with each other's information in a variety of ways.
1.1.1 Intranets, extranets, and the Internet
If a network can exchange information with other networks through a protocol called TCP/IP (Transmission Control Protocol/Internet Protocol), it is part of the Internet. At its simplest, the Internet is a network of networks. No one person or company runs the Internet. Because of this, the information available on the Internet changes constantly. New computers are continually added to the networks that make up the Internet, which provide an evergrowing source of information.
You use this global Internet to send and receive email, participate in news and discussion groups, and interact with web sites.
Web sites are collections of documents and programs that can include hypertext, graphics, sounds, movies, and more. Often they contain links to other web documents, perhaps at other web sites. All the web sites in the world are known collectively as the World Wide Web (often called "WWW" or simply "the web").
A company can also maintain an internal network of web sites, email, and other Internet services; this structure is called an intranet. An intranet can contain more than just static information; you can also create interactive applications, such as administrative requests, health plan forms and much more. Usually, an intranet is kept separate from the Internet by hardware and software called a firewall, so that only people in the company can access that intranet. An intranet is a particularly useful way to disseminate information within a company.
When a company extends its intranet outside the firewall to allow
select customers, suppliers, and offsite workers access to the
company's data, that structure is called an extranet. You can use
interactive applications with an extranet too. For example, you might
want to create a form that allows you to place a purchase order with a
supplier, or track the status of a shipment.
1.1.2 Client/server relationships
The web is based on a client/server relationship. You access the web with a client program, or browser, such as Netscape Navigator, and request data from a server. The server program, such as Netscape FastTrack Server, responds by sending the data or an error back to the client as illustrated in Figure 1-1. The data may consist of HTML pages, graphics, or even multimedia programs, for example.
Figure 1-1 Client/Server Relationship

When the client (in this case a web client or browser) receives the data from the server, it renders the appropriate response. For example, if the client requested an HTML page or a graphic, the client displays it upon receipt. If the server is unable to fulfill the request made by the client, the server returns an error response.
Sometimes the word server is used to mean the hardware or machine that serves the documents, but in this book, server refers to the installed software program. |
When clients on the Internet connect to servers to visit web sites, they communicate using other protocols in addition to TCP/IP. Multiple protocols are often thought of as layers as shown in Figure 1-2.
Figure 1-2 Protocol Layers
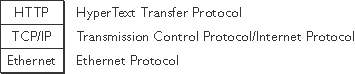
For example, the bottom layer might be Ethernet if you are on a corporate intranet, or PPP (Point-to-Point Protocol) if you use a modem. TCP/IP is the middle layer in Internet communication, and it specifies exactly how all digital data is transferred from one computer to another. TCP/IP is what makes sure the messages are sent back and forth reliably. The next layer above might be HTTP (HyperText Transfer Protocol), which specifies the type of communication and information sent between the server and the client. When both the server and client use the same protocols (such as TCP/IP and HTTP), they "speak" the same language and are able to communicate and exchange information. All web servers and clients use HTTP to communicate.
In addition to HTTP, other protocols work "on top" of TCP/IP. Some of these include:
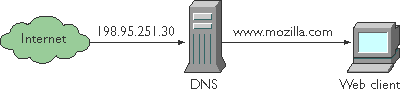
On the Internet, a computer is identified by a number, such as 198.95.251.30. Each computer connected to the Internet has a unique number assigned to it. This number is called a computer's Internet Protocol address, or IP address. To make Internet navigation easier for people, each IP address is also associated with a domain name, such as home.netscape.com, or www.mozilla.com. The words you type into the Location field in Netscape Navigator are automatically translated to IP addresses by a special program called the Domain Name System (or DNS), as shown in Figure 1-3. The DNS is usually maintained by your Internet provider or information systems department.
Figure 1-3 Domain Name System (DNS)
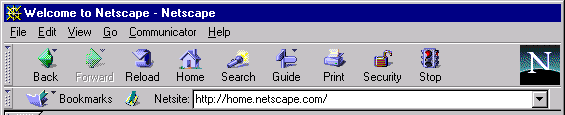
The various protocols are handled transparently by the client and server software. The only time you see what protocol you're using is when you type an Internet address, called a URL, into your browser. The protocol shown in Figure 1-4 is HTTP.
Figure 1-4 URL in Communicator
Each IP address and domain name must be unique in the world, so organizations have been set up to control their distribution. In the United States, one controlling organization is called the InterNIC. In order to connect your web site to the Internet, you need to register with one of these organizations for an IP address and domain name. For information on how to do this, visit the InterNIC web site at:
|
To get information from the Internet, you need to know where the information is stored. Each file on the Internet has a unique address that defines its location. This address is called a Uniform Resource Locator (URL). URLs are in the format protocol://computer:portnumber/unique_identifier.
The protocol for accessing files on the web is HTTP, so all web URLs begin with http://, as in the preceding example. Most files on the web have the extension html or htm where HTML stands for HyperText Markup Language. The rest of the example URL is straightforward--computer represents the name of the machine the web server runs on is www.mozilla.com, the port number is 80, the directory on that computer is forms, and the name of the file is order.html. Typing the URL in Figure 1.5 into Communicator's Location or Netsite field tells the server to send the client the file order.html, from the forms directory, on the computer www.mozilla.com, using HTTP.
A port number designates a specific location (or port) on the server's host machine used to pass data in and out of the computer. In the URL in the example, port number refers to the TCP/IP port reserved for the web server.
The standard web server port number is 80 and the standard secure (SSL-enabled) web server port number is 443, but you can install the server to any port. If you choose the default port number (80), you do not need to include it when you enter your URL in your browser. For example, the following URLs are interchangeable.
If you use a port other than the default port (port 80), the URL used to gain access to your home page changes. For example, if your computer is called www.mozilla.com and you choose port 9753, users who visit your site must enter the URL with the computer name and the port number as follows:
|
Before you install and configure the Netscape FastTrack Server, you should understand the concepts outlined in this chapter. This book does not provide instructions on using HTML, registering your site, or creating web site content. More information about the concepts introduced in this chapter is available on the web from the sources in Table 1-1.
| Task | Description | Web Site |
|---|---|---|
| Read guides to HTML and other information | Netscape web site | http://home.netscape.com/ |
| Register IP addresses and domain names | InterNIC web site | http://www.internic.net/ |
| Get secure Digital IDs | VeriSign web site | http://www.verisign.com/ |
| Search the web for more information | Netscape search | http://home.netscape.com/escapes/search/ |
This chapter tells you how to install the Netscape FastTrack Server and
begin configuring it for your needs.
2.1 The administration server
When you install the Netscape FastTrack Server, the administration server is installed on the same computer. The administration server is a web-based server containing forms you use to configure your Netscape server products, including the Netscape FastTrack Server. With the administration server, you can manage multiple servers from a single interface.
During the installation of your Netscape FastTrack Server, you select a port for the administration server. Like any other server, the administration server listens to that port and responds to requests sent to it.
For more information on the administration server, see the online
guideManaging Netscape Servers. For information on accessing
your Netscape FastTrack Server through the administration server, see
Chapter 3.
2.2 Before you begin installation
Before you install the Netscape FastTrack Server, you should do the following:
If you have a 2.x server installed, see Section 2.2.5 for information
before you install. If you need more information on accomplishing these
tasks than is included in the following sections, consult your system
manager.
2.2.1 Make sure DNS is running
When you install the Netscape FastTrack Server, you'll be asked for a hostname or an IP address (or multiple entries of the same) as input strings.
As you prepare for installation, make sure DNS is running properly.
Otherwise, the server can't resolve (translate) hostnames and can't
connect to any remote hosts.
2.2.2 Create an alias for the server
If your server will run on one machine among many in a network, you or your system administrator should set up a DNS CNAME record or an alias (such as www) that points to the actual server machine. Later, you can change the actual hostname or IP address of the server machine without having to change all URLs that point to the server machine.
For example, you might call the server my_server.mozilla.com and then
use an alias like www.mozilla.com. So the URLs to documents on your
server would always use the www alias instead of my_server.
2.2.3 Create a user account for the server
If you don't know how to create a new user on your system, you should consult your system manual or a Unix administrator's handbook.
You should create a Unix user account for the web server. You probably want the server to have restricted access to your system resources and to run under a nonprivileged system user account.
When the web server starts, it runs with this Unix user account (you will specify this account during installation). Any child processes of the server are created with this account as the owner. The account needs read permissions for the configuration files and write permissions for the logs directory. For security reasons, the user account should not have write permissions to some of the configuration files, though some, such as the access control files, should be group writable. If the security of the server is compromised, no one can write to the configuration files.
In addition, the user account you create for the server should belong to a group that contains the server users for all Netscape servers. With a Netscape group, multiple servers can have access to shared files.
You should create a dedicated account for the web server. You can use the account with the name nobody, but you might not want to give the user nobody Netscape group permissions. In addition, the user nobody might not work on some systems. Some systems assign a user ID of -2 for the user nobody. A user ID of less than 0 generates an error during installation. Check the /etc/passwd file to see if the uid for nobody exists, and make sure it is greater than 0.
It's strongly recommended that you use a dedicated account for the server. |
The administration server can also run with a user account that has write permissions to the configuration files for all installed servers. However, it's much easier to run the administration server as root because then the administration server user can start and stop servers with port numbers less than 1024. (Port numbers greater than 1024 can be started by any user).
For more information about the administration server, see the online
guide Managing Netscape Servers.
2.2.4 Choose unique port numbers
You need two port numbers: one for the administration server and one for the web server.
Port numbers for all network-accessible services are maintained in the file /etc/services. The standard web server port number is 80 and the standard SSL-enabled web server port number is 443, but you can install the server to any port. If you use a port other than the default port (port 80), the URL used to gain access to your home page will change. For example, if your computer is called www.mozilla.com and you choose port 9753, your server's URL will be http://www.mozilla.com:9753/.
You should choose a random number for the administration server to make it harder for anyone to breach your server. When you configure your server, you use the administration server's port number. For example, for the server mozilla.com, the server's URL could be http://www.mozilla.com:2634/.
Make sure the port you choose isn't in use. Check the file /etc/services on the server machine to make sure you don't assign a port number that is reserved for another service. If you choose a port that is being used by another service, the installation program prompts you for another port.
If you choose a server port number lower than 1024, you must be logged in as root to start the server. After the server is bound to the port, the server changes from the root user account to the user account you specify. If you choose a port number greater than 1024, you don't have to be the root user to start the server. |
Before you upgrade a 2.x server to a 3.01 server you should read the information on upgrading/migrating in Managing Netscape Servers.
Use the administration server to migrate settings from a previous version of the server. For more information, see Section 3.1.5.
Copy any documents that you still want to use from your 2.0 document
directory to your new 3.01 document directory.
2.3 Installation instructions
The following sections describe the installation of the Netscape FastTrack Server.
You must install your version 3.01 servers in a separate server root directory from the server root that contains your 2.x servers. |
Before installing the Netscape FastTrack Server, install Netscape
Navigator 3.0 (or later), Netscape Navigator Gold, or Netscape
Communicator. You need one of these applications installed to configure
your server. These applications are available for downloading from
http://home.netscape.com; Netscape Communicator is included with
Netscape FastTrack Server.
2.3.1 Logging in as the correct user
Before you install the server, you must log in as root, unless you meet both these conditions:
If you meet these conditions, you should log in with the user account
that the administration server will use.
2.3.2 Unpacking the files
To get the Netscape FastTrack Server files and unpack them, follow these steps:
To run ns-setup, follow these steps:
You are now ready to configure your new server. The installation
program prompts for the name of your network client. The default is
Netscape Navigator. You should launch the client and begin configuring
your Netscape FastTrack Server immediately after installation.
2.3.4 Configuring your new Netscape FastTrack Server
To complete the installation, you must configure your server using the administration server's Server Administration page. After the installation program writes the configuration files to the disk, the administration server starts and displays this page.
If you don't understand a setting, you can use the default value and later change it via the Server Manager forms.
The configuration HTML form collects data used to generate the configuration files magnus.conf and obj.conf. The server uses these files to control how it works. For complete documentation, see the NSAPI Programmer's Guide on the Netscape DevEdge web site at:
http://developer.netscape.com/library/documentation/ |
The last step of running ns-setup started your network client. If your client isn't running, start it. Type the URL for your server's administration server, using the following format:
http://machine_name:admin_port/ |
Here machine_name represents the name you entered for your machine's full name during installation and admin_port is the administration port you specified (for example, http://server1.mozilla.com:54321/).
To configure your web server, follow these steps:
mozilla-unsecure mozilla-secure unsecure_test_area |
If the configuration was successful, you see a page showing your new
server's name, the port it listens to, and the primary document
directory. From this page, you can configure your server further,
register your server for technical support, install another server, or
return to the Server Administration page. Clicking on the "Configure
more about your server" link takes you to the Server Manager, where you
can configure your server. For more information about the Server
Manager, see Section 3.2.
2.4 What the installation process does
The installation process places all the files under the server root directory that you specified during installation.
The following files are created under the server root directory:
The following directories are created under the server root directory.
http://developer.netscape.com/library/documentation/ |
http://developer.netscape.com/library/documentation/index.html. |
This section describes the most common installation problems and explains how to solve them.
I accidentally denied all access to the Server Manager forms.
Log in to the system as root or with the server's user account. In the admin-serv/config directory, edit the ns-admin.conf file. There's a line for allowed hosts or allowed addresses. Use wildcard patterns, or modify the lines to include your host and address, save the file, and then restart the administration server.
Clients can't locate the server.
First, try using the hostname. If that doesn't work, use the fully qualified domain name (such as www.mozilla.com), and make sure the server is listed in DNS. If that doesn't work, use the IP address.
The port is in use.
Most likely, you didn't shut down a server before you migrated the settings. Shut down the old server, then manually start the new one.
The port might also be used by another installed server. Make sure the port you've chosen isn't already being used by another server.
The server is slow and transfers take too long.
If you log accesses through SYSLOG, you might encounter reduced performance. Switch to using the server's error log files instead.
The server machine might need more RAM. Also, other applications running on the computer might be using CPU cycles, degrading server performance.
I've forgotten the administration user name and password.
In the admin-serv/config directory in your server root directory, edit the admpw text file, which contains a line of text similar to the following:
admin:lnOVeixulqkmU |
The text before the colon is the administration user name (in this case, admin); the text following the colon is the password, which is encrypted.
Delete everything after the colon and save the file. Shut down the administration server, and restart it. (See Section 4.1 for more information.) When prompted for the administration password, leave the password field blank. You should be able to access the administration server now. Be sure to create a new password for the administration server. For more information on creating a new password for the administration server, see Managing Netscape Servers.
This chapter describes how to configure and manage your server by doing the following:
During installation, you specified a port number for the administration
server. The administration server helps you manage your Netscape
FastTrack Server (or multiple servers) from a single interface--the
Netscape Server Administration page. From this page you can access the
Server Manager, which is a collection of forms you use to change
options and control your web server.
3.1 Using the Server Administration page
You configure your administration server and access the configuration forms for other Netscape servers (including the Netscape FastTrack Server) with the Netscape Server Administration page. This page contains links to the Server Managers for the Netscape servers you have installed.
You can perform the following web server tasks from the Server Administration page:
In addition, you can configure and manage the administration server.
For more information, see Managing Netscape Servers.
3.1.1 Accessing the Server Administration page
If you stopped the administration server after installation, you must start the administration server before you can configure your web server. Go to the server root directory and type ./start-admin. This starts the administration server using the port number you specified during installation.
As long as you have access to client software such as Navigator, you can access the Server Administration page to configure your web server.
To access the Server Administration page, make sure the administration server is running and then complete the following:
http://servername.your_domain.domain:port_number/ |
The Server Administration page lists all the servers you've installed
on this system. Click the name of the server you want to configure
under Servers Supporting General Administration.
3.1.2 Starting and stopping a web server
Figure 3-1 shows the On/Off icon.
Figure 3-1 On/Off Icon

To start or stop your web server, complete the following:
There are three ways you can have multiple web servers on your system:
Each approach has its strengths and weaknesses; you should choose the one that's right for your situation.
If you install multiple instances of the server, you can have separate configuration information. For example, one instance of the server could have security features or web publishing enabled while another server could have them disabled. However, each instance of the server takes substantial resources of RAM, disk space, and swap space.
Hardware virtual servers allow you to map multiple IP addresses to multiple document roots. For example, if you have two IP addresses, you could map the first IP address to one document root and the second IP address to a second document root. While hardware virtual servers take fewer system resources than multiple instances of the server, they must share the same configuration information. For example, if one hardware virtual server has enabled security features or web publishing, they all must have it enabled.
Software virtual servers give you the ability to map a single IP
address to multiple server names. Each software virtual server can have
its own home page. One use for this is to host multiple web sites from
one IP address. However, in order for software virtual servers to work
correctly, the users accessing the server must be using client software
that supports the HTTP Host header, such as Netscape Communicator. Like
hardware virtual servers, software virtual servers all must have the
same configuration.
3.1.4 Installing multiple instances of the web server
You can install another instance of the web server on your current computer without going through the installation program. Your web server software license allows you to have as many web server instances as you want on one system. Each web server you have installed can run on any TCP/IP port on your system, but you cannot run two web servers on the same port at the same time unless they are configured to respond to different IP addresses. Contact your system's vendor for information on how to configure your system to respond to different IP addresses.
If your system is configured to listen to multiple IP addresses, for each server you install enter one of the IP addresses that your system is hosting.
If you installed your server before configuring your system to host multiple IP addresses, configure your system to respond to different IP addresses. Then you can either install hardware virtual servers or change the server's bind address using the Server Manager (see Section 4.7 and install separate instances of the server for each IP address.
To install another web server with its own separate configuration files:
After installing, you will have several subdirectories in your server
root directory, one for each server you install. Each of these servers
can be managed from the Server Administration page.
3.1.5 Migrating a server from a previous version
You can migrate a server from 2.x to 3.01 using the administration server. Your 2.x server is preserved, and a new 3.01 server using the same settings is created.
You should stop running the 2.x server before migrating settings. Make sure you have Netscape Navigator 3.0 or later or Netscape Communicator installed on your computer before migrating settings.
To remove a server from your system, use the Server Administration page. Be sure that you will not need the server anymore. You can also remove the administration server for the type of server you are deleting. For example, if you are removing a FastTrack server and no longer plan to install any FastTrack servers, you could remove the administration server too.
To remove a server:
Do not remove the binaries for the administration server if more than one server is installed. |
The Server Manager is the collection of forms you use to change options and control your server. To access the Server Manager:
When changing server information, you must save and apply your changes in order for your changes to take place. After you submit a form, you get a pointer to a script that allows you to save and apply your changes. |
You can return to the Server Administration page by clicking the Admin button in the upper-right corner of the Server Manager. The Server Manager is shown in Figure 3-2.
Figure 3-2 Server Manager
Use the server configuration buttons in the top frame to configure the
server. After clicking a button, you will see a list of items on the
left. Click one of these links; the corresponding form comes up in the
main frame. If you need more information about a form, click Help for
context-sensitive help. In the help window, click Contents to see a
list of online manuals you can view.
3.2.1 Using the Resource Picker
Most of the Server Manager forms configure the entire server. Some forms can configure either the entire server or files or directories that the server maintains. These forms have the Resource Picker, shown in Figure 3-3 at the top. The Resource Picker lets you specify what resource to configure.
Figure 3-3 Resource Picker
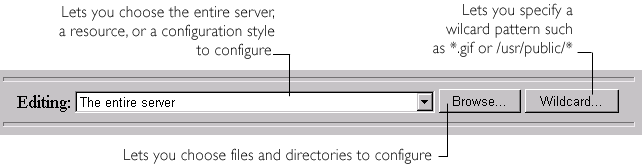
Pick a resource to configure from the drop-down list. Clicking Browse
brings up a form that lets you browse your primary document directory;
clicking Options on this form allows you to choose other directories.
Clicking Wildcard lets you configure files with a specific extension.
3.2.2 Wildcards used in the Resource Picker
In many parts of the server configuration, you specify wildcard patterns to represent one or more items to configure. Please note that the wildcards for access control may be different from those discussed in this section.
Wildcard patterns use special characters. If you want to use one of these characters without the special meaning, precede it with a backslash (\) character.
| Pattern | Use |
|---|---|
| * | Match zero or more characters. |
| ? | Match exactly one occurrence of any character. |
| | | An or expression. The substrings used with this operator can contain other special characters such as * or $. The substrings must be enclosed in parentheses, but the parentheses cannot be nested. |
| $ | Match the end of the string. This is useful in or expressions. |
| [abc] | Match one occurrence of the characters a, b, or c. Within these expressions, the only character that needs to be treated as a special character is ]; all others are not special. |
| [a-z] | Match one occurrence of a character between a and z. |
| [^az] | Match any character except a or z. |
| *~ | This expression, followed by another expression, removes any pattern matching the second expression. |
| Pattern | Result |
|---|---|
| *.netscape.com | Matches any string ending with the characters .netscape.com. |
| (quark | energy).netscape.com | Matches either quark.netscape.com or energy.netscape.com. |
| 198.93.9[23].??? | Matches a numeric string starting with either 198.93.92 or 198.93.93 and ending with any 3 characters. |
| *.* | Matches any string with a period in it. |
| *~netscape-* | Matches any string except those starting with netscape-. |
| *.netscape.com~quark.netscape.com | Matches any host from domain netscape.com except for a single host quark.netscape.com. |
| .netscape.com~(quark | energy | neutrino).netscape.com | Matches any host from domain netscape.com except for hosts quark.netscape.com, energy.netscape.com, and neutrino.netscape.com. |
| *.com~*.netscape.com | Matches any host from domain com except for hosts from subdomain netscape.com. |
This chapter describes how to configure server preferences for your
Netscape FastTrack Server by using the Server Manager configuration
forms.
4.1 Starting and stopping the server
Once installed, the server runs constantly, listening for and accepting requests. If your server is running, you'll see the On icon and its green light (to the left of the server's name) in the Server Administration page, as shown in the graphic at left. You can start and stop the server by clicking the icon. You can also start, restart, and stop the server from the Server Manager.
Stop shuts down the server completely, interrupting service until it is restarted. If you set the etc/inittab file to automatically restart (using "respawn"), you need to remove the line pertaining to the web server in etc/inittab before shutting down the server; otherwise, the server automatically restarts.
To start or stop the server from the Server Manager:
After you shut down the server, it may take a few seconds for the server to complete its shut-down process and for the status to change to "Off." |
If your machine crashes or is taken offline, the server stops and any
requests it was servicing may be lost.
4.2 Setting the termination timeout
When you stop your server, the server stops accepting new connections. Then it waits for all outstanding connections to complete. The time the server waits before timing out is configurable in the magnus.conf file. By default it is set to 3 seconds. You probably do not need to change this value. If you do need to change the value, add a line in magnus.conf as follows:
TerminateTimeout seconds |
where seconds represents the number of seconds you want to wait before timing out.
The advantage to configuring this value is that if for some reason you
want to wait longer for connections to complete, you can. However,
because most servers often have connections open from nonresponsive
clients, if you increase the time the server waits, you will almost
always have to wait the full time before your server shuts down.
4.2.1 Restarting the server
You can restart the server using one of the following methods.
If you are using a version of Unix not derived from System V (such as SunOS 4.1.3), you won't be able to use the inittab file.
Because the installation forms cannot edit the /etc/rc.local or /etc/inittab files, you need to edit those files with a text editor. If you don't know how to edit these files, consult your system administrator or system documentation.
Normally, you can't start an SSL-enabled server with either of these files because the server requires that you enter a password before starting. Though you can start an SSL-enabled server automatically if you keep the password in plain text in a file, this practice is not recommended.
Leaving your SSL-enabled server's password in plain text in the server's start script on your system is a large security risk. Anyone who can access the file has access to your SSL- enabled server's password. Consider whether you can afford the security risks before keeping your SSL-enabled server's password in plain text on your system. |
The server's start script, key pair file, and the key password should be owned by root (or, if a non-root user installed the server, that user account), with only the owner having read and write access to them.
If the security risk is not a concern for you, follow these steps to start your SSL-enabled server automatically:
echo "your_SSL-enabled_server_password" | |
echo "MBi12!mo" | ./$PRODUCT_BIN -d $PRODUCT_SUBDIR/config d$@ |
To restart the server using inittab, put the following text on one line in the /etc/inittab file:
http:2:respawn:server_root/type-identifier/start -i |
The -i option prevents the server from putting itself in a background process.
Replace server_root with the directory where you installed the server, and replace type-identifier with the server's directory.
You need to remove this line before you stop the server.
4.2.3 Restarting with the system RC scripts
If you use /etc/rc.local, or your system's equivalent, place the following line in /etc/rc.local:
server_root/type-identifier/start |
Replace server_root with the directory where you installed the server.
4.2.4 Restarting the server manually
To restart the server from the command line, log in as root if the server runs on ports with numbers lower than 1024; otherwise, log in as root or with the server's user account. At the command-line prompt, type the following line and press Enter:
server_root/type-identifier/start |
Replace server_root with the directory where you installed the server.
You can use the optional parameters -p and -i at the end of the line:
The -p option starts the server on a specific port number. This overrides the setting in magnus.conf.
The -i option runs the server in inittab mode, so that if the server process is ever killed or crashed, inittab will restart the server for you. This option also prevents the server from putting itself in a background process.
If the server is already running, the start command will fail. You must stop the server first, then use the start command. Also, if the server startup fails, you should kill the process before trying to restart it. |
If you used the etc/inittab file to restart the server you need to remove the line starting the server from /etc/inittab and type kill -1 1 before you try to stop the server. Otherwise, the server restarts automatically after it is stopped.
To stop the server manually, log in as root or use the server's user account (if that is how you started the server), and then type the following at the command line:
server_root/type-identifier/stop |
You can view your server's technical and content settings from the Server Manager. You can also see if your server is running. The technical settings come from magnus.conf, and the content settings come from obj.conf. These files are located in the server root, in the directory httpd-server_name /config. For more information about the magnus.conf and obj.conf files, see The NSAPI Programmer's Guide on Netscape's DevEdge online documentation web site at:
http://developer.netscape.com/library/documentation/ |
The following list explains the server's technical settings:
The server's content settings depend on how you've configured your
server. Common server content settings include the server's document
directory, its index filenames, name and location of its access log,
and default MIME type.
4.4 Restoring backup configuration files
You can view or restore a backup copy of your configuration files. These files include httpd-server_id.acl, magnus.conf, obj.conf, mime.types, and .acl files.
To view or restore a backup copy of your configuration files:
You can customize the server's technical options, including:
You can set the number of maximum simultaneous requests, which is the number of active requests allowed for the server at one time. However, for general purpose Internet or intranet use, you probably will not need to change the default value (128 requests).
To get the number of simultaneous requests, the server counts the number of active requests, adding 1 to the number when a new request arrives, subtracting 1 when it finishes the request. When a new request arrives, the server checks to see if it is already processing the maximum number of requests. If it has reached the limit, it defers processing new requests until the number of active requests drops below the maximum amount.
In theory, you could set the maximum simultaneous requests to 1 and still have a functional server. Setting this value to 1 would mean that the server could only handle one request at a time, but since HTTP requests generally have a very short duration (response time can be as low as 5 milliseconds), processing one request at a time would still allow you to process up to 200 requests per second.
In actuality, Internet clients frequently connect to the server and then do not complete their requests. In these cases, the server waits 30 seconds or more for the data before timing out. Also, some sites do heavyweight transactions that take minutes to complete. Both of these factors add to the maximum simultaneous requests that are required. If your site is processing many requests that take many seconds, you may need to increase the number of maximum simultaneous requests.
If you need to change the number of maximum simultaneous requests, set the number before starting the server. To reset the number:
You can configure the server to use Domain Name System (DNS) lookups during normal operation. By default, DNS is not enabled; if you enable DNS, the server looks up the hostname for a system's IP address. Although DNS lookups can be useful for server administrators when looking at logs, they can impact performance. When the server receives a request from a client, the client's IP address is included in the request. If DNS is enabled, the server must look up the hostname for the IP address for every client making a request.
Turning off DNS lookups on your server has the following consequences: hostname restrictions won't work, and hostnames won't appear in your log files. Instead, you'll see IP addresses. |
To enable DNS, complete the following:
The listen-queue size is a socket-level parameter that specifies the number of incoming connections the system will accept for that socket. The default setting is 128 incoming connections.
Normally, you should not change the listen-queue size. The default setting is sufficient in most cases. |
If you manage a heavily used web site, you should make sure your system's listen-queue size is large enough to accommodate the listen-queue size you set for the server. If you do change the listen-queue size, make sure that your system supports the new size. The listen-queue size set from the Server Manager form changes the listen-queue size requested by the web server. If the server requests a listen-queue size larger than the system's maximum listen-queue size, the size defaults to the system's maximum.
Setting the listen-queue size too high can degrade server performance. The listen-queue size is designed to prevent the server from becoming overloaded with connections it cannot handle. If your server is overloaded and you increase the listen-queue size, the server will only fall further behind. |
To configure the listen-queue size:
With HTTP 1.1, a connection can be set to be persistent (similar to "keep alive" in HTTP 1.0). However, even if a connection is persistent, it still needs to have a timeout setting, or it may consume system resources.
Normally, you should not change the persistent connection timeout. The default setting is sufficient in most cases. |
If you need to change the setting:
| Next | Contents |
|
|
| privacy and legal statement | ||
| 6563PRO.HTML | ||