![[Compaq]](../../images/compaq.gif)
![[Go to the documentation home page]](../../images/buttons/bn_site_home.gif)
![[How to order documentation]](../../images/buttons/bn_order_docs.gif)
![[Help on this site]](../../images/buttons/bn_site_help.gif)
![[How to contact us]](../../images/buttons/bn_comments.gif)
![[OpenVMS documentation]](../../images/ovmsdoc_sec_head.gif)
| Document revision date: 28 June 1999 | |
|
|
|
|
|
|
| Previous | Contents |
MIME (Multi-purpose Internet Mail Extension) types control what types of multimedia files your mail system supports. You can also use MIME types to specify what file extensions belong to certain server file types, for example, to designate what files are CGI programs. For more information on using file extensions with programs, see "Installing CGI programs" on page 139.
To add a new MIME type:
Do not put spaces between multiple file suffixes when you are adding or editing a MIME type. If you put a space between them, you may receive an error or your server may not restart. If this happens, edit your mime.types file to delete the space. The mime.types file is in your server root in the httpd-identifier/config directory. After you have edited the file, from the Server Manager, use the Apply button to apply your manual changes. |
To edit a MIME type:
To remove a MIME type, click Remove next to the type you want to remove.
4.7 Configuring network settings
You can change your server's network settings using the Server Manager. Some of the tasks include:
For various reasons, you might need to move the server from one directory to another. If you move the server, you need to change the location the server references--it needs to know where the binary files are. After changing the location, you need to shut down the server and copy the server files and subdirectories to a new location.
To change the server's location:
The server user specifies a Unix user account that the server uses. All the server's processes run as this user.
You don't need to specify a server user if you chose a port number greater than 1024 and aren't running as the root user (in this case, you don't need to be logged on as root to start the server). If you don't specify a user account here, the server runs with the user account you start it with. Make sure that when you start the server, you use the correct user account.
If you don't know how to create a new user on your system, ask your system administrator or consult your system documentation.
Even if you need to start the server as the root user, you don't want it to run as root all the time. You want the server to have restricted access to your system resources and run as a nonprivileged user. The user name you enter as the server user should already exist as a normal Unix user account. After the server starts, it runs as this user.
If you want to avoid creating a new user account, you can choose the user nobody or an account used by another HTTP server running on the same host. On some systems, however, the user nobody can own files but not run programs.
To change the server's user account:
The server name is the fully qualified domain name of your server machine. When clients access your server, they use this name. The format for the server name is machinename.subdomain.domain. For example, if your full domain name is netscape.com, you could install a server with the name www.netscape.com.
To change the server name:
The server port number specifies the TCP port that the server listens to. The port number you choose can affect your users--if you use a nonstandard port, anyone accessing your server must specify a server name and port number in the URL. For example, if you use port 8090, the user would specify something like this URL:
http://www.netscape.com:8090 |
If you aren't sure that the port number you plan to use is available, look at the /etc/services file on the server machine.
Port numbers for the most commonly used network-accessible services are maintained in the file /etc/services.
The standard unsecure web server port number is 80; the standard secure web server port number is 443. Technically, the port number can be any port from 1 to 65535. If you aren't running as the root user when you install or start the server, you need to use a port number higher than 1024.
To change the server port number:
At times you might want the server machine to answer to two URLs. For example, you might want to answer both http://www.netscape.com/ and http://www.mozilla.com/ from one machine.
To use this feature:
You can specify a custom error response that sends a detailed message to clients when they encounter errors from your server. You can specify a file to send or a CGI program to run.
You might want to change the way the server behaves when it gets an
error for a specific directory. Instead of sending back the default
file, you might want to send a custom error response instead. For
example, if a client tries repeatedly to connect to a part of your
server protected by access control, you might return an error file with
information on how to get an account.
4.8.1 What are the errors?
You can customize the response to several different kinds of errors:
Before you can set up the response, you need to write the HTML file to send or create the CGI program to run. After you do this, set the response by doing the following:
To remove a customization, return to the form and delete the filename from the text box next to the error code. Working with dynamic configuration files
Server content is seldom managed entirely by one person. You may need to allow end users to access a subset of configuration options so that they can configure what they need to, without giving them access to the Server Manager. The subset of configuration options are stored in dynamic configuration files. Two types of dynamic configuration files are supported by the Netscape FastTrack Server: .htaccess and .nsconfig. You can enable .nsconfig files in the Server Manager; you have to manually enable .htaccess files.
There is no support for LDAP in the dynamic configuration files. You should not use dynamic configuration files if you use LDAP. You must use NCSA-style user databases to use .htaccess files. You must use NCSA-style user databases with .nsconfig files. For more information on user databases, see Managing Netscape Servers. |
If you already use .nsconfig files, you might want to continue using
them. However, Netscape also provides a utility for converting your
.nsconfig files to .htaccess files.
4.8.3 Using .htaccess files
The files that support .htaccess are in the server root, in
plugins/htaccess. These files include a plug-in that enables you to use
.htaccess files and a script for converting .nsconfig files to
.htaccess files.
4.8.3.1 Activating .htaccess checking
To use .htaccess files, you must first modify the server's obj.conf file to load, initialize, and activate the plug-in. At the top of the obj.conf file, after the other Init directives, add the following lines:
Init fn="load-modules" funcs="htaccess-init,htaccess-find" \ shlib="server_root/plugins/htaccess/htaccess.so" Init fn="htaccess-init" |
These lines load and initialize the module when the server is started. server_root is the path to your server root.
To activate .htaccess file processing for all directories managed by the server, add the PathCheck directive:
PathCheck fn="htaccess-find" |
to the default server object, which is delimited by:
<Object name="default"> ... </Object> |
Generally, the directive to activate .htaccess processing should be the last PathCheck directive in the object.
To activate .htaccess file processing for particular server directories, place the PathCheck directive in the corresponding object definition in obj.conf.
If you want to name your .htaccess files something other than .htaccess, you need to specify the filename in the PathCheck directive using the following format:
PathCheck fn="htaccess-find" filename="filename" |
Replace filename with the filename you are using.
After editing the configuration file, stop and start your server. (See Section 4.1 for more information.) Apply your configuration file changes in the Server Manager by clicking the Apply button. Subsequent accesses to the server will be subject to .htaccess access control in the specified directories.
To restrict write access to .htaccess files, create a configuration
style for them, and apply access control to that configuration style.
4.8.3.2 Converting existing .nsconfig files to .htaccess files
The Netscape FastTrack Server includes a script for converting your existing .nsconfig files to .htaccess files. To convert your files, at the command prompt, enter the path to Perl on your system, the path to the script, and the path to your obj.conf file. For example you might type the following (it should all be on one line when you type it):
server_root/install/perl server_root/plugins/htaccess/htconvert server_root/ https-server_name/config/obj.conf |
The script converts all .nsconfig files to .htaccess files, but does
not delete the .nsconfig files.
4.8.3.3 Supported .htaccess directives
The following .htaccess directives are supported in this release:
The only AuthType supported is Basic.
4.8.3.4 Example of an .htaccess file
The following example shows an .htaccess file:
<Limit GET POST> order deny,allow deny from all allow from all </Limit> <Limit PUT DELETE> order deny,allow deny from all </Limit> AuthName mxyzptlk.mozilla.com AuthUserFile /server_root/mxyz-docs/service.pwd AuthGroupFile /server_root/mxyz-docs/service.grp |
With .nsconfig files, you can allow end users to apply access control or customize error messages without allowing them to use CGI or parsed HTML. The format and capability of these dynamic configuration files is described in Section 4.8.4.1.
When a request is made for a resource in which dynamic configuration is enabled, the server must search for the configuration files within one or more directories of that resource. This search can be an expensive operation in terms of performance, so the server lets you configure how much flexibility you need, weighing it against the efficiency cost.
You can provide a base directory to the server, in which case the server starts its search for configuration files from the filesystem directory. Alternatively, you can provide no base directory, in which case the server attempts to infer the base directory from the URL. That is, if the requested URL is to a file in the document root, the server starts searching from the document root.
You also specify the name of the configuration file to search for within the base directory.
If you centralize all of your configuration information for the subdirectories of the base directory in the base directory's configuration file, the server is more efficient because it doesn't have to search for configuration files in the subdirectories.
However, you may sometimes want the server to search the subdirectories. If you do, the server searches for .nsconfig files starting from the top level directory and searching downward until reaching the directory in which the referenced resource resides. The server processes .nsconfig files in the order it encounters them. If a top level file restricts a user's access, the server does not give the user access, even though a lower level file might allow access.
The server processes all restrictions based on IP address and DNS entry (RestrictAccess directive) as it finds them in a file. If the server finds a file that denies a user access because of IP address or DNS entry, it stops processing files. The server collects restrictions based on user name (RequireAuth directive) and processes them at the end, unless the request has already been denied because of IP address or DNS entry.
For example, if you selected the base directory inferred from URL translation, selected .nsconfig for your filename, and chose to search subdirectories, the search would occur as described in the following paragraphs.
When a user requests the filesystem path /usr/netscape/suitespot/docs/gfx/icons/logo.gif, instead of searching for /usr/netscape/suitespot/docs/.nsconfig the server would search all of the subdirectories:
/usr/netscape/suitespot/docs/.nsconfig /usr/netscape/suitespot/docs/gfx/.nsconfig /usr/netscape/suitespot/docs/gfx/icons/.nsconfig |
You can also enter a wildcard pattern of file types you want to disable in directories where dynamic configuration is enabled. For example, to disable CGI programs and parsed HTML, use * (cgi | parsed-html).
To configure .nsconfig files:
The .nsconfig files consist of sets of directives that control the server. These directives are surrounded by Files directives that tell the server which files in the configuration file's directory the directives apply to. For example:
<Files PATTERN1> ... directives ... </Files> <Files PATTERN2> ... directives ... </Files> |
PATTERN1 and PATTERN2 are wildcard patterns that tell the server which file system pathnames to apply the directives to. For example, * would apply the directive to all file system pathnames. Any pattern given is first prefixed with the directory containing the configuration file to ensure that the directives are applied only to subdirectories. There can be as many sets of Files directives in the .nsconfig file as you need.
The file can contain blank lines. Lines beginning with # are treated as comments.
Each directive can take a variable number of parameters. The Files directives include:
The following example shows an .nsconfig file:
<Files *> ErrorFile reason="Unauthorized" code="401" path="/errors/unauthorized.html" ErrorFile reason="Forbidden" code="403" path="/errors/forbidden.html" ErrorFile reason="Not Found" code="404" path="/errors/notfound.html" ErrorFile reason="Server Error" code="500" path="/errors/server- error.html" RestrictAccess method="(GET | HEAD | POST)" type="allow" ip="*" RestrictAccess method="(GET | HEAD | POST)" type="deny" ip="198.95.251.30" return-code="404" </Files> <Files *.gif> AddType exp=*.gif type=application/octet-stream </Files> <Files *.txt> RequireAuth dbm="server_root/authdb/default" realm=Text userpat="user*" </Files> |
You can use the server's chroot function to make the server use the document root directory as the root directory (/).
If you are inexperienced in Unix system administration, you might want to learn more about Unix before using this feature. |
You should keep the server root outside the server chroot directory. You should have the server use the document root as the chroot directory and turn off the document root feature. Log and configuration files should be stored outside your chroot directory. The server process must be started as root (superuser). Any configuration items related to documents will have to be made relative to the new root directory.
You will not be able to use CGI programs or the exec tag to parse HTML if you use the chroot feature. You can't allow users to have public information directories unless the proper system-shared libraries, binaries, and dummy-parsed files are kept in the chroot directory.
To change the root directory:
You can limit the use of the file system links in your server. File system links are references to files stored in other directories or file systems. The reference makes the remote file as accessible as if it were in the current directory. There are two types of file system links:
For more information about hard and symbolic links, see your Unix system documentation.
File system links are an easy way to create pointers to documents outside of the primary document directory and anyone can create these links. For this reason you might be concerned that people might create pointers to sensitive files (for example, confidential documents or system password files).
To restrict symbolic links:
You can control who accesses the files on your web site. This chapter discusses the various methods you can use to determine who has access to what files or directories on your web site.
If you want to control who can configure the web server itself and who
can access the server configuration files, see the online guide
Managing Netscape Servers. You should also ensure the security of your
web server's computer, as discussed in Chapter 7.
5.1 What is access control?
Access control lets you determine who can access the server. You can use two attributes for controlling access:
You can require users to authenticate themselves before getting access
to your web site. Authentication means that users verify their identity
either by entering a user name and password or by using a client
certificate installed in their web browser, such as Netscape Navigator
or Netscape Communicator. The first method of requiring the user name
and password is the "Basic" method, which can be done with or without
encryption, and the second method of using client certificates is the
"SSL" method, which must be done with encryption on.
5.1.1.1 User name and password authentication
If you require users to enter a user name and password to get access to your web site, you store the list of users and groups in an LDAP database, which can be either a file stored on the web server computer or an LDAP server on a remote computer (for example, a computer running Netscape Directory Server).
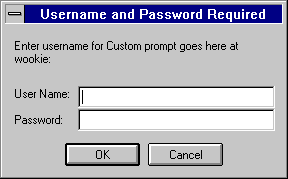
When users attempt to access a file or directory that requires User-Group authentication, the web browser displays a dialog box asking the user to enter a user name and password. The server can get this information encrypted or not, depending on whether encryption is turned on for your server.
After entering the information, the user either sees the file or directory listing requested or a message denying access. (You can customize the access-denied message that they see.) Figure 5-1 shows the authentication window. This window shows a custom message. Users see this window when authenticating themselves to the server.
Figure 5-1 Authentication Window
If your server doesn't use SSL encryption, the user name and password that the end user types are sent unencrypted across the network. Someone could intercept the network packets and read the user name and password being sent to the web server. For this reason, User-Group authentication is most effective when combined with SSL encryption or Host-IP authentication, or both. |
For information on configuring your web server to require User-Group
authentication, see Section 5.3.
5.1.1.2 Client certificate authentication
You can confirm users' identities with security certificates before giving the users access to your web site. You can do this in two ways:
When a request comes in and you have client authentication enabled, the server performs these actions in order:
New in 3.x
In version 2.0, users had to enter a user name and password along with sending a certificate to the server. In 3.x, the web server looks up the entry in an LDAP directory, so the access appears seamless to the end user.
Requiring client authentication for controlling access to specific resources is different from requiring client authentication for all connections to the server. To require client authentication for the entire server, you select a radio button in the Encryption Preferences form. To require client authentication with access control, you use the SSL authentication method.
Users must first install a client certificate in their web browser and
then optionally publish the certificate in an LDAP directory, such as
Netscape Directory Server.
5.1.2 Host-IP authentication
You can limit access to files and directories on your web site by making them available only to people using specific computers. You specify hostnames or IP addresses for the computers that you want to allow or deny. You can use wildcard patterns to specify multiple computers or entire networks. If you want to use this feature, you must have DNS running in your network and your computer must be configured to use it.
End-user access to a file or directory using Host-IP authentication appears seamless. Users can access the files and directories immediately without entering a user name or password. If the computer doesn't have access, the user will get a message denying access. (You can also customize this message.)
It's possible for more than one person to have access to a particular computer. For this reason, Host-IP authentication is most effective when combined with User-Group authentication. If both methods of authentication are used, the end user will have to enter a user name and password before getting access. See Section 5.3 for more information. |
When you use access control on your web server, the settings are stored in a file with the extension .acl. Access control files are stored in the directory server_root/server_typeacl where server_type is the name of the server. For example, the administration server uses the directory adminacl. Netscape FastTrack Server uses httpacl.
The main ACL filename is generated-https-server-id.acl; the temporary working file is called genwork-https-server-id.acl. If you use the Server Manager forms to restrict access, you'll have these two files. However, if you want to do more complex restrictions, you can create multiple files and reference them from the magnus.conf file. There are also a few features available only by editing the files. For example, you can restrict access to the server depending on the time of day or day of the week.
You also manually create and edit .acl files if you want to customize access control. For example, you might want to use an Oracle or Informix database of users instead of an LDAP database. To do this type of customizing, you need to use the access control API to program a hook into the server's access control structure. This API is written in C. For more information on the API, see the Netscape DevEdge Online site at:
http://developer.netscape.com |
For more information on access control files and their syntax, see the
online help. Also see Section 5.3 for more information.
5.2 How does access control work?
You can control access to the entire server or to parts of the server (that is, directories, files, and file types). When the server evaluates an incoming request, it determines access based on a hierarchy of rules called access control entries (ACEs), and then it uses the matching entries to determine if the request is allowed or denied. Each ACE specifies whether or not the server should continue to the next ACE in the hierarchy. The collection of ACEs is called an access control list (ACL).When a request comes in to the server, the server looks in obj.conf for a reference to an ACL, which is then used to determine access. By default, the server has one ACL file that contains multiple ACLs.
For example, suppose someone requests the following URL:
http://www.mozilla.com/my_stuff/web/presentation.html |
The server would first check access control for the entire server. If the ACL for the entire server was set to continue, the server checks to see if there is an ACL for the file type (*.html). Then, it checks for an ACL for the directory, my_stuff. If one exists, it checks the ACE and then moves on to the next directory. The server continues traversing the path either until it reaches an ACL that says not to continue or until it reaches the final ACL for the requested URL (in this case, the file presentation.html).
To set up access control for this example using the Server Manager forms, you could create an ACL for the file only or for each resource leading to the file. That is, one for the entire server, one for the my_stuff directory, one for the my_stuff/web directory, and one for the file itself.
The following sample ACL file illustrates one way to control access to this resource.
# File automatically written

#

# You may edit this file by hand

#

version 3.01;

# This ACL denies all access to the my_stuff directory

acl "path=C:\Netscape\SuiteSpot\docs\my_stuff";

deny (all)

    user = "anyone";

# This ACL allows access to anyone in the user database

acl "path=C:\Netscape\SuiteSpot\docs\my_stuff\web";

allow (all)

    user = "anyone";

# This ACL allows access to the file to anyone in the "my_group"
group

acl
"path=C:\Netscape\SuiteSpot\docs\my_stuff\web\presentation.html";

allow (all)

    user = "anyone";

    group = "my_group"

# This is the default ACL and denies access to anyone

acl "default";

deny (all)
|
This section takes you through the process of restricting access to documents on your web site. The sections following this one describe in detail each option available when using access control. Keep in mind that most access control rules use only a subset of the available options.
There is also a section of examples you can review on page 108.
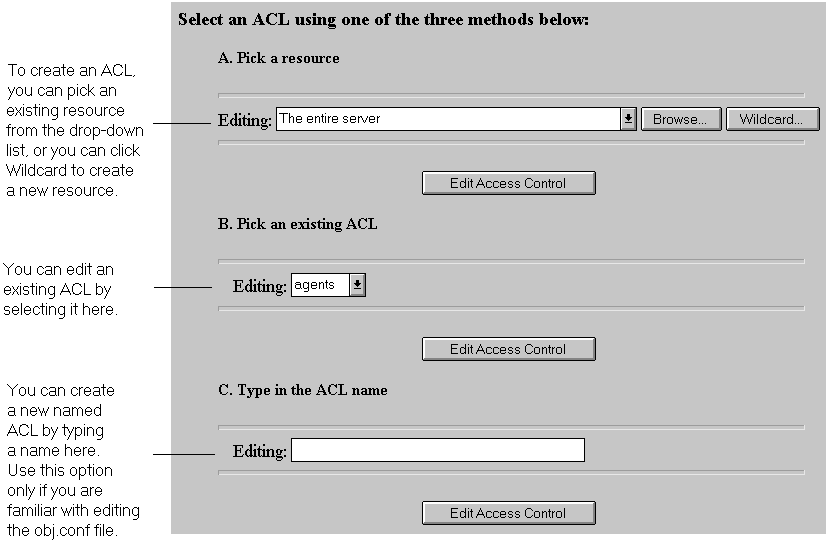
To create an access control rule:
Figure 5-2 Restrict Access Form
| Resource Wildcard | What It Means |
|---|---|
| default | A named ACL created during installation that restricts write access, so only users in the local database or LDAP directory can publish documents. |
| Entire Server | One set of rules determines the access to your entire web site, including any virtual servers you have running. To restrict access to a virtual server, specify the path of its document root. |
| *.html | Controls access to all files with the .html extension |
| *.cgi | Controls access to all files with the .cgi extension |
| usr/ns-home/cgi-bin/* | Controls access to all files and directories in the cgi-bin directory. Note that the path is absolute. |
| uri="/sales" | Controls access to the sales directory in the document root. To specify URIs, create a named ACL. |
Figure 5-3 Form Elements
The following sections describe the options that appear in the bottom
frame of the access control window.
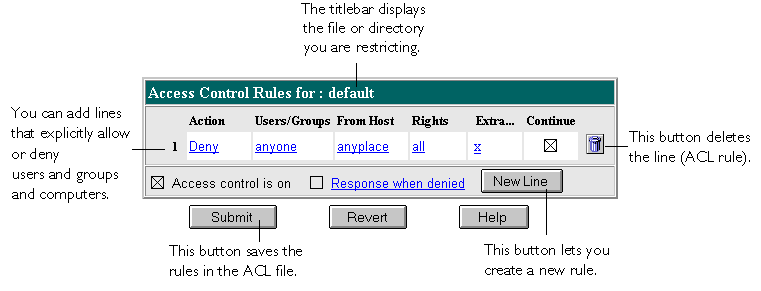
5.3.1 Setting access control actions
You can specify the action the server takes when a request matches the access control rule.
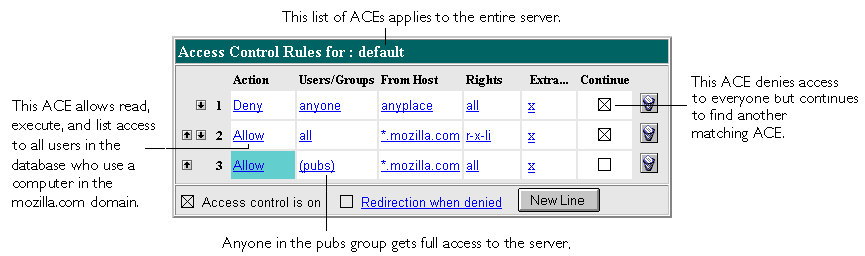
The server goes through the list of ACEs to determine what the access is. For example, the first ACE is usually to deny everyone. If the first ACE is set to "continue," the server checks the second ACE in the list. (If continue is not checked, everyone would be denied access to the resource.) If the second entry matches, then the next ACE is used. The server continues down the list until it reaches either an ACE that doesn't match or that matches but is set to not continue. The last ACE that matches is used to determine if access is allowed or denied. For example, in Figure 5-4 any user in the database can view a file (read access), but they must be in the "pubs" group if they want to publish a file to the server. You can combine Deny and Allow statements in an ACL.
Figure 5-4 Combining Deny and Allow Statements
You can restrict access to your web site based on the user who requests a resource. With user and group authentication, users are prompted to enter a user name and password before they can access the resource specified in the access control rule.
The web server uses a list of users, who might be sorted into groups, to determine access rights for the user requesting a resource. The list of users (and the groups they are included in) are stored either in a database on the web server computer or in an LDAP server, such as Netscape Directory Server. You should make sure the database has users and groups in it before you set access control.
You can allow or deny access to everyone in the database, or you can allow or deny specific people by using wildcard patterns or lists of users or groups.
To configure access control with users and groups, follow the general directions for restricting access. (See Section 5.3 for more information.) When you click the Users/Groups field, a form appears in the bottom frame. The following list describes the options in the form.
You can restrict access to your web site based on which computer the request comes from. You specify this restriction by using wildcard patterns that match the computers' hostnames or IP addresses. For example, to allow or deny all computers in a specific domain, you would enter a wildcard pattern that matches all hosts from that domain, such as *.netscape.com.
To specify users from hostnames or IP addresses, follow the general directions for restricting access. When you click the From Host field (the link called "anyplace"), a form appears in the bottom frame. Check the "Only from" option and then type either a wildcard pattern or a comma-separated list of hostnames and IP addresses. Restricting by hostname is more flexible than by IP address--if a user's IP address changes, you won't have to update this list. Restricting by IP address, however, is more reliable--if a DNS lookup fails for a connected client, hostname restriction cannot be used.
The hostname and IP addresses should be specified with a wildcard pattern or a comma-separated list. The wildcard notations you can use are specialized; you can only use the *. Also, for the IP address, the * must replace an entire byte in the address. That is, 198.95.251.* is acceptable, but 198.95.251.3* is not. When the * appears in an IP address, it must be the right-most character. For example, 198.* is acceptable, but 198.*.251.30 is not.
For hostnames, the * must also replace an entire component of the name.
That is, *.netscape.com is acceptable, but *sers.netscape.com is not.
When the * appears in a hostname, it must be the left-most character.
For example, *.netscape.com is acceptable, but users.*.com is not.
5.3.4 Setting access rights
You can set access rights to files and directories on your web site. That is, in addition to allowing or denying all access rights, you can specify a rule that allows or denies partial access rights. For example, you can give people read-only access rights to your files, so they can view the information but not change the files. This is particularly useful when you use the web publishing feature to publish documents.
When you create an access control rule, the default access rights are set to all access rights. To change access rights, click the Rights link in the top frame, and then check or clear the access rights you want to set for a particular rule. The following list describes each access right you can select.
You can enter custom expressions for an ACL. You can use this feature if you are familiar with the syntax and structure of ACL files. There are a few features available only by editing the ACL file or creating custom expressions. For example, you can restrict access to your server depending on the time of day, day of the week, or both.
The following customized expression shows how you could restrict access by time of day and day of the week. This example assumes you have two groups in your LDAP directory: the "regular" group gets access Monday through Friday, 8:00am to 5:00pm. The "critical" group gets access all the time.
allow (read)

{

        (group=regular and dayofweek="mon,tue,wed,thu,fri");

        (group=regular and (timeofday>=0800 and
timeofday<=1700));

        (group=critical)

}
|
For more information on valid syntax and ACL files, see the online help.
5.3.6 Removing access control entries
When you cleared the option labeled "Access control on," you get a prompt asking if you want to erase records in the ACL. When you click OK, the server deletes the ACL entry for that resource from the ACL file.
If you want to deactivate an ACL, but not discard it, you can comment
out the ACL lines in the file generated-https-server-id.acl by putting
# signs at the beginning of each line.
5.3.7 Responding when access is denied
You can choose the response a user sees when denied access, and you can vary the message for each access control object. By default, the user receives a message that says the file wasn't found (the HTTP error code 404 Not Found is also sent).
To change what message is sent for a particular ACL:
This section describes some common examples for restricting access to a
web server and its contents. Some of these examples assume you set up
the "default" ACL to deny anyone access to the server. You can also add
a "deny all" line as the first rule to each of these examples, as done
in the example for the entire server.
5.4.1 Restricting access to the entire server
This example allows access to users in a group called "employees" who access the server from computers in a subdomain. There are no access control rules for other resources on the server. You might use this example if you have a server for a department and you only want users to access the server from computers in a specific subdomain of your network.
To restrict access to the entire server:
Figure 5-5 Restricting Access to the Entire Server
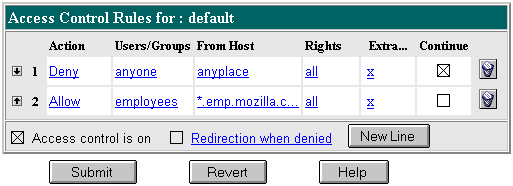
Be sure to restart the server for the changes to take effect. The following text is the ACL file for this example.
# File automatically written

#

# You may edit this file by hand

#

version 3.01;

acl "default";

deny (all)

    user = "anyone";

allow absolute (all)

    user = "employees" and

    dns = "*.emp.mozilla.com";
|
This example lets users in a group called "executives" have read access to a directory and its subdirectories and files on the server. The user called "ceo" has full permissions to the directory.
To restrict access to a directory on the server:
Figure 5-6 Restricting Access to a Path in the Server
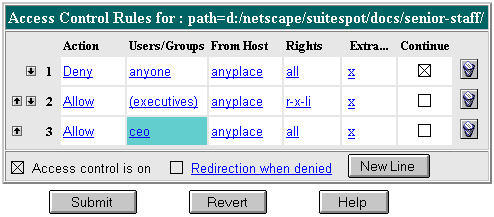
The entry in the generated.https-serverid.acl file for this example looks like this:
acl "path=/usr/netscape/suitespot/docs/senior-staff/";

deny (all)

    user = "anyone";

allow absolute (read,execute,list,info)

    group = "executives";

allow absolute (all)

    user = "ceo";
|
This example uses a URI to control access to a single user's content on the web server. URIs are paths and files relative to the server's document root directory. Using URIs is an easy way to manage your server's content if you frequently rename or move all or part of it (for example, for disk space). It's also a good way to handle access control if you have additional document roots.
This example gives anyone read access to files and directories in the path specified by the URI /my_directory. Only one user ("me" in this example) has full access to the directories and files.
You might use this example if you have several users who publish their content on your server. The users want to have write access to their content, and they want anyone to have read/execute access.
To restrict access to a URI:
Figure 5-7 Restricting Access to a URI in the Document Root

The entry in the generated.https-serverid.acl file for this example looks like this:
acl "uri=/my_directory";

allow absolute (read,execute,list,info)

    user = "anyone";

allow absolute (all)

    user = "me";
|
This example controls write and delete access to all files with the extension .cgi. You might use this example if you only want specific users to create programs that run on your server. In this example, anyone can run the programs, but only users in the "programmers" group can create or delete them.
To restrict access to a file type:
Figure 5-8 Restricting Access to a File Type
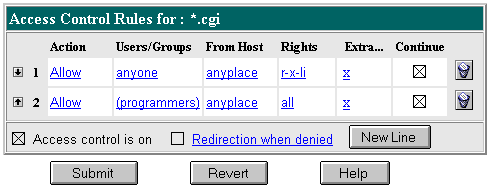
In this example, both continue boxes are checked. This means that if a request for a file comes in, the server will first look at the ACL for the file type, and then it will continue to look for another ACL that matches (for example, an ACL on the URI or the path). The server checks ACLs in this order:
     acl "*.cgi";

     allow (read,execute,list,info)

         user = "anyone";

     allow (all)

         group = "programmers";
|
This example restricts write and delete access to the server during working hours. You might use this example if you don't want people making changes to documents at times when other people might be accessing the files. This example allows users to make changes during the weekday evenings (between 6:00pm and 6:00am, Monday through Friday) and all the time during the weekend.
To restrict access based on time of the day and day of the week:
     user = "anyone" and
     dayofweek = "sat,sun" or
     (timeofday >= 1800 and
     timeofday <= 600)
|
Restart your server for the changes to take effect.
5.5 Manually converting a 2.0 ACL file
If you have a 2.0 server installed when you install the 3.01 server, you have the option of automatically converting your 2.0 ACL files to 3.01 format. You can also convert them manually after installation. For example, if you have the access control files on a different computer, you can copy them to the 3.01 server computer and then convert them.
To convert 2.0 ACL files:
Once the file is converted, you can manually edit it. Or if you converted to the default file generated.httpd-serverid.acl, you can use the Server Manager forms to edit the settings.
| Previous | Next | Contents |
|
|
| privacy and legal statement | ||
| 6563PRO_001.HTML | ||